background image

Page 9 of 32

Document No.: 006335 
Revision: K 

OWNERS OPERATING & MAINTENANCE MANUAL

INVERNESS 24-HOUR TREATMENT RECLINER™

BACK ASSEMBLY - CONTINUED

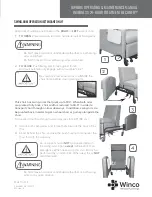
4. 

Hold the rear apron up, exposing the mounting brackets 

(A

). Lift the upholstered back by its sides while aligning the 

mounting brackets with the recline mechanism 

(B)

.

Keep hands clear of connection points 
or injury may occur.

•  It is recommended that two people be 

used for this step

•  Be careful not to tear or puncture vinyl.

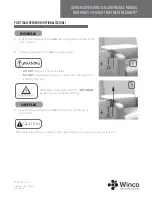
5. 

Slide the back onto the recline mechanism until the middle 
hole of the mounting bracket 

(A)

 is aligned with the middle 

hole of the recline mechanism 

(B)

.

6. 

Install knobs 

(A)

 (tethered to back) and tighten to a secure fit.

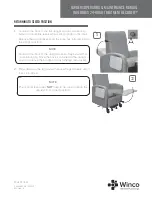
7. 

Ensure that the rear apron rests 

OVER

 the rear brace of chair.

Test to ensure the back has been properly 
installed by pulling up on the back. The 
back should remain securely in place.

4

5

6

7

Содержание Inverness 24-Hour Treatment Recliner

Страница 1: ...INVERNESS 24 HOUR TREATMENT RECLINER OWNERS OPERATING AND MAINTENANCE MANUAL IMPORTANT DO NOT DISCARD THIS MANUAL KEEP THIS MANUAL FOR FUTURE REFERENCE AND TRAINING ...

Страница 2: ...ERNS PLEASE CONTACT WINCO MFG LLC Winco assumes no responsibility for damage or injury caused by improper assembly installation use or maintenance of these products No part of this manual may be duplicated in any form without the prior consent of Winco Mfg LLC Unauthorized duplication distribution of these materials may result in civil prosecution to the maximum extent allowed by law The informati...

Страница 3: ...PERATION LOCK UNLOCK 13 FOOT PLATE OPERATION 13 RECLINE CHAIR ATTENDANT POSITION 14 RETURN CHAIR TO UPRIGHT POSITION ATTENDANT POSITION 15 PLACING CHAIR IN TRENDELENBURG ATTENDANT ONLY 16 TRENDELENBURG TO RECLINE ATTENDANT ONLY 16 SWING ARM OPERATION ATTENDANT ONLY 17 TRANSFERRING PATIENT TO CHAIR 18 SIDE TABLE OPERATION OPTIONAL FEATURE 19 PIVOT TABLE OPERATION OPTIONAL FEATURE 20 OPERATING INSTR...

Страница 4: ...t contamination after each use The product has many recyclable components and to the extent practical all effort should be used to recycle responsibly Otherwise the product components shall be disposed of in accordance with local statutes PREPARATION BEFORE YOU BEGIN 1 Carefully examine your product for any damage Be sure to inspect all components IF DAMAGE IS EVIDENT CONTACT FREIGHT CARRIER OR WI...

Страница 5: ...Pull plug only to remove cord 10 Clean switch with a damp cloth only Warranty will be VOID if liquid is introduced into switch mechanism 11 Extension cords are not recommended 12 DO NOT roll recliner or other equipment over cord 13 This product is for use on a nominal 120 volt circuit and has a three pin plug If the plug does not fit into the outlet contact a certified electrician to install the p...

Страница 6: ...ment configuration Devices qualifying as double insulated require different testing examination procedures than Class I Grounded devices If your facility requires the product to be tested be sure to follow testing examination procedures for Class II Double Insulated devices ISOLATION DIAGRAM FOR HEAT MASSAGE SYSTEM Area Insulation Type A Basic Operational B Double Insulated Reinforced C Double Ins...

Страница 7: ...ies i e side table pivot table etc out of the way of patients legs when reclining changing position of patient 7 ALWAYS ensure swing arms are securely latched after cleaning before patient transfer and while a patient is in the chair 8 An occupant should NOT be transported with the swing arms open except in the event of an emergency 9 LOCK casters at all times when chair is stationary AND when a p...

Страница 8: ...performing step 2 2 Pull one of the recline levers A located on either side of the chair until fully extended to bring the recline mechanism B into its upright position 3 Release the recline lever A and push leg rest in to its stored position until it locks in place 1 2 ASSEMBLY INSTRUCTIONS Recline Lever A NOTE Leg rest is spring loaded and will be rapidly released into the recline position when ...

Страница 9: ...ion points or injury may occur It is recommended that two people be used for this step Be careful not to tear or puncture vinyl 5 Slide the back onto the recline mechanism until the middle hole of the mounting bracket A is aligned with the middle hole of the recline mechanism B 6 Install knobs A tethered to back and tighten to a secure fit 7 Ensure that the rear apron rests OVER the rear brace of ...

Страница 10: ...t 4 Fit the rear portion of the Armrest cover over the rear of the arm 5 Smooth wrinkles 6 Make sure openings align with release handle Page 10 of 32 Document No 006335 Revision K OWNERS OPERATING MAINTENANCE MANUAL INVERNESS 24 HOUR TREATMENT RECLINER ARMREST COVER INSTALLATION OPTIONAL ACCESSORY CHAIRS WITH SIDE TABLES 1 2 3 4 5 6 NOTE Cover designs will vary based on chair options i e tables he...

Страница 11: ...acket 7 Tighten knob Page 11 of 32 Document No 006335 Revision K OWNERS OPERATING MAINTENANCE MANUAL INVERNESS 24 HOUR TREATMENT RECLINER CHAIRS WITH PIVOT TABLES ARMREST COVER INSTALLATION CONTINUED 1 2 3 4 6 7 NOTE Cover designs vary based on chair options i e tables heat massage etc Covers are left hand and right hand specific Make sure you are installing each cover on the correct side 5 Be car...

Страница 12: ... over the rear of the arm and pull tight 3 Use the Phillips screw driver to punch a hole in the armrest cover in line with the top mounting hole for the IV bracket 4 Reattach the bracket using the screw that was removed in step 1 Tighten both screws Page 12 of 32 Document No 006335 Revision K OWNERS OPERATING MAINTENANCE MANUAL INVERNESS 24 HOUR TREATMENT RECLINER CHAIRS WITH IV POLES ARMREST COVE...

Страница 13: ...n to position shown Foot plate MUST be used with staff assistance The foot plate is rated for a MAXIMUM weight capacity of 500 lbs 226 8 kg 1 TO EXTEND Using your foot lift UP on the foot plate lever A and pull out foot plate at the same time as far as it will travel Foot plate can now be used by the occupant 2 TO STORE Using your foot lift UP on the foot plate lever A and push in on the foot plat...

Страница 14: ...and the other hand to push on the upholstered back B until desired position or maximum recline has been reached Release recline lever A to maintain position Do NOT force the back of chair up or down without fully extending either of the two recline levers this can damage the chair NOTE Activate the leg rest by pulling the recline lever A 1 2 way out To recline the back fully extend the recline lev...

Страница 15: ...oot to return leg rest to its stored position Damage to the mechanism and upholstery may occur Use hand on face of leg rest ONLY DO NOT place hands on sides edges or back of leg rest when returning to locked position injury may occur NOTE To return the back to the upright position fully extend the recline lever A Once the back is returned to the upright position release the handle and push the leg...

Страница 16: ... position SEE Recline Chair From Attendant Position 2 Once chair is fully reclined attendant can push down near the rear of Trendelenburg lever A with their foot allowing it to move down and forward 3 Hold Trendelenburg lever in position push down on the chair s back B This will shift the occupant into the Trendelenburg position 4 Release Trendelenburg lever Chair must be in the fully reclined pos...

Страница 17: ...ugh narrow doorways In addition swing arm can be pivoted back in order to get a wheel chair or gurney alongside the chair To transport the chair through a doorway less than 39 99 cm 3 Unlock both swing arms and rotate them towards the back of the chair 4 Stand behind the chair and use the push handle to maneuver the chair through the doorway An occupant should NOT be transported with the swing arm...

Страница 18: ...y safe patient handling policies 6 Close the swing arm ensuring that the arm locks securely Do NOT leave swing arm open after occupant is transferred to chair When closing swing arm make sure occupants extremities are clear of swing arm travel and latch When closing swing arm make sure any foreign objects are clear of swing arm travel and latch Ensure arm is securely latched by tugging pulling fir...

Страница 19: ...able mechanism Side tables have been rated for a MAXIMUM weight capacity of 20 lbs 9 0 kg 2 TO STORE Lift up on the lever located under the side table and lower to its stored position Keep hands and objects clear of the moving parts of the table mechanism Ensure occupant s extremities are clear of table path until it is locked in the upright position Page 19 of 32 Document No 006335 Revision K OWN...

Страница 20: ...he chair Pivot tables have been rated for a MAXIMUM weight capacity of 20 lbs 9 0 kg 3 Loosen the adjustment knob A two full turns and lift up on pivot table Pivot table should be secured and path clear whenever using the swing arm function Page 20 of 32 Document No 006335 Revision K OWNERS OPERATING MAINTENANCE MANUAL INVERNESS 24 HOUR TREATMENT RECLINER PIVOT TABLE OPERATION OPTIONAL FEATURE POS...

Страница 21: ...ved the desired angle to lock the back into position DO NOT push or pull leg rest to maneuver chair DO NOT attempt to stand or sit on the leg rest DO NOT place hands legs or feet under seat mid ottoman or leg rest Stay clear of recline mechanism when operating chair Page 21 of 32 Document No 006335 Revision K OWNERS OPERATING MAINTENANCE MANUAL INVERNESS 24 HOUR TREATMENT RECLINER RECLINE WHILE IN...

Страница 22: ...or heels until it locks into place Page 22 of 32 Document No 006335 Revision K OWNERS OPERATING MAINTENANCE MANUAL INVERNESS 24 HOUR TREATMENT RECLINER RETURNING TO SEATED POSITION 1 NOTE To return the back to the upright position fully extend the recline lever A Once the back is returned to the upright position release the handle and push the leg rest closed 2 NOTE The recliner lever does NOT hav...

Страница 23: ...er resets each time switch is pressed The massage option uses four 4 separate motors located in the backrest of the chair Two in the lower backrest and two in the middle upper backrest To operate push MASSAGE button 1X Lower Back Low Intensity 2X Lower Back High Intensity 3X Upper Lower Back Low Intensity 4X Upper Lower Back High Intensity 5X Alternating Upper Lower Back 6X MASSAGE OFF Massage wil...

Страница 24: ...nectors under chair for possible loose connections then re plug into wall and test again If system still does not work contact Winco customer service 1 800 237 3377 CORD STORAGE For models with Heat HT or Heat Massage HM To prevent tripping on cord damage to cord or damage to recliner the power cord should be coiled and stored in the Hook Loop fastener provided BEFORE moving chair or whenever Heat...

Страница 25: ...g chair or servicing chair Chairs equipped with heat and massage DO NOT attempt to unplug wires ENSURE all wiring for seat is clear of all moving parts of the mechanism before during and after re installation of seat 3 Locate the gas spring and loosen the nut on the gas spring using an 11 16 wrench 4 Remove the opposite end of gas spring by removing the cotter clevis pin Proceed to step 5 or 6 dep...

Страница 26: ...ack on the chair back B to check for proper adjustment Repeat above steps as needed until correct release action is achieved Then TIGHTEN HEX NUT that you loosened in step 5 Make sure all bow tie cotter pins are securely inserted in all clevis pins and that the cables are attached through slot A at opposite end of operator Failure to securely insert the bow tie cotter pins into the clevis pin coul...

Страница 27: ...appearance and feel and performance of your upholstery may diminish if not cleaned properly Remove grime hair and body oils Your furnishings should be cleaned with mild soap water solution and a damp cloth on a regular basis especially where skin hair make contact with upholstery Avoid harsh detergents or chemicals that could damage the upholstery or finish of your chair If the furnishing s uphols...

Страница 28: ...BE EXCEEDED SPECIFICATIONS 6240 Inverness 24 Hour Treatment Recliner Seat Height 25 5 64 77 cm to Foot plate 19 48 26 cm Seat Width 26 66 04 cm Overall Height 51 75 131 45 cm Overall Width Trays Down 39 99 06 cm Trays Up 56 25 142 88 cm Arms at 180 33 5 85 09 cm Seat Back Height 28 5 72 39 cm Seat Depth 20 75 52 71 cm Upright Depth 41 5 105 41 cm Overall Length Reclined 75 5 191 77 cm Weight 199 l...

Страница 29: ...le Accessory Holder Arm Rest Covers Available for Left Right or Both Sides AH Accessory Holder Available for Left Right or Both Sides AIRX Arm Rest Cover Right AILX Arm Rest Cover Left Urethane Arm Cap Headrest Pillow Cover Set UB Urethane Arm Cap NP Headrest Cover Pillow Set Page 29 of 32 Document No 006335 Revision K OWNERS OPERATING MAINTENANCE MANUAL INVERNESS 24 HOUR TREATMENT RECLINER INVERN...

Страница 30: ...isms or related parts that are covered under above warranties Winco Mfg LLC shall not be liable for any labor shipping or any other costs incurred as a result of or in conjunction with a warranty claim The purchaser s exclusive remedy under this warranty shall be limited to such repair or replacement of defective components at Winco Mfg LLC sole discretion For warranty service contact the dealer t...

Страница 31: ...download via the resources section of our website SPECIFICATIONS SUBJECT TO CHANGE While we endeavor to maintain consistent products due to conditions beyond our control specifications are subject to change without notice We reserve the right to add or delete products at any time and without prior notice Always provide your product s specific serial number when ordering any replacement parts When ...

Страница 32: ...f our associates please feel free to contact us at 800 237 3377 WincoMfg com 5516 SW 1st Lane Ocala FL 34474 Info WincoMfg com Copyright 2019 Winco Mfg LLC Inverness 24 Hour Treatment Recliner Owners Operating and Maintenance Manual Document No 006335 Revision K ...

Отзывы: