Winbook LC30D Скачать руководство пользователя страница 33

V30DMBT-U21/M21 2004/12/22 

上午

 09:50 


33 

5. Press the 

VOL (+)


or


VOL (-)

 button


to toggle 

Add/ 

Erase 

than press the 

ENTER


button.


6. You can also press the

 ADD 

or

 ERASE

 buttons on the 

remote control to add or erase channels directly. 


Any channel, including an erased channel, can be viewed by 
directly entering the channel numbers through the remote control. 
Channels that have been erased are unable to be viewed using the 
channel up or channel down arrows on the remote control. 

Changing Channels 

This LCD TV turner provides the ability to display up to 125 channels (1 to 125). To select a 
channel, enter the channel number using 1 to 3 digit numbers. 


Using the Channel Buttons


1. Press the 

UP

 or 

DOWN 

button to change channels. 

When you press the 

UP

 or 

DOWN

 button, the TV 

changes channel in sequence. Channels not previously 
memorized or manually added won’t be accessible in 
this manner.     
 

Directly Accessing Channel


Enter the channel number using the numeric buttons to 
go directly to the channel desired.   

For example, to go to channel 27, press “

2

”then “

7

”. 

The TV will change to channel 27. 

Using the direct access method you can access any 
available channel including non-memorized and erase 
channels.    To select a channel over 100, press the +100 
button. (For example, to go channel 122, press “

+100

”, 

then, “

2

”, and “

2

” again).


Using the Parental Controls 

The 

Parent Control 

feature allows you to block channels from being viewed unless an unlock 

PIN code is entered. 
 
Before Parent Control restrictions can be utilized, you must first create a PIN number. 
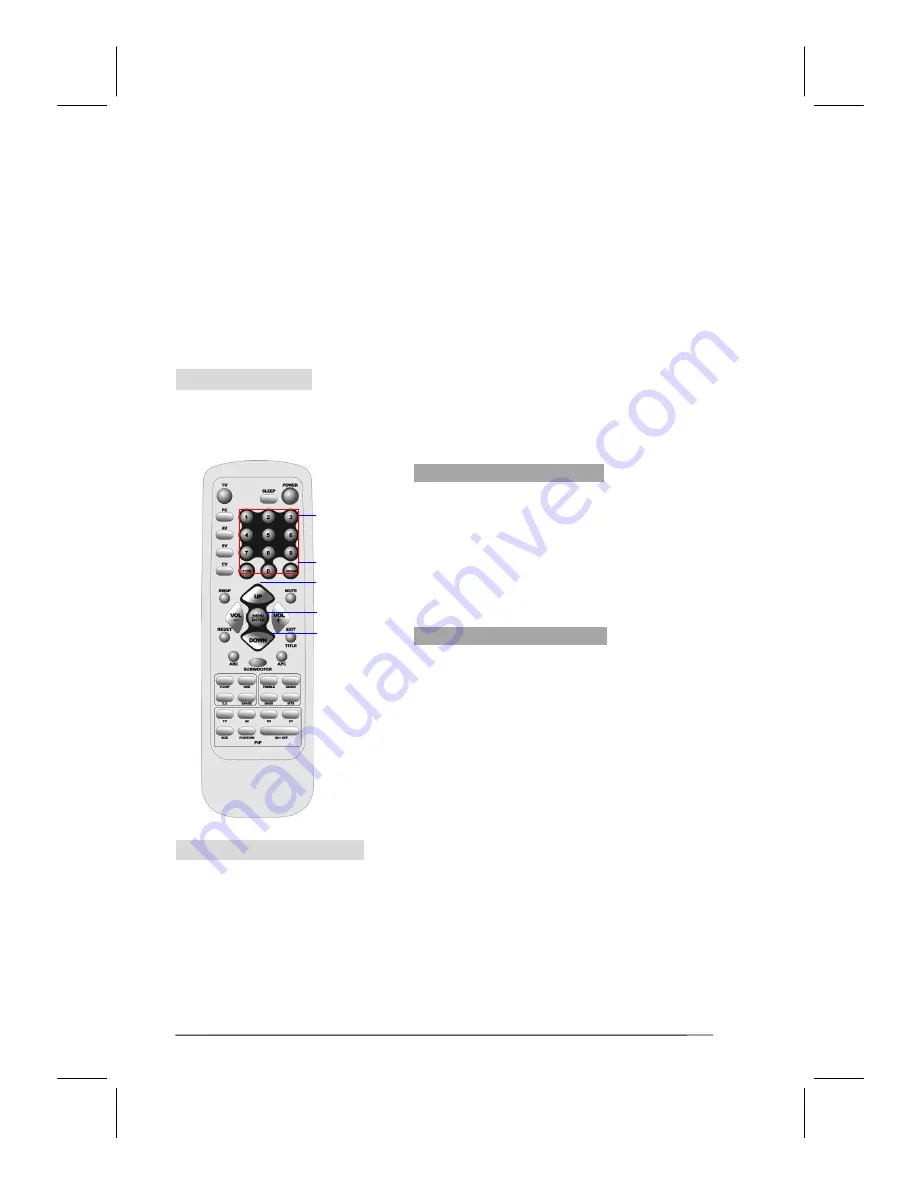
 

NUMBER 
BUTTONS 

RETURN 

UP 
 

TITLE/EXIT 

DOWN 
 

Содержание LC30D

Страница 1: ...s 16 Switching Language Modes 16 Setting the Sleep Timer 17 Auto Power Off 17 How to enter the Menu Items 18 Adjusting the Volume 18 B PC mode Adjustment 19 Adjusting Contrast and Brightness Settings...

Страница 2: ...V30DMBT U21 M21 2004 12 22 09 50 2 Viewing Closed Captions 40 D Other functions 41 12 Troubleshooting 42 13 PC Input Preset Timing Table 46 14 Specifications 47...

Страница 3: ...aws Certain Canadian programs may also be copyrighted and any unauthorized recording in whole or in part may be in violation of these rights WARNING Do not leave stationary images patterns PIP windows...

Страница 4: ...hank You for Choosing This Product Your new LCD TV was built utilizing the latest advancements in television technology We are proud to offer you a product that will provide convenient dependable serv...

Страница 5: ...other heat generating products including amplifiers 4 For added protection during a lightning storm or for extended periods of non use unplug the power cord from the wall outlet and disconnect the ant...

Страница 6: ...oduct Do not place the product on a bed sofa rug or other similar surfaces since they can block ventilation openings This product was not designed to operate in an enclosed environment Don t place the...

Страница 7: ...trol for the sharpest picture possible OTA TV viewing only Build in multi channel sound decoder for stereo and bilingual broadcasts Automatic channel program for up to 125 channels Automatic sleep tim...

Страница 8: ...V30DMBT U21 M21 2004 12 22 09 50 8 Dimension Unit mm...

Страница 9: ...V30DMBT U21 M21 2004 12 22 09 50 9 Video Input device DVD player Satellite receiver Set top box VIDEO Input device Digital Camera Satellite receive Set top box Ports Cr Cb...

Страница 10: ...V30DMBT U21 M21 2004 12 22 09 50 10 Head Phone Subwoofer Amplifier Antenna PC VCR TV only DVI I Head Phone Subwoofer Amplifier Antenna PC VCR...

Страница 11: ...mote control POWER turn the LCD TV on or off SOURCE set up the input source PC AV SV TV CV MENU display the main menu CHANNEL down or up change the channel VOLUME increase or decrease the volume ASPEC...

Страница 12: ...V30DMBT U21 M21 2004 12 22 09 50 12 Accessories User s manual Remote control Batteries 3A x2 Power Cord DVI Cable...

Страница 13: ...2004 12 22 09 50 13 Remote Control Sleep Power Number Buttons Return Channel UP Mute MENU Enter VOL TITLE EXIT Channel DOWN APC Audio Function TV PC AV SV CV SWAP VOL Reset ARC Subwoofer Other Functi...

Страница 14: ...services AUDIO button Toggle audio source between main display and PIP TREBLE button Adjust treble level BASS button SUBWOOFER button Adjust bass level Enable Disable the subwoofer PIP Control ON OFF...

Страница 15: ...de No light Power off Red light PC mode Green light Power Saving PC mode Amber light Note The TV will automatically power off if no signal is detected for 10 minutes Viewing the Menus and On Screen Di...

Страница 16: ...to Component mode Y Pb Cb Pr Cr Switching Language Modes 1 Press the MENU button to display the main menu 2 Press the ENTER button to enter Management Press the UP or DOWN button to select the Langua...

Страница 17: ...TV 1 Press the SLEEP button to display the Sleep Timer screen 2 Toggle the SLEEP button to set the sleep timer in 30 minute intervals Auto Power Off The TV will automatically power off if no signal is...

Страница 18: ...eturn to the previous screen or exit from the Menu Adjusting the Volume Using Volume Control Press the VOL or VOL button to increase or decrease the volume level Using Mute At any time you can tempora...

Страница 19: ...n menu 2 Press the VOL or VOL button to move the cursor to the Picture Adjust menu 3 Press the UP or DOWN button to access the sub menu Use the up or down arrows to select an item 4 Press the VOL or V...

Страница 20: ...Press the Enter button to access the sub menu VOL UP VOL MENU ENTER TITLE EXIT DOWN Management Main Display PC PIP Display Off Language Reset No PWR off Timer 10 Min PC Adjust H Position lllllllllllll...

Страница 21: ...he display automatically set these values select Auto Image from the sub menu 7 Press the EXIT button to return to the previous screen or exit Note When a DVI D signal is detected PC Adjust menu optio...

Страница 22: ...ess the VOL or VOL button to move the cursor to Audio Adjust menu There are 6 equalizer modes as shown below VOL UP VOL MENU ENTER TITLE EXIT DOWN Management Main Display PC PIP Display Off Language R...

Страница 23: ...lizer sub menu Press the VOL or VOL button to select an equalizer mode b Press the ENTER button to enter User or Normal mode then press the VOL or VOL button to set the desired equalizer frequencies a...

Страница 24: ...he EXIT button to return to the previous screen or exit Audio Adjust Equalizer POP Balance l z Sound Main Mute No Main PIP Audio Adjust Equalizer POP Balance l Sound Main z Mute No No Yes Audio Adjust...

Страница 25: ...to display the main menu Press the Enter button to enter the management menu 2 Press the UP or DOWN button to select the PIP Display sub menu item then press the VOL or VOL button to select the PDP so...

Страница 26: ...ccess the PIP menu Simply press the PIP ON OFF button on the remote control Selecting a Source for PIP display Press the PIP ON OFF button on the remote control to to display the PIP window Then press...

Страница 27: ...or VOL button to select the desired TV source 4 Press the EXIT button to return to the previous screen then press the VOL or VOL button to select the TV Setting menu 5 Press the ENTER button to access...

Страница 28: ...sired item 8 Press the EXIT button to return to the previous screen or exit from the Menu Sound Option Choosing a Multi Channel Sound MTS Soundtrack Depending on the particular program being broadcast...

Страница 29: ...the EXIT button to return to the previous screen Press the VOL or VOL button to access the Picture Adjust menu then Press the ENTER button 5 Press the UP or DOWN button to select the desired item VOL...

Страница 30: ...he remote control There are three steps to memorizing channels 1 Selecting a video signal source 2 Memorizing the available channels automatically 3 Adding Deleting channels manually Selecting the Vid...

Страница 31: ...llowing actions 1 Press the MENU button to display the main menu 2 Press the VOL or VOL button to select the TV Setting menu item 3 Press the ENTER button to access the TV Setting 4 Press the UP or DO...

Страница 32: ...MENU button to display the main menu 2 Press the VOL or VOL button to select the TV Setting menu 3 Press the ENTER button to accessTV Setting 4 Press the UP or DOWN button to move the cursor to the Er...

Страница 33: ...DOWN button to change channels When you press the UP or DOWN button the TV changes channel in sequence Channels not previously memorized or manually added won t be accessible in this manner Directly A...

Страница 34: ...ess the ENTER button 5 The Please Enter Pin screen will appear Input your 4 digit PIN here The factory default PIN code is 1234 6 After entering a valid PIN number the Parent Control sub menu screen w...

Страница 35: ...2 Press the VOL or VOL button to select the TV Setting menu 3 Press the ENTER button to access TV Setting 4 Press the UP or DOWN button to move the cursor to the Parent Control sub menu then press th...

Страница 36: ...Ratings 1 Press the MENU button to display the main menu 2 Press the VOL or VOL button to select the TV Setting menu 3 Press the ENTER button to access TV Setting 4 Press the UP or DOWN button to move...

Страница 37: ...trols will block it The screen will turn blue and the following message will appear Parent Control working Level TV G TV Y Young children TV Y7 Children 7 and over TV G General audience TV PG Parental...

Страница 38: ...n menu 2 Press the VOL or VOL button to select the TV Setting menu 3 Press the ENTER button to access TV Setting 4 Press the UP or DOWN button to move the cursor to the Parent Control sub menu then pr...

Страница 39: ...o blue and the following message will appear Parent Control working Level MPAA PG13 G General audience no restrictions PG Parental guidance suggested PG13 Parents strongly cautioned R Restricted Child...

Страница 40: ...e and on the videotape packaging in order to properly configure the closed captioning function 1 Press the MENU button to display the main menu 2 Press the VOL or VOL button to select the TV Setting m...

Страница 41: ...both vertically and horizontally to fill the entire screen while keeping the original aspect ratio 4 APC Automatic Picture Control Automatic Picture Control allows you to easily set the screen lumino...

Страница 42: ...sure the BRIGHTNESS is properly adjusted The florescent lamp may have reached the end of its life Contact an authorized service center Make sure the video source is plugged into the composite video i...

Страница 43: ...and Color adjustments Reset the TV to the factory default settings The picture is too dark Select a different APC mode Check the PICTURE and BRIGHTNESS adjustment The fluorescent lamp may have reached...

Страница 44: ...ource signal may be weak Your provider may be experiencing difficulties Check your input connections The picture is doubled or tripled The source signal may be weak Check your input connections The pi...

Страница 45: ...e immediately resolved unplug the power cord for 8 10 seconds Then check again to see if the TV is operating normally It may be necessary to perform a factory reset to solve some issues To initiate a...

Страница 46: ...solution and the frequencies are displayed on the screen may not exactly same as this list Under PC mode and connecting DVI cable from video device for example as a DVD player or a Set Top Box the pic...

Страница 47: ...x 768 60Hz Digital compliant DVI 1 0 HDCP 1 1 PC Input HDTV Ready via D Sub 15Pin 720P 1080i Audio 1 CVBS S Video x 1 Audio 2 Y Cb Pb Cr Pr x 1 Audio Input Audio 3 PC x 1 Video Output Video out TV on...

Страница 48: ...V30DMBT U21 M21 2004 12 22 09 50 48...

Отзывы: