background image

16


willowpump.com

 l text or call 

1-888-WILLOW-3

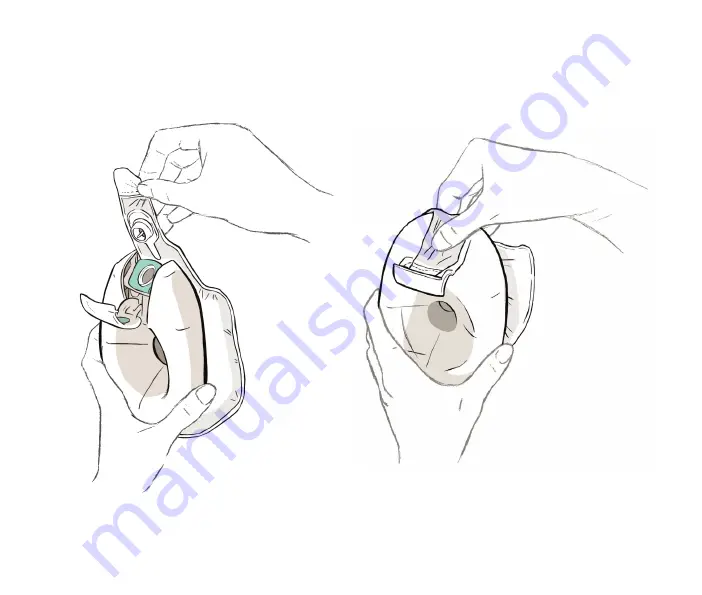
fig 3f


Drape a new 

Milk Bag over Flange 
with writing “THIS 
SIDE UP” facing away 
from Flange.

fig 3g

 Firmly press 

Milk Bag’s One-
way Valve onto 
Flextube™ collar. 
Make sure Valve is 
securely attached 
to collar.

Содержание Breast Pump Generation 3

Страница 1: ...Instructions for Use The first all in one in bra breast pump Willow Wearable Breast Pump Generation 3...

Страница 2: ...Instructions for Use are updated periodically so please check willowpump com for current version...

Страница 3: ...illow 3 Pumping 13 Turn on Pump Assembly Alignment Initiate Latch Phases of Willow Secure Pump in Bra Suction Levels Realignment Tips 4 Ending Your Session 28 Pause Pump Break Latch Remove Pump Flip t...

Страница 4: ...ing administered 6 Only wear Willow Generation 3 latched while pumping Do not wear Willow Generation 3 on Pause latched for an extended period of time 7 Always break latch before removing Pump from br...

Страница 5: ...ot work when connected to Charger always disconnect Pump from Charger before using 28 Only use Charger supplied with Willow Breast Pump Generation 3 29 Plug Charger into an electrical outlet that is v...

Страница 6: ...a single user and has an expected operating life of 12 months Reusable parts Flange and Flextube should be cleaned prior to use reference Section 2 GETTING STARTED Boil Flange Flextube These parts are...

Страница 7: ...ump Generation 3 Instructions for Use PRODUCT PARTS Milk Container additional flange sizes and spare parts are available for purchase at willowpump com Willow Pump Generation 3 Flange Flextube Cleanin...

Страница 8: ...mp for single and double pumping The product includes re chargeable Pump s Flange s Flextube s and disposable Milk Bags Serial Number Pump Pause Power Port Reset Button Suction Controls Increase Decre...

Страница 9: ...r attaches to Milk Bag Flextube Tip attaches to Flange Spout Flextube Grips slide into grooves on Pump interior Flange Spout attaches to Flextube Tip Tabs to tuck Milk Bag Door Volume Indicators appro...

Страница 10: ...Your size for Willow might be different than the size you use for another pump Using the right size for your Flange or Milk Container can make all the difference when it comes to comfort and the volum...

Страница 11: ...commend you revisit your flange fit from time to time Too Small During pumping some or your entire nipple rubs against the side of the flange tunnel Too Large During pumping more areola is drawn into...

Страница 12: ...he Pump pressed firmly and securely against your breast Pick the right bra Full coverage Has a flap Made of stretchy fabric No underwires or padding If it feels like Willow will shift when you move ti...

Страница 13: ...for 10 minutes and place on a clean surface to air dry MILK BAG READY FOR USE Single use only please recycle May be stored in refrigerator or freezer After boiling allow Flange to cool before touching...

Страница 14: ...up a Plug Charger into outlet then into Pump b Wait until Pump lights up c Unplug Charger from Pump GET THE APP The app is an optional pumping partner and can be downloaded from the App Store iPhone...

Страница 15: ...latched while actively pumping You should break latch and remove Willow once you have finished pumping Consult your healthcare practitioner to understand for how long you should pump Willow turns off...

Страница 16: ...ny damage cracks chips or wear a Connect Flextube to Flange TIP Flextube must be pushed all the way down onto the Flange Spout fig 3b Push Flextube Tip all the way down onto Flange Spout fig 3c Slide...

Страница 17: ...15 Willow Wearable Breast Pump Generation 3 Instructions for Use b Attach Milk Bag fig 3e After sliding Door up pull open fig 3d Slide Flange Door open by pushing the blue thumb pad in and sliding up...

Страница 18: ...or call 1 888 WILLOW 3 fig 3f Drape a new Milk Bag over Flange with writing THIS SIDE UP facing away from Flange fig 3g Firmly press Milk Bag s One way Valve onto Flextube collar Make sure Valve is se...

Страница 19: ...er tabs on Flange Make sure the bag is behind and not touching the grips on either side of the Flextube fig 3h Close Flange Door by swinging closed and sliding down fig 3i The Milk Bag is bigger than...

Страница 20: ...n see if your nipple is centered in the Flange Tunnel You may need to bend forward Aligning this way can help you confirm you re aligned when you re learning how to use Willow fig 3k Bring the Flange...

Страница 21: ...or bottom of the Flange Tunnel If it does try again IMPORTANT Correct nipple alignment is key to comfort expression and performance Nipple must be positioned correctly in Flange Tunnel before pumping...

Страница 22: ...e Flange and Pump before you align To assemble bring the Pump and Flange together until they securely connect Then align Willow by bringing the Pump to your breast ensuring your nipple is centered in...

Страница 23: ...inst your breast b Press Pump Pause button to initiate latch and begin pumping C Continue to hold Pump firmly against your breast until it is latched Wait until Pump reaches Stimulation Trouble Initia...

Страница 24: ...suction or pause the pump then break latch and make sure you are aligned properly INITIATE LATCH Louder slower sounds The Pump is establishing suction Remember to hold Willow securely against your bre...

Страница 25: ...in Stimulation phase secure Pump in place by hooking nursing bra flap over Pump taking care to keep Pump pressed firmly against breast If necessary tighten bra strap to keep Pump securely in place b W...

Страница 26: ...ou are still in Stimulation phase after about 2 minutes Make sure your bra is keeping Willow pressed securely against your breast especially at the top of the Pump Press Pump Pause button break latch...

Страница 27: ...tion Once you re in Expression and have pumped about 0 5 oz of milk you ll have access to all seven suction levels The pump automatically increases your suction by one level at this time unless you re...

Страница 28: ...milk volume TO REALIGN Pause Pump and break latch reference Section 4 ENDING YOUR SESSION Break Latch Remove Pump Remove Pump from breast keeping Flange side up to avoid spilling milk not yet pumped...

Страница 29: ...ange to realign To do this perform Flip to Finish before realigning reference Section 4 ENDING YOUR SESSION Flip to Finish fig 3r Bend forward and bring the Pump to your breast fig 3s After you ve sec...

Страница 30: ...g Pump will pause To continue pumping press Pump Pause button White Solid Indicator Full Milk Bag When Milk Bag is full Pump stops pumping Break latch remove Pump perform Flip to Finish reference Sect...

Страница 31: ...tructions for Use BREAK LATCH REMOVE PUMP TIP There will be some milk in the Flange the next step will help you capture it fig 4c Break latch by placing a few fingers between Pump and breast fig 4d Ti...

Страница 32: ...nge Follow the steps below to move the last bit of milk from the Flange Tunnel into the Milk Bag TIP You may notice with a full Milk Bag the Flange starts to separate from the Pump This is normal Sque...

Страница 33: ...ig 4f TILT until pump starts to gulp milk fig 4h FLIP all the way over with the Flange opening facing the floor and wait until gulps stop a total of 8 gulps fig 4g HOLD until milk completely disappear...

Страница 34: ...separate Flange from Pump hold near the bottom and pull apart fig 4i When finished flip Pump back over so the Flange side is up fig 4j Slowly pull the Flange away from the Pump keeping the Flange faci...

Страница 35: ...you repeat Flip to Finish with only a few drops left or multiple times the Milk Bag may fill up with air fig 4l If more than a few drops are present turn Pump back on attach Flange Press Pump Pause b...

Страница 36: ...On Off button REMOVE MILK BAG CLEAN Flange and Flextube as instructed reference Section 5 CLEANING TRANSFER STORAGE fig 4m Slide Flange Door open by pushing blue thumb pad in and sliding up fig 4o Rem...

Страница 37: ...ger from Pump and unplug from electrical outlet CHARGING TIMES QUICK CHARGE Takes approximately 20 minutes to charge 1 session FULL CHARGE Takes approximately 2 hours and light indicator will turn sol...

Страница 38: ...ailed instructions in Section 2 GETTING STARTED Boil Flange Flextube Clean with mild dish washing soap and brushes provided See detailed instructions in Section 5 CLEANING TRANSFER STORAGE Milk Bag Mi...

Страница 39: ...d prevent bacterial growth 2 SOAK FOR 5 MINUTES Using mild dish washing soap soak both parts in very warm soapy water for 5 minutes minimum 3 WASH BRUSH THOROUGHLY Using the two Cleaning Brushes provi...

Страница 40: ...ying rack and allow to air dry For best results avoid using cloth towels store dry parts in clean cool place do not store wet or damp parts To maintain cleanliness avoid touching inside of parts IMPOR...

Страница 41: ...C 4 hours ideal up to 6 hours acceptable Refrigerator 39 F 4 C 4 days ideal up to 5 days acceptable Freezer 0 F 18 C 3 6 Months Deep Freezer 4 F 20 C 6 months up to 12 months Source La Leche League In...

Страница 42: ...3 TO EMPTY MILK BAG Use clean scissors to cut on dotted line below Label Area on Milk Bag fig 5f Pour milk into bottle To release as much as possible squeeze bag Discard Milk Bag please recycle fig 5...

Страница 43: ...lid when fully charged approximately 5 sessions Orange Enough charge for 1 session Pump is ready to pump Recharge soon Pulses while charging Red Low battery inadequately charged for session In order t...

Страница 44: ...al Reposition Pump with special attention to these tips reference Section 3 PUMPING Alignment 1 Bra is not between Pump and breast 2 Pump is pressed securely against breast while trying to latch If th...

Страница 45: ...Flange size for Willow reference Section 2 GETTING STARTED Willow Flange Size Need to realign Willow Pause Pump break latch and remove Pump from breast Realign Willow fully assembled reference Section...

Страница 46: ...ion 2 GETTING STARTED Willow Flange Size Decreased low Pump suction The Pump has seven suction settings push up arrow to increase suction Check your Flanges and Flextubes for signs of wear They should...

Страница 47: ...immersed in water Dry Pump off immediately Prop Pump upright with charger port down and blue suction controls up and let dry overnight Do not use Pump or Charger for 24 hrs Contact Customer Care Pump...

Страница 48: ...coverage terminates if you sell or otherwise transfer this product to another person This warranty gives you speci c legal rights and you may also have other rights which vary by location WILLOW MAKES...

Страница 49: ...bill of sale or other dated proof of purchase and a brief statement of the problem along with a Returned Goods Authorization number You may obtain the appropriate Authorization number and shipping add...

Страница 50: ...tor Life 273 hours Defined to be approximately three 15 minute sessions per day for one year Bluetooth Info Bluetooth v4 1 Bluetooth Low Energy Range up to 10 m Security Encryption 128 bit AES Advance...

Страница 51: ...s If the air is very dry use the pump where floors are wood concrete or ceramic tile If floors are covered with synthetic material the relative humidity should be at least 30 If you notice shocks when...

Страница 52: ...that may cause undesired operation Note This equipment has been tested and found to comply with the limits for a Class B digital device pursuant to part 15 of the FCC Rules These limits are designed t...

Страница 53: ...23 0 1 0 38 0 38 0 74 1 1 2 1 2 2 3 10 3 8 3 8 7 3 100 12 12 23 For transmitters rated at a maximum output power not listed above the recommended separation distance d in meters m can be estimated us...

Страница 54: ...s CISPR 11 Group 1 The Willow Breast Pump Generation 3 uses RF energy only for its internal function Therefore its RF emissions are very low and are not likely to cause any interference in nearby elec...

Страница 55: ...V air 8 kV contact 6 kV air 8 kV and 15 kV air Floors should be wood concrete or ceramic tile If floors are covered with synthetic material the relative humidity should be at least 30 NOTICE If the Wi...

Страница 56: ...period at 0 95 reduction 250 300 periods 5 UT 95 dip in UT for 0 5 cycle 30 reduction 25 30 periods at 0 95 reduction 0 5 period at 0 45 90 135 180 225 270 and 315 95 reduction 1 period at 0 95 reduc...

Страница 57: ...oftheWillowBreastPump including cables thantherecommendedseparationdistancecalculated fromtheequationapplicabletothefrequencyofthetransmitter Recommendedseparationdistance d 1 2 P d 1 2 P80MHzto800MHz...

Страница 58: ...field strength in the location in which the Willow Breast Pump is used exceeds the applicable RF compliance level above the Willow Breast Pump should be observed to verify normal operation If abnormal...

Страница 59: ...llection system for electrical waste and electronic equipment including batteries Flange and Milk Bags can be disposed of in your home s recycling container Flextube should be disposed of in your home...

Страница 60: ...MBOL DEFINITION SYMBOL DEFINITION Manufacturer Keep away from heat Date of Manufacture Temperature Limit Lot Number Humidity Limitation Catalog Number Atmospheric Limitation Serial Number Consult Inst...

Страница 61: ...DEFINITION Keep dry Type BF Applied Part Class II Equipment Device does not rely on earth plug or power cord Ingress Protection Indoor use only Do not throw in trash Send to a recycling center Do not...

Страница 62: ...illow Flextube and the stylized W are trademarks or registered trademarks of Willow in the United States and other countries Patent www willowpump com patents CAREFULLY READ ALL INSTRUCTIONS PRIOR TO...

Страница 63: ...IFU 1014 A...

Отзывы: