background image

PAGE 4 — 732W

ZF — #8 x 1" Machine

Screw — Qty. 4

ZG — #6 x 5/8" Flat Head

Screw — Qty. 48

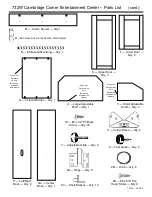
732W Cambridge Corner Entertainment Center – Parts List 

(cont.)

ZE — #6 x 3/8" Brass

 Screw — Qty. 12

ZH — 1

5

/

8

" Black

Screw — Qty. 5

ZI — 1¼" Black

Screw — Qty. 12

ZN — Magnetic

Catch — Qty. 2

ZO — Double Magnetic

Catch — Qty. 1

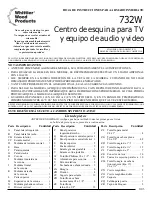
ASSEMBLY INSTRUCTIONS

TOOLS REQUIRED:

 Phillips Screwdriver, Slotted Screwdriver, Tape Measure, Hammer, Wood Glue.
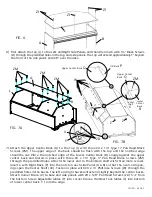
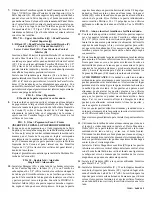
FIG. 1

1)

Install Cam Connectors (ZK):

four in each Side Panel (A&B)

four in Center Shelf Moulding (D)

four in Base (E)

Glue Wood Dowels (ZP): three in top edge of Vertical Divider (O)

READ CAM-LOCK INSTRUCTIONS

IMPORTANT:

NOTE:

 Due to the fact that more than one type of hardwood is used, we recommend testing for desired color.

To test for desired color on:

a)

Veneer parts – apply stain to unexposed portion of side panel.

b)

Alder pieces – apply stain to back of base.

NOTE:

 In an effort to control costs and preserve natural resources, we remanufacture some components,

cutting them into smaller parts to eliminate the defects. This may result in some holes or grooves appearing

in inconspicuous locations such as the bottom of the bottom shelf. These extra holes should be disregarded

in assembling your product.

DO NOT IMBED THE SHOULDER

INTO THE WOOD!

Shoulder must be

flush with the wood!

ZK

WOOD TRIM TO FRONT

The side panels have a compression

stamp on the bottom edge:

“L” for left, “R” for right.

STAIN

TEST AREA

WOOD TRIM

TO FRONT

ZP — Wood Dowel –

Qty. 3

ZJ — 2" Black Screw — Qty. 7

ZL — Cam Housing

— Qty. 16

ZK — Cam Connector —

Qty. 16

ZM — #6 x 1¼" Pan

Head (type 17) Black

Screw — Qty. 9

Vertical Divider stamped

“BOTTOM” on bottom edge

ZK

B

ZK

E

D

ZP

A

ZK

O

ZQ — Door Skirt – Qty. 1

.

.

.

.

ZR — Locking Plug — Qty. 2

Содержание 732W

Страница 1: ...IN CASE WE NEED TO CONTACT YOU IMPORTANT NOTES O READ INSTRUCTIONS COMPLETELY BEFORE STARTING ASSEMBLY O ADDITIONAL SANDING WITH 220 GRIT IS RECOMMENDED FOR ENHANCED BEAUTY O ALWAYS SAND WITH THE GRA...

Страница 2: ...t Qty 1 H Crown Qty 1 L Top Qty 1 E End view Vue de l extr mit Vista lateral Wood trim Garniture en bois Borde con acabado de madera Wood trim Garniture en bois Borde con acabado de madera TOP A Left...

Страница 3: ...ble Shelf Qty 1 V Small Adjustable Shelf Qty 2 Z Tack Glide Qty 2 Y Adjustable Glide Qty 2 X Corner Brace Qty 2 ZB Knob Qty 4 ZA Hinge Qty 8 ZC Shelf Bracket Qty 12 M End view Vue de l extr mit Vista...

Страница 4: ...r on a Veneer parts apply stain to unexposed portion of side panel b Alder pieces apply stain to back of base NOTE In an effort to control costs and preserve natural resources we remanufacture some co...

Страница 5: ...crews ZH through the predrilled blind holes across the center of the Bottom Shelf CB so that they start to come through the top of the shelf Line up the screws with the holes in the bottom edge of the...

Страница 6: ...ing will overhang the bottom of the shelf FIG 4 5 With the notch for the embossed emblem toward the bottom attach the Crown Spacer M to the Crown H with three 1 Black Screws ZI through the lower predr...

Страница 7: ...the notched edge should be out Place the notched edge of the Lower Center Back R snugly against the upper center back and fasten in place with three 6 x 1 Type 17 Pan Head Black Screws ZM through the...

Страница 8: ...k Screws ZI through the predrilled holes in the side panel into the crown moulding Repeat above steps for the Right Crown Moulding K FIG 9 8 With unit standing upright place a small bead of glue along...

Страница 9: ...ow for adjustment of the doors Loosening the screws in the side panel will allow the door to be moved up or down The hinges on both doors may have to be loosened to align the doors properly Align the...

Страница 10: ...uble Magnetic Catch ZO to the bottom of the crown spacer centered side to side and flush with front edge using pan head screws included in catch kit Attach the catch plates to the upper inside edge of...

Страница 11: ...negro de cabeza troncoc nica tipo 17 6 x 1 9 ZN Cierre magn tico 2 ZO Cierre magn tico doble 1 ZP Taquete 3 ZQ Fald n para puerta 1 ZR Tap n de bloqueo 2 FELICITACIONES POR HABER SELECCIONADO UN MUEBL...

Страница 12: ...para Leva ZL Instale la Corona H al Panel Lateral Izquierdo con un Tornillo Negro de 15 8 ZH a trav s del orificio que se encuentra en el panel lateral y dentro de la corona De la misma manera instale...

Страница 13: ...erior boca abajo en posici n horizontal mida 5 8 de pulga da desde el borde externo y trace una l nea tenue Coloque el fald n ZQ sobre la l nea de modo que quede al ras del borde inferior de la puerta...

Страница 14: ...Z AU BESOIN LE MOD LE EST SUJET CHANGEMENTS SANS PR AVIS 8 03 PI CE DESCRIPTION QT 732W Meuble audio vid o de coin Cambridge A Panneau gauche 1 B Panneau droit 1 CB tag re du bas 1 CC tag re du milieu...

Страница 15: ...e la couronne puis dans les trous de guidage de la pi ce intercalaire de couronne Les trous sup rieurs inutilis s de la couronne et de la pi ce inter calaire de couronne doivent tre align s Le bord su...

Отзывы: