


558KFDH — 01/09 — Page 7
Fig. 9
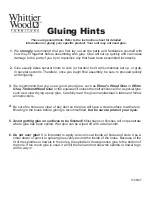
Fig. 10
Wall
Stud
Wall Bracket (K)
(side view)
Wall Bracket (K)
(back view)
Wall Bracket (K)
(back view)
x 6
P
Wall
P
K
P
Wall
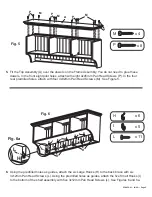
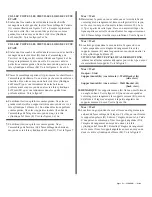
9.
Locate studs in the wall behind the space where you want to hang your storage shelf. Affix
the Wall Brackets (K) into the studs with 4x45mm Pan Head Screws (P).
IF YOU CANNOT
LOCATE ENOUGH STUDS TO SECURE THE BRACKETS,
purchase the proper wall attachment
hardware for your type of wall and secure the brackets according to those instructions.
See Figure 9.
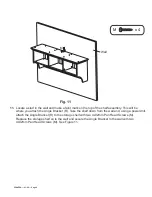
10. NOTE:
The Wall Brackets (K) attached to the wall angle out at the top. See Figure 10. When you
hang your storage shelf, the Wall Brackets (K) that are pre-attached to the shelf fit over the angled
part of the Wall Brackets on the wall. See Figure 10a.
Fig. 10a


