


558KFDH — 01/09 — Page 4
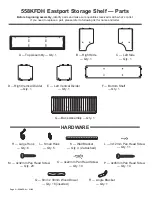
M
M
G
x 2
M
x 4
M
B
M
M
M
M
M
M
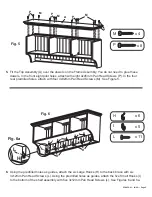
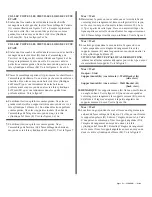
3.
Spread a thin layer of glue in the dowel hole on the Left Side. Insert the Back Assembly (G)
as shown in Figures 3 and 3a. Quickly wipe away any excess glue. Using the pocket holes as guides,
attach using two 4x32mm Pan Head Screws (M). See Figures 3 and 3a.
4.
Spread a thin layer of glue in the three dowel holes on the Right Side (B). Insert the Back/Shelf
Assembly (G) as shown in Figures 4 and 4a. Quickly wipe away any excess glue. Using the pocket
holes as guides, attach using four 4x32mm Pan Head Screws (M). See Figures 4, 4a and 4b.
Fig. 4
Fig. 4b
Fig. 3a
Fig. 4a
Fig. 3
G