COMPONENT ACCESS
27” Stacked Laundry Center
n
5-15
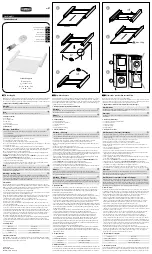
Removing the Dryer Assembly (continued)
7.
Locate the pressure hose disconnect inside the cabinet,
to the right of the motor (see Figure 3). Disconnect hose
fitting and pull hose down through opening in dryer base.
Disconnect hose fitting
Figure 3
8.
Disconnect the three harness connectors to the right of
the water inlet valve assembly (Water Valve/Lid Switch/
Motor & Shifter Harnesses). See Figure 4.
Disconnect 3 connectors
Water Inlet Valve
Figure 4
9.
Use a Phillips screwdriver to remove three screws securing
the center transition panel to cabinet (see Figure 5).
Loosen center Phillips screw
Remove Right and Left Phillips screws
Figure 5
10.
Lower transition panel and remove from cabinet.
11.
From the front of the unit, remove one (1) screw per side
attaching dryer support frame to the washer top.
Remove 1 screw from each side
Figure 6
IMPORTANT: The following steps must be performed by two
(2) people.
12.
With two people, one removing screws and the other
supporting the dryer. From the back, remove three (3)
5/16” screws per side attaching dryer to washer top. See
Figure 7.
Step 12
Figure 7
13
. Remove one 5/16” screw per side attaching dryer to
triangle bracket. See Figure 8.
Step 13
Figure 8
Содержание WET4027HW0
Страница 1: ...L 95 SERVICE MANUAL 27 GAS ELECTRIC STACKED LAUNDRY CENTER W11197006 Multimedia Enhanced ...
Страница 30: ...2 16 n 27 Stacked Laundry Center DIAGNOSTICS TROUBLESHOOTING Notes ...
Страница 46: ...3 16 n 27 Stacked Laundry Center TESTING WASHER Notes ...
Страница 80: ...5 20 n 27 Stacked Laundry Center COMPONENT ACCESS Notes ...
Страница 82: ...27 GAS ELECTRIC STACKED LAUNDRY CENTER W11197006 ...