3-4
OVEN CONTROL
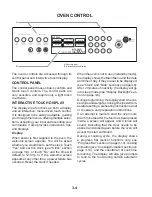
A. Control panel
B. Interactive touch display
A
B
Cook Method
Food Type
Kids Menu
Most Used
Time / Temp /
Power
MAIN MENU:
Settings & Info
The oven’s controls are accessed through its
control panel and interactive touch display.
CONTROL PANEL
The control panel houses basic controls and
Quick touch controls. The control pads are
very sensitive, and require only a light touch
to activate.
INTERACTIVE TOUCH DISPLAY
The display area functions as both a display
and an interactive, menu-driven touch control.
It is designed to be easily navigable, guiding
you through the menus, offering multiple selec-
tions, accepting your input and executing your
commands. It also provides instructions, tips,
and displays.
Display
When power is first supplied to the oven, the
welcome screen appears. You will be asked
whether you would like to set the clock. Touch
“Yes” and set the clock (see “Clock” section
on page 3-6), or touch “No” and the time will
default to 12:00 p.m. If the welcome screen
appears at any other time, a power failure has
occurred. Reset the clock if needed.
When the oven is not in use (in standby mode),
the display shows the Main Menu and the date
and time of day, if they are set to be displayed.
(see “Clock” and “Date” sections on page3-6).
After 2 minutes of inactivity, the display will go
into sleep mode (see “Display Backlight” sec-
tion on page 3-6).
During programming, the display shows menus,
servings and weights, cooking time/power/tem-
perature settings, preheating instructions, and/
or cookware and preparation instructions.
If an attempt is made to start the oven more
than 5 minutes after the food has been placed
inside, a screen will appear, and 4 tones will
sound, indicating that the door needs to be
opened and closed again before the oven will
accept the start command.
During a cooking cycle, the display shows
a progress bar (sensor functions only, see
“Progress Bar” section on page 3-10), cooking
animation (see “Cooking Animation” section on
page 3-10), and the countdown of cook time
remaining. The display will also give prompts
to tend to the food during certain automatic
cycles.
Содержание SPEEDCOOK GH6208 XR
Страница 16: ...1 12 NOTES ...
Страница 45: ...4 13 i Lift the door glass assembly off the door frame Remove Door Glass Door Glass Assembly ...
Страница 76: ...5 10 NOTES ...
Страница 82: ...6 6 NOTES ...
Страница 92: ...8 6 NOTES ...
Страница 93: ...8 7 NOTES ...
Страница 94: ...8 8 NOTES ...
Страница 96: ...CORPORATION ...

