background image

FR37

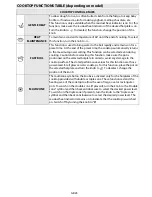
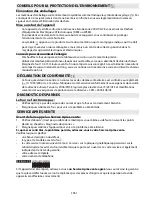
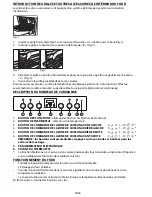
FONCTIONNEMENT DE LA TABLE DE CUISSON

Le bandeau de commande du four est doté de quatre boutons pour le réglage des plaques électriques. Les 
boutons de commande de la table de cuisson portent une échelle numérique correspondant à différentes 
puissances, ainsi qu’’une série de symboles de fonction.

Tournez le bouton de la plaque chauffante sélectionnée dans le sens des aiguilles d’une montre 
jusqu’à la position désirée (suivez les instructions qui accompagnent la table de cuisson).

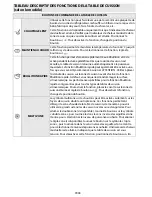
UTILISATION DU PROGRAMMATEUR ÉLECTRONIQUE

Première utilisation du four

Réglage de l’heure, du jour et de la tonalité du signal sonore.
Dès que le four est branché au réseau électrique, «

AUTO »

 et « 0.00 » clignotent sur l’afficheur. Pour régler 

l’heure courante, appuyez simultanément sur les touches 

-

 et 

+

: les deux points du milieu clignotent. 

Réglez l’heure courante avec les touches 

+

 et 

-

. Après avoir atteint la valeur désirée, appuyez sur la touche 

du milieu. L’afficheur indique « ton. 1 ». Pour sélectionner la tonalité désirée, appuyez sur la touche –. Après 
avoir sélectionné votre tonalité préférée, appuyez sur la touche du milieu. Pour modifier l’heure courante, 
procédez comme indiqué plus haut.

Réglage du minuteur 

Pour régler le minuteur, maintenez la pression sur la touche du milieu : l’afficheur indique « 0.00 » et la 
clochette clignote. Réglez le minuteur avec la touche 

+

 (la valeur maximale disponible est de 23 heures et 

59 minutes). Au bout de quelques secondes, le compte à rebours commence. L’afficheur indique l’heure 
courante et la clochette allumée confirme le réglage. Pour afficher l’état du compte à rebours et le modifier, 
appuyez à nouveau sur la touche du milieu.

RÉGLAGE DU TEMPS DE CUISSON

Après avoir sélectionné le mode de cuisson et la température avec les boutons, appuyez sur la touche du 
milieu : l’afficheur indique « 0.00 » et la clochette clignote. Appuyez à nouveau sur la touche du milieu : 
l’afficheur indique en alternance 

 et « 0.00 » ; «

AUTO »

 clignote. Réglez le temps de cuisson avec les 

touches 

+

 et 

-

 (la plus grande valeur disponible est 10 heures). Au bout de quelques secondes, l’afficheur 

indique l’heure courante ; «

AUTO

» reste allumé pour confirmer le réglage. Pour afficher le temps de 

cuisson restant et le modifier, appuyez sur la touche du milieu pendant 2 secondes ; appuyez une seconde 
fois sur cette touche. À la fin du temps prédéfini, le symbole 

 s’éteint, l’alarme sonne et «

AUTO »


clignote. Appuyez sur n’importe quelle touche pour désactiver l’alarme. Remettez le bouton des fonctions 
et de la température à zéro et appuyez sur la touche du milieu pendant 2 secondes pour terminer la 
cuisson.

Différer l’heure de fin de cuisson

Après avoir sélectionné un temps de cuisson, appuyez sur la touche du milieu : sur l’afficheur alternent 

, l’heure de fin de cuisson et «

AUTO

» clignotant. Appuyez sur la touche 

+

 jusqu’à afficher l’heure de 

fin de cuisson désirée (la cuisson peut être différée de 23 heures et 59 minutes au maximum). Au bout de 
quelques secondes, l’afficheur montre l’heure courante, le symbole 

 s’éteint et «

AUTO

» reste allumé 

pour confirmer le réglage. Pour afficher l’heure de fin de cuisson et la modifier, appuyez sur la touche du 
milieu ; appuyez deux fois de suite sur cette touche. À la fin du compte à rebours, le symbole  

s’allume 

et le four lance la cuisson sélectionnée.

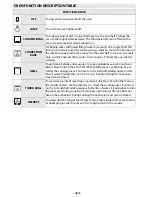
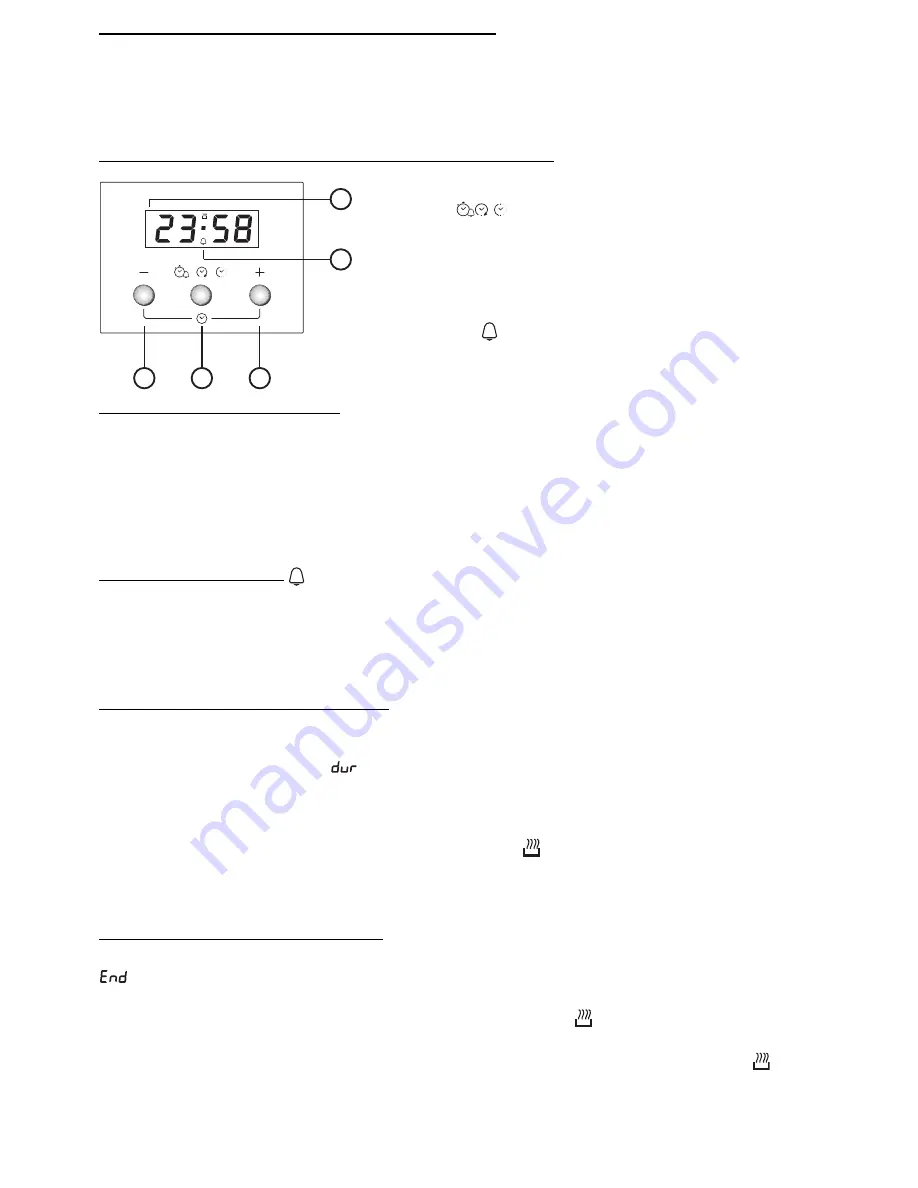
1.

Touche 

-

: diminution de la valeur affichée

2.

Touche 

: sélection des réglages

a. Minuterie
b. Temps de cuisson
c. Sélection de l’heure de fin de cuisson

3.

 : augmentation de la valeur affichée

A.

Le symbole


indique que la fonction minuterie est active.

B.

Le symbole 

AUTO

 confirme que le réglage a bien été effectué.

A
U
T
O

2

3

1

A

B

Содержание PCCI 502161

Страница 1: ...PCCI 502161 Benutzer und Wartungshandbuch User and maintenance manual Manuel d utilisation et d entretien Handleiding voor gebruik en onderhoud ...

Страница 2: ......

Страница 3: ...heit verantwortliche Personen entsprechend eingewiesen Die erreichbaren Teile des Backofens können während des Betriebs sehr heiß werden Halten Sie Kinder vom Gerät fern und achten Sie darauf dass sie das Gerät nicht als Spielzeug benutzen Berühren Sie die Heizelemente sowie die Geräteinnenflächen während und unmittelbar nach dem Betrieb nicht es besteht Verbrennungsgefahr Vermeiden Sie den Kontak...

Страница 4: ...werden Wenden Sie sich an eine autorisierte Kundendienststelle ALLGEMEINE HINWEISE Vor der Inbetriebnahme Entfernen Sie Kartonteile Schutzfolien und Klebeetiketten von den Zubehörteilen Nehmen Sie die Zubehörteile aus dem Backofen und heizenSiedenBackofenauf 200 C auf Lassen Sie ihn etwa eine Stunde eingeschaltet um den Geruch von Isoliermaterial und Schutzfetten zu beseitigen Während des Gebrauch...

Страница 5: ...ellen ob die Störung behoben ist Falls die Störung nach den vorstehend beschriebenen Kontrollen weiter besteht rufen Sie bitte die nächstliegende Kundendienststelle an Sie benötigen dabei folgenden Angaben Eine kurze Beschreibung der Störung Gerätetyp und Modellnummer die Servicenummer die Zahl nach dem Wort Service auf dem Typenschild befindet sich rechts im Backofeninnenraum bei offener Backofen...

Страница 6: ...dschuhe so lange das Zubehör noch heiß ist Speiserückstände können Sie dann leicht mit einer geeigneten Bürste oder einem Schwamm entfernen Reinigung der Backofenhinterwand und der katalytischen Seitenwände falls mitgeliefert WICHTIG Verwenden Sie keine ätzenden oder scheuernden Reinigungsmittel harte Bürsten TopfkratzeroderBackofensprays dadadurchdiekatalytischeEmaillierungbeschädigtwerdenund die...

Страница 7: ...n Backofenbeleuchtung auszuwechseln falls mitgeliefert gehen Sie wie folgt vor 1 Trennen Sie den Ofen von der Stromversorgung 2 Falls mitgeliefert entfernen Sie die seitlichen Einhängegitter 3 Hebeln Sie die Lampenabdeckung mit Hilfe eines Schlitzschraubendrehers nach außen ab 4 Wechseln Sie die Glühlampe aus bezüglich des Typs siehe nachstehenden Hinweis 5 Setzen Sie die Lampenabdeckung wieder ei...

Страница 8: ...n nach Beendigung des Garvorgangs und Ausschalten des Backofens noch einige Zeit nachlaufen Wird die Backofentür während des Betriebs geöffnet so schalten sich die Heizelemente automatisch aus MITGELIEFERTES ZUBEHÖR A ROST 1 Zum Garen oder Grillen von Speisen oder zum Abstellen von Töpfen Kuchenformen und anderem Kochgeschirr im Ofen B BACKBLECH 1 Zum Backen von Bäckerei und Konditoreierzeugnissen...

Страница 9: ...RMOSTAT BEDIENKNOPF Temperaturwahl 3 BEDIENKNOPF KOCHZONE VORNE LINKS 0 1 10 4 BEDIENKNOPF KOCHZONE HINTEN LINKS 0 1 10 5 BEDIENKNOPF KOCHZONE HINTEN RECHTS 0 1 10 6 BEDIENKNOPF KOCHZONE VORNE RECHTS 0 1 10 ANMERKUNG Die Bedienknöpfe sind versenkbar Drücken Sie den Bedienknopf mittig ein um ihn aus der Versenkung zu holen 7 ELEKTRONISCHEN PROGRAMMIERERS 8 THERMOSTAT KONTROLLLEUCHTE Die Funktion Mu...

Страница 10: ...ird die Uhrzeit angezeigt und das Glockensymbol hört zu blinken auf um die erfolgte Einstellung anzuzeigen Um sich den Fortgang des Countdowns anzeigen zu lassen und diesen ggf zu modifizieren erneut die mittlere Taste drücken Einstellen der Gardauer Nach Auswahl der Betriebsart und der Gartemperatur mit den Bedienknöpfen die mittlere Taste drücken am Display erscheint 0 00 und das Glockensymbol b...

Страница 11: ...Backofen Zur Einstellung dieser Funktion drehen Sie den Bedienknopf auf TURBOSTUFE Mit dieser Funktion kann Wasser schneller zum Sieden gebracht werden Sie bleibt für eine vorgegebene Zeit eingeschaltet Nach Ablauf dieser Zeit schaltet die Kochzone automatisch zur höchsten Leistungsstufe zurück Die Funktion kann auch während eines Garvorgangs zugeschaltet werden Vorsicht Stellen Sie vor dem Einsch...

Страница 12: ... Gemüse und Rösten von Brot Es wird empfohlen das Gargut auf die 4 Ebene zu geben Zum Grillen von Fleisch Es wird empfohlen eine Fettpfanne zu verwenden um den Bratensaft aufzufangen Geben Sie die Fettpfanne mit etwa einem halben Liter Wasser auf die 3 Ebene Heizen Sie den Backofen 3 5 Min vor Während des Garvorgangs muss die Tür geschlossen bleiben GRILL HEISSLUFT Zum Garen großer Fleischstücke K...

Страница 13: ...uf Rost Plätzchen Tört chen Ja 2 160 175 20 45 Fettpfanne Kuchenblech Ja 2 4 160 170 20 45 Ebene 4 Rost Einschubebenen nach halber Garzeit vertauschen Ebene 2 Fettpfanne Kuchenblech Beignets Ja 2 175 200 30 40 Fettpfanne Kuchenblech Ja 2 4 170 190 35 45 Ebene 4 Form auf Rost Einschubebenen nach halber Garzeit vertauschen Ebene 2 Fettpfanne Kuchenblech Baiser Ja 2 100 110 150 Fettpfanne Kuchenblech...

Страница 14: ...ackene Pasta Cannelloni Auf läufe Ja 2 200 45 55 Form auf Rost Lamm Kalb Rind Schwein 1 kg Ja 2 200 80 110 Fettpfanne oder Form auf Rost Hähnchen Kaninchen Ente 1 kg Ja 2 200 50 100 Fettpfanne oder Form auf Rost Puter Gans 3 kg Ja 1 2 200 80 130 Fettpfanne oder Form auf Rost Fisch gebacken in Folie Filet ganz Ja 2 175 200 40 60 Fettpfanne oder Form auf Rost Gefülltes Gemü se Tomaten Zucchini Auber...

Страница 15: ...lech Gargut bei Bedarf nach zwei Dritteln der Garzeit wenden Gratiniertes Gemüse 2 200 20 30 Form auf Rost Lasagne Fleisch Ja 2 4 200 50 100 Ebene 4 Form auf Rost Einschubebenen bei Bedarf nach zwei Dritteln der Garzeit vertauschen Ebene 2 Fettpfanne oder Form auf Rost Fleisch Kartof feln Ja 2 4 200 45 100 Ebene 4 Form auf Rost Einschubebenen bei Bedarf nach zwei Dritteln der Garzeit vertauschen E...

Страница 16: ...en wieder zusammenfällt wählen Sie beim nächsten Mal eine niedrigere Temperatur etwas weniger Flüssigkeit und rühren Sie den Teig vorsichtiger Kuchen mit saftiger Füllung Käse oder Obstkuchen backen Sie am besten mit der UMLUFT Funktion Ist der Kuchenboden zu feucht verwenden Sie eine niedrigere Ebene und bestreuen Sie den Boden mit Semmelbröseln oder Kekskrümeln bevor Sie die Füllung hineingeben ...

Страница 17: ...hose responsible for their safety The accessible parts of the appliance may become very hot during use Young children should be kept away from the appliance and supervised to ensure that they do not play with it During and after use do not touch the heating elements or interior surfaces of the appliance risk of burns Do not allow the appliance to come into contact with cloths or other flammable ma...

Страница 18: ...horized service centre GENERAL RECOMMENDATIONS Before use Remove cardboard protection pieces protective film and adhesive labels from accessories Remove the accessories from the oven and heat it 200 C for about an hour to eliminate the smell of the protective grease and insulating materials During use Do not place heavy objects on the door as they could damage it Do not cling to the door or hang a...

Страница 19: ...witch the appliance off and then on again it to see if the problem has been eliminated If the fault persists after the above checks contact the nearest After sales Service Always specify a brief description of the fault the type and exact model of the oven the service number number after the word Service on the rating plate located on the right hand edge of the oven cavity visible when the oven do...

Страница 20: ...ies Soak the accessories in water with washing up detergent immediately after use handling them with oven gloves if still hot Food residues can be easily removed using a brush or sponge Cleaning the rear wall and catalytic side panels of the oven if present IMPORTANT do not use corrosive or abrasive detergents coarse brushes pot scourers or oven sprays which could damage the catalytic surface and ...

Страница 21: ...supply To replace the side lamp if present 1 Disconnect the oven from the power supply 2 Remove the side accessory holder grilles if present 3 Use a screwdriver to prise off the lamp cover 4 Replace the lamp see note for lamp type 5 Refit the lamp cover pushing it on firmly until it clicks into place 6 Refit the side accessory holder grilles 7 Reconnect the oven to the power supply N B Only use 25...

Страница 22: ...tched off the cooling fan may continue to run for a while When the oven door is opened during cooking the heating elements switch off ACCESSORIES SUPPLIED A WIRE SHELF 1 the wire shelf can be used to grill food or as a support for pans cake tins and other ovenproof cooking receptacles B BAKING TRAY 1 for cooking all bread and pastry products but also roasts fish en papillotte etc C DRIP TRAY 1 the...

Страница 23: ...FUNCTION SELECTOR KNOB On off and function selector knob 2 THERMOSTAT KNOB selecting the temperature 3 CONTROL KNOB FOR FRONT LEFT HOTPLATE 0 1 10 4 CONTROL KNOB FOR REAR LEFT HOTPLATE 0 1 10 5 CONTROL KNOB FOR REAR RIGHT HOTPLATE 0 1 10 6 CONTROL KNOB FOR FRONT RIGHT HOTPLATE 0 1 10 N B the knobs are retractable Press the knobs in the middle and they pop up 7 ELECTRONIC PROGRAMMER 8 THERMOSTAT LE...

Страница 24: ... the middle button the display shows 0 00 and the bell symbol flashes Press the middle button again on the display and 0 00 appear in sequence and AUTO flashes Set cooking time using the buttons and the maximum programmable value is 10 hours After a few seconds the display shows the time of day and AUTO remains lit confirming the setting To view the remaining cooking time and change it if necessar...

Страница 25: ...ooking Caution before selecting this function make sure the pot is positioned on the selected hotplate in order to avoid any damage to the cooktop surface The stated performance values for this function are those guaranteed for all glass ceramic cooktops For this function place the pot on the selected hotplate and turn the knob to To deselect change the position of the knob MULTIZONE The multizone...

Страница 26: ...RILL To grill steak kebabs and sausages to cook vegetables au gratin and toast bread Place food on the 4th shelf When grilling meat use the drip tray to collect the cooking juices Position it on the 3rd shelf adding approx half a litre of water Preheat the oven for 3 5 min During cooking the oven door must remain closed TURBO GRILL To roast large joints of meat legs roast beef chickens Position th...

Страница 27: ...2 175 200 30 40 Drip tray baking tray Yes 2 4 170 190 35 45 Shelf 4 oven tray on wire shelf switch levels halfway through cooking Shelf 2 drip tray baking tray Meringues Yes 2 100 110 150 Drip tray baking tray Yes 2 4 100 130 150 Shelf 4 oven tray on wire shelf switch levels halfway through cooking Shelf 2 drip tray baking tray Bread Pizza Focaccia Yes 2 225 250 12 50 Drip tray baking tray Yes 2 4...

Страница 28: ...Yes 4 200 3 5 grill Fish fillets steaks Yes 4 200 20 30 Shelf 4 wire shelf turn food halfway through cooking Shelf 3 drip tray with water Sausages Kebabs Spare ribs Hamburgers Yes 4 200 30 40 Shelf 4 wire shelf turn food halfway through cooking Shelf 3 drip tray with water Roast chicken 1 1 3 Kg 2 200 55 70 Shelf 2 wire shelf turn food two thirds of the way through cooking if necessary Shelf 1 dri...

Страница 29: ... shelf Meat Potatoes Yes 2 4 200 45 100 Shelf 4 oven tray on wire shelf switch levels two thirds of the way through cooking if necessary Shelf 2 drip tray or oven tray on wire shelf Fish Vegetables Yes 2 4 175 30 50 Shelf 4 oven tray on wire shelf Shelf 2 drip tray or oven tray on wire shelf Recipe Function Preheating Shelf from bottom Temper ature C Time min Accessories ...

Страница 30: ...s during cooking set a lower temperature the next time perhaps reducing the amount of liquid in the mixture and mixing more gently For sweets with moist fillings cheesecake or fruit pies use the CONVECTION BAKE function If the base of the cake is soggy lower the shelf and sprinkle the bottom of the cake with breadcrumbs or biscuit crumbs before adding the filling Meat Use any kind of oven tray or ...

Страница 31: ...nnes y compris les enfants qui en raison de leurs capacités physiques sensorielles ou mentales de leur inexpérience ou de leur méconnaissance ne sont pas en mesure d utiliser l appareil en toute sécurité doivent se servir de l appareil uniquement sous la surveillance ou en se conformant aux instructions d une personne responsable Les parties accessibles du four peuvent atteindre une température él...

Страница 32: ... copeaux et la sciure de bois On ne doit plus pouvoir accéder à la partie inférieure du four une fois l installation terminée Afin de garantir le bon fonctionnement de l appareil veillez à ne pas obstruer l ouverture minimale prévue entre le plan de travail et la partie supérieure du four BRANCHEMENT DE L APPAREIL Vérifiez que la tension figurant sur la plaque signalétique de l appareil correspond...

Страница 33: ...est conforme au règlement n 1935 2004 Il a été conçu fabriqué et commercialisé conformément aux exigences de sécurité de la directive Basse Tension 2006 95 CE qui remplace la directive 73 23 CEE et modifications suivantes et aux exigences de protection de la directive CEM 2004 108 CE Le four ne fonctionne pas Vérifiez qu il n y a pas de coupure de courant et que le four est correctement branché Ét...

Страница 34: ...sur le joint Dès que le four est froid essuyez à l aide d un chiffon ou d une éponge Accessoires Faites tremper les accessoires dans du détergent à vaisselle immédiatement après leur utilisation S ils sont encore chauds munissez vous de gants pour les manipuler Utilisez une brosse ou une éponge pour détacher facilement les résidus d aliments Nettoyage de la paroi arrière et des panneaux catalytiqu...

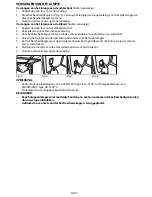
Страница 35: ...e du four DÉPLACEMENT DE LA RÉSISTANCE SUPÉRIEURE UNIQUEMENT SUR CERTAINS MODÈLES 1 Retirez les grilles porte accessoires latérales 2 Faites sortir légèrement la résistance Fig 3 avant de l abaisser Fig 4 3 Pour remettre la résistance en place soulevez la en la tirant légèrement vers vous Vérifiez qu elle repose sur les sièges latéraux prévus à cet effet Fig 1 Fig 2 Fig 3 Fig 4 ...

Страница 36: ... l ampoule brûlée par une ampoule neuve voir Remarque pour connaître le type 5 Remontez le couvercle de l ampoule en l appuyant contre la paroi du four jusqu à ce qu il soit accroché correctement 6 Remontez les grilles porte accessoires latérales 7 Rebranchez le four REMARQUE Utilisez uniquement des ampoules à incandescence de 25 40W 230V type E 14 T300 C ou des ampoules halogènes de 20 40W 230 V ...

Страница 37: ...idissement peut continuer de fonctionner pendant un certain temps À l ouverture de la porte durant la cuisson les éléments chauffants se désactivent ACCESSOIRES FOURNIS A GRILLE 1 à utiliser pour la cuisson d aliments ou comme support pour casseroles moules à gâteau ou tout autre récipient adapté pour la cuisson au four B PLAQUE À PÂTISSERIE 1 pour cuire les produits de boulangerie pâtisserie mais...

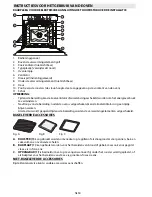
Страница 38: ...DE THERMOSTAT sélection de la température 3 BOUTON DE COMMANDE DE LA ZONE DE CUISSON AVANT GAUCHE 0 1 10 4 BOUTON DE COMMANDE DE LA ZONE DE CUISSON ARRIÈRE GAUCHE 0 1 10 5 BOUTON DE COMMANDE DE LA ZONE DE CUISSON ARRIÈRE DROITE 0 1 10 6 BOUTON DE COMMANDE DE LA ZONE DE CUISSON AVANT DROITE 0 1 10 REMARQUE les boutons sont escamotables Appuyez sur le centre de ces boutons pour les extraire de leur ...

Страница 39: ...onné le mode de cuisson et la température avec les boutons appuyez sur la touche du milieu l afficheur indique 0 00 et la clochette clignote Appuyez à nouveau sur la touche du milieu l afficheur indique en alternance et 0 00 AUTO clignote Réglez le temps de cuisson avec les touches et la plus grande valeur disponible est 10 heures Au bout de quelques secondes l afficheur indique l heure courante A...

Страница 40: ... cuisiner ATTENTION Veillez à placer l ustensile de cuisson sur la zone de cuisson avant d activer la fonction Ébullition rapide À défaut vous risqueriez d endommager la surface vitrocéramique Les performances spécifiées pour la fonction Ébullition rapide sont garanties pour tous les types de tables de cuisson vitrocéramiques Pour activer la fonction placez la cocotte sur la zone de cuisson désiré...

Страница 41: ...Pour cuire les entrecôtes les brochettes les saucisses faire gratiner des légumes ou dorer du pain Nous suggérons de positionner le plat sur le 4e gradin Pour faire griller de la viande il est conseillé d utiliser une lèchefrite pour recueillir le jus de cuisson La placer sur le 1er gradin en ajoutant environ un demi litre d eau Préchauffez le four 3 5 minutes La porte du four doit rester fermée p...

Страница 42: ...0 170 20 45 Gradin 4 grille inverser les gradins à mi cuisson Gradin 2 lèchefrite plaque à pâtisserie Choux ronds Oui 2 175 200 30 40 Lèchefrite plaque à pâtisserie Oui 2 4 170 190 35 45 Gradin 4 plaque sur grille inverser les gradins à mi cuisson Gradin 2 lèchefrite plaque à pâtisserie Meringues Oui 2 100 110 150 Lèchefrite plaque à pâtisserie Oui 2 4 100 130 150 Gradin 4 plaque sur grille interv...

Страница 43: ...n au four en papillote filet entier Oui 2 175 200 40 60 Lèchefrite ou plaque sur grille Légumes farcis tomates courgettes aubergines Oui 2 175 200 50 60 Plaque sur grille Croque monsieur Oui 4 200 3 5 grille Filets darnes de poisson Oui 4 200 20 30 Gradin 4 grille tourner l aliment à mi cuisson Gradin 3 lèchefrite avec eau Saucisses Brochettes Pointes de porc Hamburgers Oui 4 200 30 40 Gradin 4 gr...

Страница 44: ...r les gradins aux 2 3 de la cuisson si nécessaire Gradin 2 lèchefrite ou plaque sur grille Viande et pommes de terre Oui 2 4 200 45 100 Gradin 4 Plaque sur grille inverser les gradins aux 2 3 de la cuisson si nécessaire Gradin 2 lèchefrite ou plaque sur grille Poisson et légumes Oui 2 4 175 30 50 Gradin 4 plaque sur grille Gradin 2 lèchefrite ou plaque sur grille Recette Fonction Pré chauffage Gra...

Страница 45: ...tilisez la fois suivante une température inférieure vous pouvez également réduire la quantité de liquide et mélanger la pâte plus délicatement La pâtisserie avec une farce juteuse gâteaux au fromage ou avec des fruits requiert la fonction CONVECTION FORCÉE Si le fond de la tarte est trop humide placez le sur un gradin inférieur et saupoudrez la base avec de la chapelure ou des biscuits émiettés av...

Страница 46: ...is van oneigenlijk gebruik of een foute instelling van de bedieningsknoppen Het gebruik van het apparaat is niet toegestaan aan personen waaronder kinderen met beperkte lichamelijke zintuiglijke of verstandelijke vermogens of met weinig ervaring of kennis van het apparaat tenzij ze instructies met betrekking tot het gebruik van het apparaat hebben gehad van personen die verantwoordelijk zijn voor ...

Страница 47: ...st de oven moeten tegen hitte bestand zijn min 90 C Voer eerst alle zaagwerkzaamheden uit voordat u de oven plaatst en verwijder nauwgezet alle spaanders en zaagresten Het onderste gedeelte van de oven mag niet meer toegankelijk zijn na de installatie Voor een correcte functionering van het product mag de minimale opening tussen het werkblad en de bovenkant van de oven niet geblokkeerd worden AANS...

Страница 48: ...omen met voedingsmiddelen en is in overeenstemming met de Europese richtlijn n 1935 2004 en is ontworpen vervaardigd en op de markt gebracht in overeenstemming met de veiligheidsvoorschriften van de Laagspanningsrichtlijn 2006 95 EG die 73 23 EEG en daaropvolgende amendementen vervangt de beschermingsvoorschriften van de EMC richtlijn 2004 108 EG Oven verwarmt niet Controleer of het elektriciteits...

Страница 49: ...er bevatten bijv pizza groenten etc kan er condens worden gevormd op de deur en op de afdichting Neem de condens af met een doek of een spons als de oven afgekoeld is Accessoires Laat de accessoires na gebruik weken in water met afwasmiddel Pak ze vast met handschoenen als ze nog heet zijn Voedselresten kunnen met een afwasborstel of met een sponsje worden verwijderd Reiniging van de achterwand en...

Страница 50: ...RWARMINGSELEMENT ALLEEN BIJ BEPAALDE MODELLEN 1 Verwijder de roosters van de accessoiresteunen van de zijkant 2 Trek voorzichtig Fig 3 het verwarmingselement naar buiten en breng het naar beneden Fig 4 3 Om het verwarmingselement terug te plaatsen tilt u het op trekt u het voorzichtig naar u toe en legt u het op de daarvoor bestemde zittingen aan de zijkant Fig 1 Fig 2 Fig 3 Fig 4 ...

Страница 51: ...naar buiten en verwijder het 4 Vervang het lampje zie de opmerking hieronder voor het type lampje 5 Zet het beschermkapje weer op zijn plaats en duw het tegen de wand om het op de juiste manier vast te laten haken 6 Monteer de roosters van de accessoiresteunen weer op de zijkant 7 Sluit de oven weer aan op de netvoeding OPMERKING Gebruik alleen gloeilampen van 25 40W 230V type E 14 T300 C of halog...

Страница 52: ...ng nadat de oven is uitgeschakeld kan de koelventilator nog een tijdje blijven werken Als de deur wordt geopend tijdens de bereiding worden de verwarmingselementen uitgeschakeld BIJGELEVERDE ACCESSOIRES A ROOSTER 1 kan gebruikt worden om voedsel op te grillen of als draagrooster voor pannen bak en cakevormen en ovenvaste schalen B BAKPLAAT 1 kan gebruikt worden voor het bereiden van brood of gebak...

Страница 53: ...NINGSPANEEL 1 FUNCTIEKNOP in uitschakelen en selecteren van functies 2 THERMOSTAATKNOP instellen van de temperatuur 3 BEDIENINGSKNOP KOOKZONE LINKSVOOR 0 1 10 4 BEDIENINGSKNOP KOOKZONE LINKSACHTER 0 1 10 5 BEDIENINGSKNOP KOOKZONE RECHTSACHTER 0 1 10 6 BEDIENINGSKNOP KOOKZONE RECHTSVOOR 0 1 10 OPMERKING de knoppen zijn verzonken Druk op het midden van de knop om ze uit hun zitting te laten komen 7 ...

Страница 54: ... wordt het tijdstip van de dag weergegeven en de bel brandt om te bevestigen dat de instelling heeft plaatsgevonden Om de status van het aftellen weer te geven en eventueel te veranderen nogmaals op de middelste toets drukken Instelling van de bereidingsduur Nadat de bereidingswijze en de temperatuur met de knoppen zijn geselecteerd op de middelste toets drukken op het display wordt 0 00 weergegev...

Страница 55: ...ot het einde van de bereidingstijd Om de functie in te schakelen draait u de knop op SNELKOKEN Deze functie zorgt ervoor dat water snel aan de kook wordt gebracht de functie blijft een vaste tijd ingeschakeld Als de tijd om is schakelt de kookzone automatisch terug naar de maximale stroomstand De snelkookfunctie kan ook geactiveerd worden nadat u al op de betreffende kookzone met koken bent begonn...

Страница 56: ... het gratineren van groente en om brood te roosteren Zet het gerecht op de vierde steunhoogte Voor het grillen van vlees wordt geadviseerd de opvangbak te gebruiken om het braadvet op te vangen Plaats de opvangbak op de derde steunhoogte en giet er ongeveer een halve liter water in Verwarm de oven 3 5 minuten voor Tijdens de bereiding moet de ovendeur dicht blijven TURBO GRILL Voor het grillen van...

Страница 57: ...tvorm op rooster verwisseldegerechten halverwege de bereidingstijd Steunhoogte 2 taartvorm op rooster Koekjes taartjes Ja 2 160 175 20 45 Opvangbak bakplaat Ja 2 4 160 170 20 45 Steunhoogte 4 rooster verwisseldegerechten halverwege de bereidingstijd Steunhoogte 2 opvangbak bakplaat Soesjes Ja 2 175 200 30 40 Opvangbak bakplaat Ja 2 4 170 190 35 45 Steunhoogte 4 ovenschaal op rooster verwisseldeger...

Страница 58: ... de bereidingstijd Steunhoogte 2 taartvorm op rooster Pasteitjes bladerdeeghapjes Ja 2 175 200 20 30 Opvangbak bakplaat Ja 2 4 175 200 20 40 Steunhoogte 4 ovenschaal op rooster verwisseldegerechten halverwege de bereidingstijd Steunhoogte 2 opvangbak bakplaat Lasagne pasta uit de oven cannelloni ovenschotels Ja 2 200 45 55 Ovenschaal op rooster Lamsvlees kalfsvlees rundvlees varkensvlees 1 kg Ja 2...

Страница 59: ...ijd om Steunhoogte 1 opvangbak met water Rosbief rosé 1 kg 2 200 35 45 Ovenschaal op rooster draai het voedsel indien nodig na tweederde van de bereidingstijd om Lamsbout schenkel 2 200 60 90 Opvangbak of ovenschaal op rooster draai het voedsel indien nodig na tweederde van de bereidingstijd om Gebakken aardappelen 2 200 45 55 Opvangbak bakplaat draai het voedsel indien nodig na tweederde van de b...

Страница 60: ...ndien nodig na tweederde van de bereidingstijd om Steunhoogte 2 opvangbak of ovenschaal op rooster Vis en groente Ja 2 4 175 30 50 Steunhoogte 4 ovenschaal op rooster Steunhoogte 2 opvangbak of ovenschaal op rooster Recept Functie Voorver warmen Steunhoogte van onder Temperatuur C Tijd min Accessoires ...

Страница 61: ...dan de volgende keer een lagere temperatuur verminder bijvoorbeeld de hoeveelheid vocht of meng het beslag voorzichtiger Bij taarten met een vochtige vulling kaastaarten of vruchtentaarten moet de functie TURBO HETE LUCHT worden gebruikt Als de bodem van de taart te vochtig blijft zet de taart dan op een lager niveau en bestrooi de bodem met paneermeel of verkruimelde koekjes voordat u de vulling ...

Страница 62: ...NL60 ...

Страница 63: ......

Страница 64: ...FR NL DE GB Printed in Italy 09 2011 5019 610 01260 ...

Отзывы: