background image

22

CARING FOR YOUR MICROWAVE OVEN

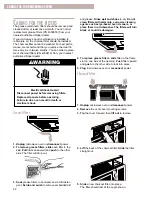
and grease. Rinse well and shake to dry. Do not
clean filters with ammonia, corrosive cleaning
agents such as lye-based oven cleaners, or
place them in a dishwasher. The filters will turn
black or could be damaged.

4. To replace grease filters, slide filter in the frame

slot on one side of the opening. Push filter upward
and push to the other side to lock into place.

5. Plug in microwave oven or 

reconnect

power.

Charcoal filter:

1.

Unplug

microwave oven or 

disconnect 

power. 

2. Remove the vent cover mounting screws.

3. Tip the cover forward, then lift out to remove.

4. Lift the back of the charcoal filter. Slide the filter

straight out.

5. Slide a new charcoal filter into place. 

The filter should rest at the angle shown.

Grease filters:

1.

Unplug

microwave oven or 

disconnect 

power. 

2. To remove grease filters, slide each filter to the

side. Pull filters downward and push to the other
side. The filter will drop out.

3. Soak grease filters in hot water and a mild deter-

gent. Scrub and swish to remove embedded dirt

C

ARING FOR THE FILTERS

The grease (aluminum) filters should be removed and
cleaned often, at least once a month. You can order
replacement grease filters (PN 4358853) from your
nearest authorized Roper dealer.

If your microwave hood combination is installed to
recirculate air, the charcoal filter should be installed.
The charcoal filter cannot be washed. For best perfor-
mance, we recommend that you replace charcoal fil-
ters every six to twelve months. You can order replace-
ment charcoal filters (PN 4359416) from your nearest
authorized Roper dealer.

w

WARNING

Electrical Shock Hazard

Disconnect power before removing filters.

Replace all panels before operating.
Failure to do so can result in death or 
electrical shock.

Содержание MHE13XK

Страница 1: ...ck 12 Using the minute timer 12 Using Your Microwave Oven 12 Cooking at different cook powers 13 Cooking with more than one cook cycle 14 Using COOK 14 Using DEFROST 14 Defrost chart 16 Defrosting tips 17 Using REHEAT 18 Using BEVERAGE 18 Using BAKED POTATO 18 Using POPCORN 19 Using ADD 1 MINUTE 19 Adding or subtracting cook time 19 Cooking Guide 20 Caring for Your Microwave Oven 21 Caring for the...

Страница 2: ...ial number label plate see Microwave oven features in the Getting to Know Your Microwave Oven section Also record the other information shown in the next column Keepthisbookandthesalessliptogetherinasafeplaceforfuturereference Itisimportantforyou tosaveyoursalesreceiptshowingthedateofpurchase Proofofpurchasewillassureyouof in warrantyservice Model Number __________________________________ Serial N...

Страница 3: ...ealed containers for example closed glass jars may explode and should not be heated in the microwave oven Use the microwave oven only for its intended use as described in this manual Do not use corrosive chemicals or vapors in the microwave oven This type of oven is specifically designed to heat cook or dry food It is not designed for industrial or laboratory use As with any appliance close superv...

Страница 4: ...t cover or block any openings on the microwave oven Do not store this microwave oven outdoors Do not use the microwave oven near water for example near a kitchen sink in a wet basement or near a swimming pool and the like Do not immerse cord or plug in water Keep cord away from heated surfaces Do not let cord hang over edge of table or counter Do not mount over a sink Do not cover racks or any oth...

Страница 5: ... for the electric current The microwave oven is equipped with a cord having a grounding wire with a grounding plug The plug must be plugged into an outlet that is properly installed and grounded WARNING Improper use of the grounding plug can result in a risk of electric shock Consult a qualified electrician or serviceman if the grounding instructions are not completely under stood or if doubt exis...

Страница 6: ...sorbed by the food GETTING TO KNOW YOUR MICROWAVE OVEN This section discusses the concepts behind microwave cooking It also shows you the basics you need to know to operate your microwave oven Please read this information before you use your oven RADIO INTERFERENCE Using your microwave oven may cause interference to your radio TV or similar equipment When there is interference you can reduce it or...

Страница 7: ...to swing on it when the door is open Use hot pads Microwave energy does not heat containers but the heat from the food can make the container hot Do not use newspaper or other printed paper in the oven Do not dry flowers fruit herbs wood paper gourds or clothes in the oven Do not start a microwave oven when it is empty Product life may be shortened If you practice programming the oven put a contai...

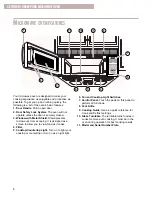
Страница 8: ...etal Shield Shield prevents microwaves from escaping It is designed as a screen to allow you to view food as it cooks 4 Filter 5 Cooktop Countertop Light Turn on to light your cooktop or countertop or turn on as a night light 6 Fan and Cooktop Light Switches 7 Control Panel Touch the pads on this panel to perform all functions 8 Vent Grille 9 Cooking Guide Use as a quick reference for Cook and Def...

Страница 9: ... bag of popcorn in any of three sizes 6 BEVERAGE Touch this pad 1 to 2 times to reheat a beverage 7 BAKED POTATO Touch this pad 1 to 4 times to bake potatoes 8 COOK TIME Touch this pad followed by Number pads to set a cooking time 9 COOK POWER Touch this pad after the cook time has been set followed by a Number pad to set the amount of microwave energy released to cook the food The higher the numb...

Страница 10: ...nnot turn the fan off manually 2 Turn fan off when desired Press FAN until it turns off NOTES If you have entered all settings for a function but do not touch START ENTER within 5 seconds the START indicator light will flash If you open the door while the oven is on and then shut the door the START indicator light will flash Touch START ENTER to restart the oven If you choose a function but do not...

Страница 11: ...ood will be displayed At end of time the current time of day will show and no tones will sound TocanceltheTimedLightfunction NOTE Touching TIMER OFF shuts off both the light and timed function Touching LIGHT shuts off just the light Tosetfantorunforaspecifictime 1 Touch FAN once or twice 2 Touch TIMER SET Once display will show TIMER Twice display will show FAN then HR MN NOTES Be sure you have se...

Страница 12: ...re the display will show 88 88 For the first 30 seconds after the power is on you can set the clock time without touching CLOCK After 30 seconds has gone by you must follow the directions below to set the time If a time of day is not set 88 88 will show on the display until you touch CLOCK NOTES You can only set the clock if the oven is not cooking food If you enter an incorrect time and touch CLO...

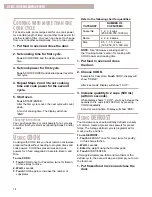
Страница 13: ...edium High Medium Medium Low Defrost Low COOK POWER 100 of full power 90 of full power 80 of full power 70 of full power 60 of full power 50 of full power 40 of full power 30 of full power 20 of full power 10 of full power WHEN TO USE IT Quick heating many convenience foods and foods with high water content such as soups beverages and vegetables Cooking small tender pieces of meat ground meat poul...

Страница 14: ...e for Casserole twice for Bacon or three times for Rice 2 Wait 4 seconds 3 Touch COOK again to increase the number of cups items 1 Put food in oven and close the door 2 Choose COOK Example for Casserole Touch COOK display will show CSRLE After 4 seconds Display will show 1 CUP 3 Increase quantity to 2 cups 500 mL within 3 seconds While display shows 1 CUP you may increase the quantity to 2 4 cups ...

Страница 15: ...ds the display will prompt you to enter weight 3 Enter food s weight in pounds and tenths of a pound Example for 1 2 lbs 54 kg Touch 1 2 NOTES For converting fractions of a pound to decimals see Weight conversion chart later in this section If you enter an incorrect weight touch DEFROST again and enter the correct weight NOTES Loosen or remove any packaging or covering on food See the Defrost char...

Страница 16: ... Hot Dogs Sausage Links Spareribs Loin Roast Boneless Sausage Bulk Fish Fillets Steaks Whole Shellfish Crabmeat Lobster Tails Shrimp Scallops SPECIAL INSTRUCTIONS Meat of irregular shape and large fatty cuts of meat should have the narrow or fatty areas shielded with foil at the beginning of a defrost cycle Do not defrost less than 1 4 lb 113 g Do not defrost less than two 4 oz 113 g patties Place...

Страница 17: ...ow solidly the food is frozen The shape of the package affects how quickly food will defrost Shallow packages will defrost more quickly than a deep block As food begins to defrost separate the pieces Separated pieces defrost more easily Use small pieces of aluminum foil to shield parts of food such as chicken wings leg tips fish tails or areas that start to get warm Make sure the foil does not tou...

Страница 18: ...4 times for 1 4 potatoes After 3 seconds The display will show remaining time At end of cooking time The display will show END USING REHEAT You can reheat food by choosing a category and quantity REHEAT has preset times and cook powers for five categories Pizza Plate Soup Sauce Casserole and Baked Goods 1 Put food in oven and close the door 2 Touch REHEAT Once for Pizza twice for Plate three times...

Страница 19: ... after choosing POPCORN see Adding or subtracting cook time at the end of the Using Your Microwave Oven section USING ADD1 MINUTE ADD 1 MINUTE lets you cook food for 1 minute at 100 cook power or add an extra minute to your cook time cycle You can also use it to extend cook time cycles in multiples of 1 minute up to 99 minutes NOTES To extend cook time cycles in multiples of 1 minute touch ADD 1 M...

Страница 20: ...n or membrane Steam can build up under the membrane during cooking causing the food to burst To relieve the pressure and to prevent bursting pierce these foods before cooking with a fork cocktail pick or toothpick Usingstandingtime Always allow food to stand after cooking Stand ing time after defrosting and cooking allows the temperature to evenly spread throughout the food improving the cooking r...

Страница 21: ...age the control panel and the interior and exterior oven surfaces To clean turntable and turntable support wash in mild sudsy water for heavily soiled areas use a mild cleanser and scouring sponge The turntable and turntable support are dishwasher safe Always remove the lid to avoid damage to the oven Use only undamaged containers Do not use containers taller than 3 4 in 1 9 cm Container must be a...

Страница 22: ...ave oven or disconnect power 2 To remove grease filters slide each filter to the side Pull filters downward and push to the other side The filter will drop out 3 Soak grease filters in hot water and a mild deter gent Scrub and swish to remove embedded dirt CARING FOR THE FILTERS The grease aluminum filters should be removed and cleaned often at least once a month You can order replacement grease f...

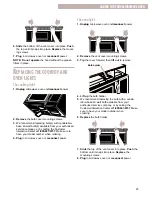
Страница 23: ...ps into place Replace the mounting screws 8 Plug in microwave oven or reconnect power Bulb holder 6 Slide the bottom of the vent cover into place Push the top until it snaps into place Replace the mount ing screws 7 Plug in microwave oven or reconnect power NOTE Do not operate the hood without the grease filters in place REPLACING THE COOKTOP AND OVEN LIGHTS Thecooktoplight 1 Unplug microwave oven...

Страница 24: ... additional time to allow it to finish cooking This frees the oven for other cooking Steam is normally produced during cooking The microwave oven has been designed to vent this steam out the vents Yes Pop packaged microwave popcorn following manufacturer s guidelines or use the preset POPCORN pad Do not use regular paper bags Use the listening test by stopping the oven as soon as the popping slows...

Страница 25: ... correct side up and is sitting securely on center shaft The support is not operating correctly Remove turntable check that the turntable support is properly in place and restart oven If turntable support does not move call an designated service technician for repair Cooking without the turntable can give you poor results The oven door is not closed completely You have set the controls as a kitche...

Страница 26: ...ts distributors Whirlpool designated service technicians are trained to fulfill the product warranty and provide after warranty service anywhere in the United States To locate the Whirlpool designated service company in your area you can also look in your telephone directory Yellow Pages REQUESTING ASSISTANCE OR SERVICE To avoid unnecessary service calls please check the Troubleshooting section It...

Страница 27: ...ckup and delivery Your microwave oven is designed to be repaired in the home D Damage to your microwave oven caused by accident alteration misuse abuse fire flood acts of God improper installation or use of products not approved by Whirlpool Corporation E Any labor costs during limited warranty F Repairs to parts or systems resulting from unauthorized modifications made to the appliance WHIRLPOOL ...

Отзывы: