background image

12

Adjusting Oven Temperature Control

NOTE: DO NOT measure the oven temperature with a 
thermometer. Opening the oven door will lower the oven 
temperature and give you an incorrect reading. Also, the 
thermometer temperature will change as your oven cycles.

Although your new oven is properly adjusted to provide accurate 
temperatures, it may cook faster or slower than your old oven.

If you are not satisfied with the baking/roasting results, you can 
change the offset temperature by following the steps below :

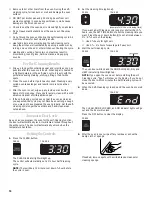
1. Press and hold BAKE for 4 seconds.

PRESS

YOU SEE

(factory setting of “0”)

The display will show 35

0

°F/177°C for 4 seconds. Then it will 

show the current offset temperature, for example “00”, if you 
have not already adjusted the temperature.

2. Set the new offset temperature.

PRESS

YOU SEE

(example when making oven 10°F/ 
5°C cooler)

Press 

  to raise the temperature or 

 to lower the 

temperature in 10°F/5°C amounts. You can set the 
temperature change as low as -30°F/-15°C or as high as 
+30°F/+15°C. A minus (-) sign will appear before the number 
when decreasing the temperature setting. The minus sign 
indicates that the oven will be cooler by the displayed 
amount. There is no sign in front of the number when 
increasing the temperature setting.

3. Enter the adjustment.

PRESS

YOU SEE

time of day or minute timer 
countdown

NOTE: The offset temperature resets to "00" if the power 
goes out for more than 1 second.

How to determine the amount of 

temperature adjustment 

needed:
The chart below tells you how much to adjust the offset 
temperature to get the cooking results you want. You can figure 
out cooking results by the amount of browning, moistness, and 
rising times for baked foods.

Broiling

The top element (as set by the Broil function) operates at full 
power when heating.

Use this setting for normal broiling and top browning with the 
door open in the Broil Stop position.

This setting can also be used for Vari-Broil with the door 
closed. The element will cycle off and on to maintain the 
preset temperature.

NOTES :

Do not preheat when broiling.

Leave the door partly open when you use the oven to broil. 
This lets the oven stay at the proper temperatures.

1. Place the oven rack for broiling.

Place the oven rack so that the surface of the food is at least 
3 in. (7.5 cm) away from the broil element. 

To Cook Food...

Adjust by this Number of 

Degrees °F/°C

a little more

+10/+5

moderately more

+20/+10

much more

+30/+15

a little less

-10/-5

moderately less

-20/-10

much less

-30/-15

Front of rack

Rear of rack

Содержание IJP85801

Страница 1: ...ELECTRICRANGES Use CareGuide CUISINIÈRES ÉLECTRIQUES Guided utilisation etd entretien Table of Contents Table des matières 2 9754170 ...

Страница 2: ...ction 28 Témoins lumineux 28 Utilisation de la commande de verrouillage 28 Réglage de l horloge 29 Utilisation de la minuterie 29 AVANT L UTILISATION 29 Utilisation de papier d aluminium 29 Circulation de l air 30 Positions des grilles 30 Grille accessoire 30 Évent du four 31 Évent de la porte du four 31 Lumière de four automatique 31 Support de rangement de la lèchefrite et sa grille 31 Ustensile...

Страница 3: ...r plate located behind the storage drawer panel in view when the storage drawer is open Also please record the date the product was purchased installed and the Builder or Store s name address and phone number Keep this book and the sales slip together in a safe place for future reference NOTE You must provide proof of purchase or installation date for in warranty service Model Number _____________...

Страница 4: ...essages in this manual and on your appliance Always read and obey all safety messages This is the safety alert symbol This symbol alerts you to potential hazards that can kill or hurt you and others All safety messages will follow the safety alert symbol and either the word DANGER or WARNING These words mean Tip Over Hazard A child or adult can tip the range and be killed Connect anti tip bracket ...

Страница 5: ...re the cooktop and surfaces facing the cooktop IMPORTANT SAFETY INSTRUCTIONS Use Proper Pan Size The range is equipped with one or more surface units of different size Select utensils having flat bottoms large enough to cover the surface unit heating element The use of under sized utensils will expose a portion of the heating element to direct contact and may result in ignition of clothing Proper ...

Страница 6: ...f the appliance may become hot enough to cause burns among these surfaces are oven vent openings and surfaces near these openings oven doors and windows of oven doors IMPORTANT SAFETY INSTRUCTIONS SAVE THESE INSTRUCTIONS For self cleaning ranges Do Not Clean Door Gasket The door gasket is essential for a good seal Care should be taken not to rub damage or move the gasket Do Not Use Oven Cleaners N...

Страница 7: ...unction The OFF button will cancel any function except the clock minute timer and control lock IndicatorLights An indicator light to the left of the display lights up when you are using an oven function when the oven door is locked and when the oven is on UsingtheControlLock The control lock lets you disable the control panel command buttons The control lock comes in handy when you want to prevent...

Страница 8: ...PRESS YOU SEE example for 10 minutes 3 Start the minute timer PRESS OR YOU SEE display counts down W hen time is up YOU SEE You will hear four 1 second tones NOTE To see the countdown time when the minute timer is not on the display press the TIMER button 4 Turn off the minute timer PRESS TWICE YOU SEE 5 To CANCEL the minute timer PRESS TWICE YOU SEE BEFORE USING UsingAluminumFoil Do not line oven...

Страница 9: ...th hot heating elements Be sure to position the oven rack s before putting food into the oven or turning the oven on To remove oven racks Lift rack at front and pull out To replace oven racks 1 Place rear of rack on rack guides 2 While lifting front of rack push in all the way Lower front For proper cooking follow these guidelines When using one rack place the rack so the top of the food will be c...

Страница 10: ...mance AutomaticOvenLight onsomemodels The oven light will turn on automatically once the oven door is opened and will remain on while the door is open Since it functions separately from the electronic range control the oven does not need to be on for the light to come on The oven light may also be turned on using the manual switch located on the control console BroilPanStorageRack onsomemodels A h...

Страница 11: ...ally sets preheating time based on the oven temperature you select For 245 F 118 C and less the preheating time is 4 minutes For 250 F 445 F 121 C 229 C the preheating time is 10 minutes For 450 F 232 C and above the preheating time is 15 minutes When preheating is complete you hear a 1 second tone the preheat indicator light turns off and the set temperature is displayed NOTES You can change the ...

Страница 12: ...splayed amount There is no sign in front of the number when increasing the temperature setting 3 Enter the adjustment PRESS YOU SEE time of day or minute timer countdown NOTE The offset temperature resets to 00 if the power goes out for more than 1 second How to determine the amount of temperature adjustment needed The chart below tells you how much to adjust the offset temperature to get the cook...

Страница 13: ...are designed to drain excess liquid and fat away from the cooking surface to help prevent spatter and smoke 3 To make sure juices drain well do not cover the grid with foil 4 Turn food only once during broiling Using tongs to turn meats prevents loss of juices Use MINUTE TIMER for timing each side 5 The surface of the food should be at least 3 in 7 4 cm away from the broil element 6 For steaks and...

Страница 14: ...ic elements on some models WarmingZoneElement onsomemodels Use the warming zone element to keep cooked foods warm It is not recommended for heating cold foods The warming zone is located in the center of your cooktop Set the switch to ON for use Cover all foods with a lid or aluminum foil Do not use plastic wrap to cover food because it may melt onto the cooktop surface When warming baked goods al...

Страница 15: ...opLight onsomemodels The cooktop light is in the top of the control console The switch is on the control console Push the switch to turn the light on The light may take a few seconds to light up ApplianceOutlets onsomemodels The 120v appliance outlets located on the control console may be used to run portable appliances placed on counter tops beside the range The outlets operate independently and ...

Страница 16: ... even heating Can be coated with porcelain enamel PoweronLights The Power On lights beside the control knobs indicate which surface elements are turned on by the knobs A Power On light will glow when its corresponding surface element is turned on ControlSettingGuide Until you get used to the settings use the following chart as a guide For best results start cooking at the high settings then turn t...

Страница 17: ...l ventilated room HowtheSelf CleaningCycleWorks The self cleaning cycle uses very high heat to burn away soil and grease During the cycle the oven gets much hotter than it does for normal baking or broiling approximately 875ºF 468ºC This high heat breaks up the soil or grease and burns it away Your oven is preset for a 3 hour self cleaning cycle However the cycle time can be adjusted to the amount...

Страница 18: ...e been set long enough or you may not have prepared the oven properly Set the self cleaning cycle longer the next time and hand clean areas noted above AutomaticDoorLock As soon as you program the oven for the self cleaning function the door will automatically lock It will remain locked throughout the entire cycle The door will automatically unlock when the temperature has fallen SettingtheControl...

Страница 19: ...urned off and cool before removing coil elements and drip bowls 2 Lift the edge of the element opposite the receptacle just enough to clear the drip bowl 3 Pull the element straight away from the receptacle 4 Lift out the drip bowl Replacing a coil element 1 Make sure all coil elements are turned off before replacing elements and drip bowls 2 Line up openings in the drip bowl with the coil element...

Страница 20: ...vy or hard objects on the cooktop can crack it Be careful with heavy skillets Do not store jars or cans above the cooktop Lift pots and pans onto and off the cooktop Sliding metal pans on the glass ceramic cooktop surface may leave marks Remove metal marks from copper or aluminum pans with Cooktop Polishing Creme before heating the cooktop again If heated before cleaning metal marks may not come o...

Страница 21: ...ler guides on both sides of the opening 2 Lift the drawer front and press in until the metal stops on the drawer slide rails clear the white stops on the drawer guides 3 Lift the drawer front again to clear the second stop and slide the drawer closed CleaningChart EXTERIOR SURFACES other than control console glass and ceramic cooktop Food spills containing acids such as vinegar and tomato should b...

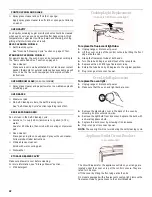
Страница 22: ...ow product label instructions Mildly abrasive cleanser Scrub with wet scouring pad Dishwasher STORAGE DRAW ER CAVITY Make sure drawer is cool before cleaning For more information see Storage Drawer section Mild detergent CooktopLightReplacement onmodelswithfluorescentlight To replace the fluorescent light tube 1 Unplug range or disconnect power 2 Lift the cover on top of the control console by lif...

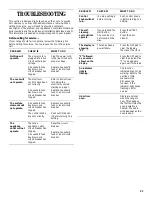
Страница 23: ...erate A household fuse has blown or a circuit breaker has tripped The control knobs are set correctly Replace household fuse or reset circuit breaker Push control knobs in before turning to a setting The appliance outlet will not operate The range appliance outlet circuit breaker has tripped A household fuse has blown or a circuit breaker has tripped Reset the circuit breaker Replace household fus...

Страница 24: ...uméros se trouvent sur la plaque signalétique située derrière le panneau du tiroir de rangement visible lorsque le tiroir est ouvert Veuillez aussi inscrire la date d achat installation de votre appareil ménager et les nom adresse et numéro de téléphone du constructeur ou du magasin Conserver ce manuel et la facture d achat ensemble dans un lieu sûr pour référence ultérieure REMARQUE Vous devez fo...

Страница 25: ...de sécurité suivront le symbole d alerte de sécurité et le mot DANGER ou AVERTISSEMENT Ces mots signifient DANGER AVERTISSEMENT Assurez vous de toujours lire tous les messages de sécurité et de vous y conformer à vous et à d autres Voici le symbole d alerte de sécurité vous ne suivez pas immédiatement les instructions blessure et ce Risque de basculement Un enfant ou une personne adulte peut faire...

Страница 26: ... tissu épais IMPORTANTES INSTRUCTIONS DE SÉCURITÉ NE PAS TOUCHER LES ÉLÉMENTS DE SURFACE OU L ESPACE PRÈS DES ÉLÉMENTS Les éléments de surface peuvent être chauds même lorsqu ils ont une teinte foncée Les endroits près des éléments de surface peuvent devenir assez chauds pour causer des brûlures Pendant et après l utilisation ne pas toucher les éléments chauffants et ne pas laisser les vêtements o...

Страница 27: ...CES INTÉRIEURES DU FOUR Les éléments chauffants peuvent être chauds même s ils ont une teinte foncée Les surfaces intérieures d un four deviennent assez chaudes pour causer des brûlures Pendant et après l utilisation ne pas IMPORTANTES INSTRUCTIONS DE SÉCURITÉ toucher ou laisser des vêtements ou autres matériaux inflammables venir en contact avec les éléments chauds ou les surfaces intérieures cha...

Страница 28: ...ARRÊT annulera toute fonction sauf l horloge la minuterie ou le verrouillage Témoinslumineux Un témoin lumineux à gauche de l afficheur s allume lorsqu une fonction du four est utilisée lorsque la porte du four est verrouillée et lorsque le four est allumé Utilisationdelacommandedeverrouillage La commande de verrouillage permet de désactiver les boutons du panneau de commande Elle est pratique pou...

Страница 29: ...nuterie en marche APPUYER SUR OU AFFICHAGE compte à rebours de l afficheur Lorsque la durée est terminée AFFICHAGE Vous entendrez quatre signaux sonores de 1 seconde REMARQUE Pour voir le compte à rebours lorsqu il n est pas affiché appuyer sur le bouton MINUTERIE 4 Désactiver la minuterie APPUYER DEUX FOIS SUR AFFICHAGE 5 Pour ANNULER la minuterie APPUYER DEUX FOIS SUR AFFICHAGE AVANT L UTILISATI...

Страница 30: ...c les éléments chauffants Veiller à placer les grilles dans le four avant de mettre les aliments au four ou d allumer le four Pour sortir une grille du four Soulever la grille à l avant et la tirer vers vous Pour remettre une grille dans le four 1 Placer l arrière de la grille sur les supports de la grille 2 En soulevant l avant de la grille la pousser jusqu au fond Abaisser la grille Pour une cui...

Страница 31: ...re amovible Cuisinière encastrée Ne pas obstruer l évent du four Les résultats de cuisson rôtissage pourraient être affectés Nettoyer l évent à l eau savonneuse chaude Éventdelaportedufour Il est possible que de l air chaud et de l humidité s échappent de l évent de la porte du four pendant certains modes de cuisson Une certaine condensation est également possible Ces situations n affectent en rie...

Страница 32: ...uton DÉPART APPUYER SUR AFFICHAGE exemple de température réglée de 350 F 170 C L afficheur montrera un compte à rebours de la durée de préchauffage Les témoins lumineux CHALEUR et DÉPART s allumeront La commande du four règle automatiquement la durée de préchauffage en fonction de la température choisie Pour 245 F 118 C et moins la durée de préchauffage est de 4 minutes Pour 250 F 445 F 121 C 229 ...

Страница 33: ...la cuisson au four rôtissage il est possible de changer le décalage de température en suivant les étapes ci dessous 1 Appuyer sur CUIRE pendant 4 secondes APPUYER SUR AFFICHAGE réglage de l usine de 00 L afficheur montrera 350 F 177 C pendant 4 secondes Ensuite il montrera le décalage de température courant par exemple 00 sera affiché si la température n est pas déjà ajustée 2 Régler le nouveau dé...

Страница 34: ...puyer de nouveau sur le bouton DÉPART Si vous utilisez le gril pendant le compte à rebours de la minuterie il est possible d afficher pendant 5 secondes la température du gril en appuyant sur le bouton GRIL 6 Après la cuisson au gril éteindre le four APPUYER SUR AFFICHAGE heure du jour ou compte à rebours de la minuterie Directivespourlacuissonaugril 1 Ouvrir la porte à la position de cuisson au g...

Страница 35: ...cuire avec des températures de cuisson au gril plus basses UTILISATIONDELATABLE DECUISSON Commandesdesélémentsdesurface Il faut enfoncer les boutons de commande pour pouvoir les tourner au réglage désiré On peut les régler à n importe quelle position entre HI et O ARRÊT Les commandes des éléments de surface permettent de multiples réglages de la chaleur Les chiffres sur le cadran servent de référe...

Страница 36: ...ndé par le bouton de commande Dual Single à gauche à l avant de la console de la cuisinière Appuyer sur le bouton de commande et le tourner au réglage désiré dans la zone marquée Dual ou Single Élémentdeliaison surcertainsmodèles On peut utiliser l élément avant droit soit comme élément de grand diamètre à pleine puissance soit comme élément de plus grande surface et de puissance plus élevée L élé...

Страница 37: ...des marmites à fond plat sur tous les types de tables de cuisson et plus particulièrement sur les tables de cuisson en vitrocéramique Les marmites à fond bosselé ou dentelé ne permettent pas un bon contact avec la surface de cuisson Déposer la marmite sur la plus grande surface de l élément de cuisson Ne pas déposer d ustensiles dépassant de plus de 1 po 2 5 cm de la surface de cuisson Les marmite...

Страница 38: ...u une base en aluminium ou en cuivre assure une distribution uniforme de la chaleur Peut être recouvert d émail vitrifié Témoinslumineuxdecourant Les témoins lumineux de courant situés à côté des boutons de commande indiquent quel élément s allume lorsque vous appuyez sur un bouton Un témoin lumineux de courant s allume lorsque l élément correspondant est mis en marche Guidedesréglages En attendan...

Страница 39: ... des ustensiles en métal ou en verre ne comporte pas d endroits rugueux qui risqueraient de rayer la surface de la table de cuisson en vitrocéramique sur certains modèles Pour une meilleure conduction thermique de la surface de cuisson à l ustensile utiliser des ustensiles à fond plat On pourra déterminer si le fond d un ustensile est plat en utilisant une règle La placer contre le fond de l usten...

Страница 40: ...de propreté provenant des éléments de la cuisinière dans le four pendant le programme d autonettoyage Vous risqueriez d en endommager la finition Vérifier que la porte est bien fermée de tous les côtés Ne pas laisser d ustensiles en plastique près de l évent du four Ils risqueraient de fondre Ne pas obstruer l évent du four pendant le programme d autonettoyage Pour des résultats de nettoyage optim...

Страница 41: ... effacer l afficheur APPUYER SUR 5 Une fois le four refroidi essuyer tout résidu ou cendre à l aide d un chiffon ou d une éponge mouillée Si nécessaire enlever les taches avec un détergent abrasif doux ou une éponge Pour arrêter n importe quand le programme d autonettoyage APPUYER SUR AFFICHAGE Une fois le four refroidi AFFICHAGE Si la température est au dessus de la température normale de cuisson...

Страница 42: ...isson en vitrocéramique doivent être entretenues de façon différente des tables de cuisson standard électriques à éléments tubulaires Les aliments renversés directement sur la table de cuisson ne brûleront pas comme sur les éléments tubulaires Ainsi la surface doit être exempte de poussière et de saletés avant d être chauffée Pour nettoyer votre table de cuisson il vous suffit de vous munir de crè...

Страница 43: ... dès que les voyants de surface chaude s éteignent 2 Racler délicatement tout aliment brûlé sur la table de cuisson à l aide du racloir à lame de rasoir 3 Frotter la crème à polir pour table de cuisson dans les saletés collées avec un essuie tout S il reste de la saleté laisser agir la crème plus longtemps et passer à l étape 2 4 Polir toute la surface de la table de cuisson à l aide de la crème à...

Страница 44: ...Nettoyant abrasif doux Frotter à l aide d un tampon de récurage mouillé Lave vaisselle Ne pas les mettre dans le four pendant le programme d autonettoyage SURFACE SOUS LA TABLE DE CUISSON sur certains modèles Pour éviter tout dommage à l appareil ne pas retirer la table de cuisson Pour plus de renseignements voir la section Table de cuisson soulevable Tampon en laine d acier BOUTONS DE COMMANDE Ne...

Страница 45: ...e 90 degrés et le retirer du receptacle 5 Le remplacer par un tube fluorescent de type F1 8T8 6 Tourner le tube de 90 degrés jusqu à sa position originale 7 Brancher la cuisinière ou reconnecter le courant électrique Remplacementdel ampoule delalampedufour Pour changer l ampoule de la lampe du four 1 Débrancher la cuisinière ou déconnecter le courant électrique 2 S assurer que le four et l ampoule...

Страница 46: ...eur s est déclenché Remplacer le fusible ou remettre en fonction le disjoncteur Les boutons de commande sont réglés correctement Pousser les boutons de commande avant de tourner au réglage désiré La prise de l appareil ne fonctionne pas Le disjoncteur de la prise de la cuisinière s est ouvert Un fusible est grillé ou un disjoncteur s est déclenché Remettre en fonction le disjoncteur voir à la page...

Страница 47: ...47 Notes ...

Страница 48: ...10 00 9754170 Printed in U S A Imprimé aux É U ...

Отзывы: