6 - INSTRUCTIONS FOR USE
0803_GB_42
- GAS KITCHENS WITH PILOT
04/2008
6.4 Lighting and shutdown of electric oven GN 1/1
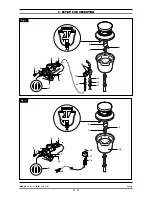
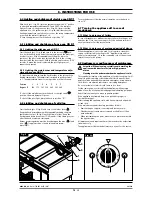
With knob (pos. 1 fig. 6A) turn the thermostat from the “0” position
to a desired temperature between 50°C and 300°C; the indicator
light will come on; the green one (pos. 2 fig. 6A) shows that the
appliance is on, the yellow one (pos. 3 fig. 6A) indicates that the
heating elements are operational, as soon as the set-up temperature
is reached, the indicator light goes off.
To turn the appliance off, turn the knob to position “0”.
6.5 Lighting and shutdown of gas oven GN 2/1
6.5.1 Lighting the pilot gas oven GN 2/1
Press the knob (pos. 5 fig. 4) and turn it to the left until
posi-
tion. Hold the knob down and at the same time press the piezo igni-
tion button (pos. 6 fig. 4) repeatedly until the pilot comes on.
Ignition of the pilot can be seen through the hole in the cooking
chamber (with the door open). Hold the knob down for about 15-20
seconds. If, when the knob is released, the pilot light goes out,
repeat the operation.
6.5.2 Lighting the main burner and temperature adju-
stment gas oven GN 2/1
To light the main burner, turn the knob further to the left until the
desired temperature. The thermostat is marked in positions from 1
to 7. The approximate values for each position are the following:
Position
1
2
3
4
5
6
7
Degrees °C
160
175
195
220
240
265
290
To shut off the main burner, turn the knob to the right until
position, the main burner will go out.
To shut off the pilot light, place the knob in position “0”.
6.6 Lighting and shutdown of solid top
Press the knob (pos. 21 fig. 2) and turn to the left as far as
.
Keep the knob pressed down while repeatedly pressing the piezo
ignition button (pos. 23 fig. 2) until the flame catches. Keep the
knob pressed down for another 15-20 seconds: if the flame goes out
after the knob is released, start again.
Burner power regulation must be done between the max (
) and
min. (
) supply position of easily selectable interme-
diate levels.
To turn the burner off during normal operation, turn the knob as
far as “0”.
6.7 Turning the appliance off in case of
breakdown
6.7.1 What to do in case of failure
In case of breakdown or malfunctioning or failure close the gas cock
and the oven. Close the connecting cock of the unit and switch off
any electric power. Call the service centre.
6.7.2 What to do in case of prolonged period of disuse
When the appliance is not to be used for a long time, clean thor-
oughly, cas instructed in the chapter 6.8 “Appliance care and fre-
quency of maintenance”, close the connecting cock of the unit and
switch off any electric power.
6.8 Appliance care and frequency of maintenance
Attention! When cleaning, carefully avoid washing the
appliance with direct water jets or high-pressure
water!
Cleaning must be performed when the appliance is cold.
Thorough daily cleaning of the appliance, after disconnecting it, will
keep it in perfect working order and make it last longer. All steel
parts should be cleaned with water and a detergent, using a damp
cloth; do not use abrasive substances or corroding detergents.
Do not use steel wool, which could cause rust to form.
For the same reason, avoid touching the appliance with anything
made of iron. Do not clean with sandpaper and lubricating gel paper.
If absolutely necessary, you may use pumice powder.
If the appliance is extremely dirty, use a synthetic sponge (i.e.
Scotchbrite sponge).
After cleaning the appliance, rinse with clean water and wipe with
a clean cloth.
If the main burner needs cleaning, proceed as follows:
• Remove the pan support, cover, rings and burner crown;
• Clean burner parts with water, soap and a suitable tool, then
rinse and wipe;
• When reassembling the parts, make sure you place them back in
the right position.
All maintenance and repair work must be carried out by authorized
technicians only.
The appliance must be checked at least once a year. For this reason,
16
· 20
1
4
5
6
2
3
3
2
1
0
50
100
150
200
250
300
Fig. 6
Fig. 6A


