


8
SinterPro
Furnace Operator’s Manual
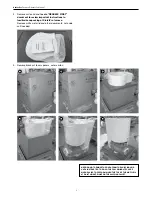
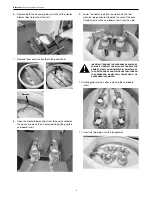
Setting Up The Oven
Unpack contents of the accessory carton.
Contents:
• 1 ea. metal forceps for handling sintering trays
• 1 ea. shallow ceramic sintering tray
• 1 ea. deep ceramic sintering tray
• 1 ea. Sintering ceramic tray lid
• 1 ea. Jar ceramic beads
• Power Cord
• Firing Tray Crown
• Cooling Tray
• USB Flash Drive
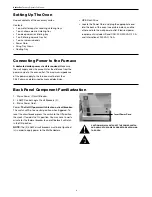
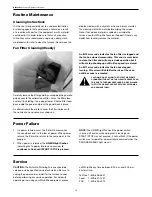
• Locate the Power Cord and plug the appropriate end
into the back of the oven (see picture below), and the
other end into the wall power outlet. Electrical power
requirements include US and CAN: 200/240 VAC, 20 A.
and International: 230 VAC, 16 A.
Connecting Power to the Furnace
A dedicated mains power circuit is required.
Make sure
the wall supply wire size accounts for the distance from the
power source to the oven outlet. The maximum impedance
of the power supply to the furnace must be less than
0.032 ohms, as determined by licensed electrician.
Back Panel Component Familiarization
1. Mains Power / Circuit Breaker.
2. 3 AMP Control Logic Circuit Breakers (2).
3. Mains Power Cord.
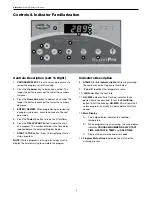
Power:
The On/Off power switch is also a circuit breaker.
The switch will flip to a neutral position when triggered. To
reset the circuit breaker press the switch to the Off position,
then rock it towards the On position. You may have to wait a
minute for the thermal breaker to cool off before it will latch
in the ON position.
NOTE:
The (2) 3 AMP circuit breakers must be set (pushed
in) in order to apply power to the Muffle Heaters.
CAUTION:ALWAYS SWITCH OFF THE POWER SWITCH
AND UNPLUG THE POWER CORD BEFORE SERVICING
THE OVEN.
Insert Power Cord


