background image

35

Machine control board, Software

704 67 020 00 _ 111

OPERATING INSTRUCTIONS

GF Robimat XL / XM

6  Machine control board, Software

The machine control board can be accessed by pulling out the drawer.

6.1  Programming keys

When the slide-out unit is open four programming keys are accessible. They are identified by the letters [ C ], [ L ], 

[ M ] and [ E ]. The machine is programmed using these keys and the selection keypad.
The programming keys have the following functions:

6.2  Menu selection

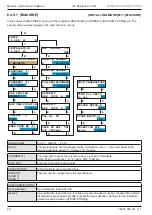
Values may be programmed and changed using the menu selection, which appears by pressing [ M ].
The following information is displayed after pressing [ M ]:

CHECK

← L SEL. M →   :E

CHECK

← L SEL. M →   :E

CHECK

Name of the menu you are in

L

L allows you to scroll back to the previous menu

M

M allows you to scroll forward to the next menu

E

E allows you to enter a menu and use its functions.

Each menu can be accessed directly from the menu selection by pressing the corresponding reference number (0 to 

10).
To exit a menu press [ L ] and [ M ] together. If both keys are pressed again, the machine reverts to normal vending mode. 

You can exit any menu by pressing the refund button [ R ].
If no button is pressed for one minute, the machine returns automatically to vend mode.

ATTENTION! Electro-statically sensitive components and modules (ESD)

Risk of damage to components!
Do not touch printed circuit boards and pins on the control board!

C L

M E

Confirm/delete error messages/

Delete data

Step forwards

within a menu

Step backwards in the menu

Acknowledge entry/

Advance menu

Содержание ELEVATE QUARTZ

Страница 1: ...ELEVATE QUARTZ OPERATING INSTRUCTIONS ...

Страница 2: ...Original Operating Instructions GB Cold drinks vending machine 21 01 19 704 67 020 00 _ 111 GF Robimat XL GF Robimat XL EC GF Robimat XL EW GF Robimat XM GF Robimat XM EC ...

Страница 3: ...ymbols 9 1 8 Terms used in the manual 9 2 Construction and Features 10 2 1 Machine diagrams 10 2 1 1 Internal view 10 2 1 2 Sliding door unit Telescopic slide out unit 11 2 1 3 High Security Version 12 2 1 4 High Security Version simplified 12 2 1 5 EC Version 13 2 1 6 Differences between Robimat XL and XM 13 2 2 Vending process 14 15 3 Installation and commissioning 16 3 1 Choosing the location 1...

Страница 4: ...ucts 26 4 Daily use 27 4 1 Door contact switch with service key 27 4 1 1 How does the door contact switch work 27 4 1 2 Using the service key 27 4 2 Product compartments Product compartment 28 29 4 4 Pushing back the product container 29 4 5 Filling the product containers 30 5 Cleaning and maintenance 31 5 1 Cleaning list 31 5 2 External surfaces 31 5 3 Product basket 32 5 3 1 Removing the product...

Страница 5: ... 4 5 SHOW STATISTICS M4 44 6 4 6 SHOW FULL STAT M5 44 6 4 7 PROG TIME LOCKS M6 45 6 4 8 INSTALLING MODE M7 47 6 4 9 SERVICE MODE M8 60 6 4 10 TUBE INVENT M9 64 6 4 11 ROBIMAT M10 65 7 Transportation Storage Decommissioning Disposal 67 7 1 Transportation instructions 67 7 2 Suitable means of transport 67 7 3 Machine s centre of gravity 69 7 4 Storage 69 7 5 Temporary Shutdown 69 7 6 Decommissioning...

Страница 6: ...document is complete 1 1 4 Software Please note that these operating instructions apply to different vending machine variants For this reason some of the information may not apply to your vending machine Software version ROMIj724 pat is described in this document If another version is installed on your machine there may be some differences Enter service code 21L to read out the software version in...

Страница 7: ...lable in a High Security version 1 3 After sales Service If malfunctions should occur which you cannot remedy yourself our Customer Service Department will be pleased to help Please have the model machine number and software version to hand This information is absolutely essential for warranty claims 1 4 The identification plate is located inside the cabinet on the top right hand side and is visib...

Страница 8: ...dition to the chiller unit a heater is fitted in the outdoor machine The heater cannot be switched on manually If the ambient temperature on site falls below 0 C the heater is switched on by the vending machine control board In this way the interior is kept frost free Chiller unit SKA Climate class Sielaff version Robimat XL Robimat XM N Normal Standard SKA 435 SKA 435 More powerful SKA 751 SKA 79...

Страница 9: ...ufacturer authorised service centre or equally qualified person in order to prevent serious accidents Appliance plugs should never be inserted in sockets when damp or touched with wet hands It is imperative that an FI safety cut out switch with 30 mA maximum leakage current is provided for the machine No higher than a 16A fuse should be used Prior to all work on electric parts the machine must be ...

Страница 10: ... NOTE Information to facilitate handling and use of the vending machine WARNING electricity Danger to life This symbol warns that electrically live components are installed in this area Covers marked with these symbols should only be removed by authorised electricians Observe handling regulations when dealing with electro statically sensitive compo nents and modules ESD Parts and components that a...

Страница 11: ...Features 1 2 3 4 5 6 7 8 9 10 11 12 1 Product container 2 POS Point of Sale 3 Sliding door unit 4 Display 5 Coin insert 6 Selection keypad 7 Product delivery unit delivery unit flap shutter 8 Chiller unit 9 Coin return 10 Product basket 11 Vertical track 12 Glass door 2 1 Machine diagrams 2 1 1 Internal view ...

Страница 12: ...opic slide out unit 1 2 3 4 5 6 7 8 9 10 11 12 13 1 Control board VMC 2 Power supply unit 3 Coin insert channel 4 Service keypad 5 Product delivery unit 6 Cashbox 7 Cashbox holder 8 Coin return channel 9 Bracket for coin mechanism 10 Coin mechanism optional 11 Coin refund motor 12 Machine mains plug 13 Chiller unit plug ...

Страница 13: ...imat XL XM OPERATING INSTRUCTIONS 2 1 3 High Security Version Components on the high security version 1 2 3 4 5 6 7 1 Theft protection 2 Coin insert 3 Selection keypad 4 Side lock 5 Coin return 6 Locking lever 7 Anti vandalism panel 2 1 4 High Security V F ...

Страница 14: ...F Robimat XL XM 2 1 5 EC Version Stainless steel The EC version is differentiated by its segmented stainless steel panel The panel can be adapted to suit customer requirements at little expense 2 1 6 and XM 113 cm 99 cm 9 compartments per shelf 7 compartments per shelf XL XM ...

Страница 15: ...t is transported 5 Product pushes down the product retainer 6 The product moves into the product basket the light grid is activated 7 The gear is activated 8 Basket is moved to transfer position the shutter door is pushed open 9 The product delivery door opens Customer can take the product 10 The change is deposited in the coin return 11 Delivery door closes basket moves back to its home position ...

Страница 16: ...mber of selections per shelf 9 9 7 7 Maximum number of products 405 648 315 504 The machine should only be filled with cans glass and PET bottles Products must comply with the requirements outlined in the following Specifications list A product with dimensions that do not correspond to these requirements may cause malfunctions In addition suitability also depends on shape and product stability For...

Страница 17: ...t not be exposed to direct sunlight The chiller unit is not designed for this Do not install the machine in places where water hoses or a high pressure cleaner is used The floor must have an adequate load bearing capacity Observe the weight Make sure that the machine is level 3 2 Distances A distance of 5 cm at the back of the machine must be observed The warm air from the chiller unit must be abl...

Страница 18: ... and fix them with the securing screws B fit the front kickplate from the top and secure C finally secure them with screws on the sides D If only a frontkick plate is fitted Mount fixing plate using 2 screws onto the machine feet Fit the front panels from underneath and mount them in the fixing plates Press the panel on and with the door open secure with two screws optional Fixing plate Fixing pla...

Страница 19: ...e four feet out evenly The distance between the floor and the lower edge of the side wall must be approx 9 cm 4 Remove the pallet truck 5 Check if the machine rocks over the axis B C when the corner F2 is pressed If it rocks screw in foot B until it stops 6 Check if the machine rocks over the axis A D when the corner F1 is pressed down If it rocks screw in foot A until it stops 7 Place the spirit ...

Страница 20: ...over axis B C Press several times on the corner at F2 to check if the machine rocks Exert strong pressure on the corner at F2 while manually unscrewing foot A until it touches the floor Finally using a size 24 spanner make a to turn to foot A This results in less weight load on foot A than on the other feet Consequently the machine does not wobble on the corner the machine door does not drag and t...

Страница 21: ... carries out a reference run The machine will be damaged if the transportation locks have not been removed Remove the cable tie in the upper left corner This prevents inadvertent movements of the lift arm In addition the product shelves are secured with a transportation safety device Remove the fixing screw on the right side and remove the transport lock bar Transportation lock Cable tie ...

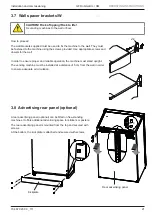
Страница 22: ...d and secured with screws 3 8 Advertising rear panel optional M10 Rear advertising panel Kickplate 2x How to proceed The wall brackets supplied must be used to fix the machine to the wall They must be fastened to the machine using the screws provided Use appropriate screws and dowels for the wall In order to ensure proper and reliable operation the machine must stand upright The vending machine mu...

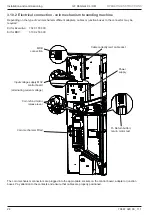
Страница 23: ...d by an B16A safety cut out A permanent installation should only be carried out by a qualified electrician The plug must be easily accessible after installation Mains supply plug Chiller unit plug Power supply The mains plug is not connected when the machine is delivered To supply the machine with power connect the mains plug to the power supply unit NOTE The mains plug should be connected only af...

Страница 24: ...e available when installing The machine software must also be set accordingly Coin mechanism Power supply M32 control board Before mounting the coin mechanism please read the operating instructions supplied by the manufacturer The installation instructions must be adhered to Fit the coin mechanism into its allocated position by hooking it into the fixing eyes Some coin mechanisms are secured by a ...

Страница 25: ...red Kit for Executive 704 01 558 00 Kit for BDV 310 02 530 00 MDB connection Input voltage supply M32 control board alternating current voltage Coin refund motor release lever R Return button return motor test Power supply Coin mechanism fitted The coin mechanism connectors are plugged into the appropriate sockets on the control board adapter or junction boxes Pay attention to the contacts and ens...

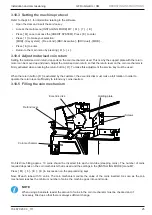
Страница 26: ...sing the return button R To make this adjustment the service key must be used When the return button R is activated by the customer the eccentric disk must make a full rotation in order to operate the return lever sufficiently to refund any coins inserted 3 10 5 Filling the coin mechanism Screws Holding plate Coin mechanism Refund lever Eccentric disk On first time filling approx 10 coins should b...

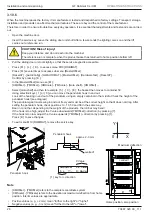
Страница 27: ...ury Keep your distance and do not reach into the machine The reference run is complete when the product basket has returned to home position bottom left Pull the sliding door unit out slightly so that the service keypad is accessible Press M L E to access menu M10 ROBIMAT Press M several times to access sub menu MasterOffset ResetXY AutoConfig HWAUTOMAT MasterOffset HardwareTest ResetXY Confirm by...

Страница 28: ...ck routine will start during which the illumination is switched on and a reference run carried out For this reason the sliding door unit must remain inside the machine until the reference run is completed Exception direct selection ROBIMAT menu M10 The reference run is completed when the product basket has returned to home position bottom left The chiller unit compressor is audible Do not leave th...

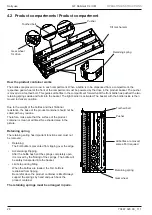
Страница 29: ... belt Gear wheel Pusher Retaining spring All bottles are moved some effort required Due to the weight of the bottles and their frictional resistance the base of the product container should not be soiled with any residue Therefore make sure that the surface of the product container is clean at all times See shaded area in the picture Retaining spring The retaining spring has important functions an...

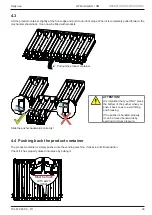
Страница 30: ...tainer Slide the pusher backwards correctly 4 4 Pushing back the product container The product container is simply pushed into the vending machine It clicks into its final position Check if it has properly clicked into place by pulling it Must be flush with each other ATTENTION It is important that you ONLY press the bottom of the pusher when you push it back so as to avoid tilting and breaking If...

Страница 31: ...nd When filling is complete push the product container slowly backwards until you hear it click into place Otherwise malfunctions may arise The product container is in correct vend position when it rests against the rear wall and is flush with the other product compartments at the front After filling check that the machine is working correctly Close the door and make some vends using coins Importa...

Страница 32: ...t basket during product delivery and must close automatically afterwards The all round seal on the flap must be kept clean and must not be sticky Seal 5 Cleaning and maintenance 5 1 Cleaning list In addition to the standard cleaning procedures maintenance work should also be carried out on the machine An overview of the maintenance work to be carried out is to be found in the maintenance plan in y...

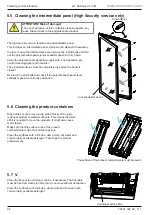
Страница 33: ...ease the two unlocking hooks and pull the basket slightly towards the right Then unhook the basket and take it out Unfold the bearing for toothed wheel pendulum by hand Insert the basket into the holder in a slightly slanted position approx 10 Push the basket to the left so that the hooks snap into the notch correctly Finally swing the basket back in and push it upwards so that the unlocking butto...

Страница 34: ... of damage to the compressor Do not start the compressor more than 5 times per hour Do not reduce the 5 minute minimum period of idleness for the compressor Note The vending machine is ready for vending every time the service key is inserted the compressor can be heard running Remove the fluff Lint filter Marking for correct positioning When inserting the lint filter make sure that it is pushed in...

Страница 35: ...product containers Dirty bottles or cans may lead to soiled sticky dirt or glue residues product compartment floors This means that more effort is required to move the products It might also cause motor failure Make sure that the surface area of the product compartments is free from dirt and residue Clean the surfaces with a lint free damp cloth hot water and commercially available detergent Then ...

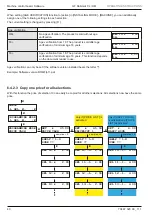
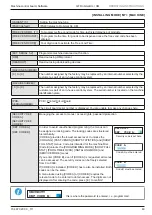
Страница 36: ...HECK Name of the menu you are in L L allows you to scroll back to the previous menu M M allows you to scroll forward to the next menu E E allows you to enter a menu and use its functions Each menu can be accessed directly from the menu selection by pressing the corresponding reference number 0 to 10 To exit a menu press L and M together If both keys are pressed again the machine reverts to normal ...

Страница 37: ... times 7 B Setting country currency machine type machine number security codes pre selection times credit system vending mode coin change parameters machine options service telephone number 8 B Testing machine components Reading out machine parameters 9 Filling and emptying coin mechanisms 10 Perform a reference run operational check of the components align the positioning of the product basket CH...

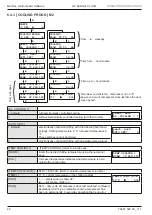
Страница 38: ... displayed once the previous error has been acknowledged The refund button R reverts to vending mode If no button is pressed for a certain time the control board automatically reverts to vending mode 6 4 1 1 Display error history Pressing M 1 E in sequence will display the error history E scrolls through the error history list The refund button R switches back to vending mode If no button is press...

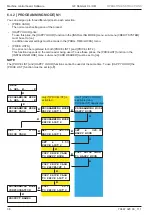
Страница 39: ...the PRICELIST function in the INSTALLING MODE menu sub menu CARD READER must be set to on NOTE The PRICE LIST and HAPPY HOUR functions cannot be used at the same time To use HAPPY HOUR the PRICE LIST function must be set to off M E M M M M M M M M M M M M M M CHECK L SEL M E PROGRAMMING MODE L SEL M E PROGRAMMING MODE PRICE CASH PROGRAMMING MODE PRICE LIST 1 PROGRAMMING MODE HAPPY HOUR PROGRAMMING...

Страница 40: ...1 1 4 00 SEL 11 2 4 00 SEL 11 1 4 00 SEL 11 2 00 SEL 11 1 2 00 SEL 11 2 2 00 SEL 11 1 2 00 SEL 12 4 00 SEL 12 1 4 00 SEL 12 2 4 00 SEL 12 1 4 00 M M E E E R R E E CHECK L SEL M E PROGRAMMING MODE L SEL M E PROGRAMMING MODE PRICE CASH SEL 10 4 00 18 SEL 10 2 00 18 SEL 11 4 00 18 SEL 10 2 00 OK SEL 10 2 00 16 new price for selection 10 new price for selection 10 new price for selection 10 new price ...

Страница 41: ...SET 45 00 PRICELIST 1 SHELF 1 9 SURE SEL 10 1 2 00 SEL 11 1 2 00 SEL 12 1 2 00 SEL 13 1 2 00 SET 4 00 HAPPY HOUR SHELF 1 9 SURE SEL 10 1 4 00 SEL 11 1 4 00 SEL 12 1 4 00 SEL 13 1 4 00 CHECK L SEL M E Age verification OK No age verification The product is sold without age verification 18 Age verification from 18 The product is sold after age verification of minimum age 18 years 16 Age verification ...

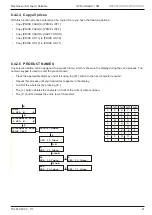
Страница 42: ...d process The numeric keypad is used to enter the product name Press the appropriate digit key and scroll using the M button to the next character required Repeat this process until your desired text appears in the display Confirm the whole text by pressing E The L button deletes the character in front of the current cursor position The C button deletes the entire row of characters Digit 1xM 2xM 3...

Страница 43: ...oor was opened AUTO SET 1 default electronically controlled chilling with the following fixed basic settings Chilling temperature 8 C increased temperature 8 C These settings cannot be altered yes 1 no 0 EL COOLING 1 yes 1 no 0 AUTO SET 0 TEMP COOLING 1 NORM 7C PLU 11C TEMP1 COMP DUR 11 C 43 0 electronically controlled chilling with adjustable temperatures TEMP COOLING 1 TEMP COOLING 2 refers to a...

Страница 44: ...cs memory as a test vend M 3 E E L TEST VEND MODE L SEL M E TEST VEND MODE PLEASE SELECT TEST VEND MODE L SEL M E TEST VEND MODE PLEASE SELECT PLEASE WAIT PLEASE WAIT CHECK L SEL M E NOTE If the machine is full the selected product will be supplied If a test vend is performed with a money card the amount will not be debited from the card The drawer must be pushed in Make selection Insert money car...

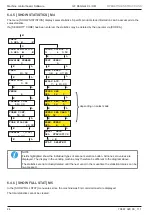
Страница 45: ...ove The statistics are not actually deleted until the next vend In the meantime the statistical values can be re accessed depending on sales made E L E L E L E L E L E L E L E L E L E L E L E L E L E L 1 E E E L CHECK L SEL M E M 4 VENDS PER SEL 12 1 EMPTY SEL PER SEL 14 5 VENDS PER CARD SEL 52 1 FREE VENDS SEL 8 5 COINS OUT HOP 1 3 0 50 CARD VENDS 32 37 20 E OVERPAY C OV 0 00 BILLS ACC 7 10 00 SH...

Страница 46: ... L E L E L E L E L E L E L E L E L 2 E L E L E L E L E L E L E L E L E L E L E L E L E L CHECK L SEL M E PROG TIME LOCKS L SEL M E TIME 09 23 21 TIME 09 23 21 TIME 17 01 13 DATE 17 01 13 DATE 17 01 13 ILLUMINATION TO 18 30 ILLUMINATION FROM MO TO MO yes 1 no 0 LOCKING 1 yes 1 no 0 AUTO SET 0 LOCKING 1 FROM 22 00 DAY OF WEEK MO SU 1 7 TH off on time 0 2 ILLUMINATION 1 ILLUMINATION TO 18 30 ILLUMINA...

Страница 47: ...0 AUTO SET 0 LOCKING NO 4321 MO ACTIVE 1111 LOCKING tyYHF L SEL 10 01000000 1 Locking activated LOCKING zjJHF S 0 Locking time invalid 1 Locking time valid activated is in use z interfaced with 1 Deactivates age verification for this selection during locking time 1 LOCKING tyYHF L SEL 10 00000001 LOCKING tyYHF L SEL 10 10000000 LOCKING tyYHF L SEL 10 01000000 LOCKING tyYHF L SEL 10 00100000 LOCKIN...

Страница 48: ...eral settings for coin changers card systems and banknote readers 3 READOUT Configuration and statistical data readout 4 COIN MECHANISM Refers to the coin mechanism settings coin changer 5 CARD READER Settings for payment systems such as e g microtronic fage coges 6 BILL VALIDATOR Refers to banknote settings Navigating the sub menus To select a sub menu use the M button Press E to open a sub menu ...

Страница 49: ... No DC CASE OF DEF TEl 030 2045xxx E L E L E L E L E L E L E L E L E L SHOW TEMPERATURE no TIME for DELIV in sec 0s ESCROW MOTOR 1 with STORE EMPTY 1 no PROMOTION RUN every 0 Min E L E L E L E L E L E L E L E L E L E L FREE VEND MO 1 no EXT SERIAL 5 2 HMI MACHINE NUMBER 12345678 In the sub menu MACHINE you can set the required LANGUAGE CURRENCY SECURITY CODE s etc The security code requires a pass...

Страница 50: ...ed all menus can be accessed The security codes can be freely selected from 0 to 9999 If CODE A is installed CODE B has to also be installed Both codes can be the same A menu locked using CODE A or CODE B requires the relevant code to be entered to obtain access The digits are not displayed After entering the code press E to confirm USER 4 SECURITY DEF CODE A 0 CODE A CODE B Security code is set h...

Страница 51: ...illed area temperature is not shown in the display yes In the vend mode the chilled area temperature is shown in the display ESCROW MOTOR Refers to the motorised refund and the coin mechanism with default Any coins inserted are refunded if the customer presses the refund button The refund motor turns a possible jam is prevented without This setting must be selected if the machine does not have a m...

Страница 52: ...ree Vend BDV Executive BDV dual MDB Key system MDB EXEC MDB BDV MDB default The communication protocol is set here CREDIT CONFIG 1 AUTO CONFIG Setting the configuration for the coin mechanism automatically or manually Some of the following fields appear only if you enter MAN CONFIG here MAN CONFIG VEND MODE 1 Setting the required vend mode NO CHG SINGLE Compulsory purchase After a coin has been in...

Страница 53: ...g time to be entered whilst non returnable change is still displayed before it is finally deleted This might be required for contactless card payment systems where the card is debited with the amount and it only turns out afterwards that the product requested cannot be dispensed The time entered here gives the customer the option of reversing the amount by re presenting his contactless card to the...

Страница 54: ...from it IRDA This is the standard setting and means that EVA DTS data can be read out via the integrated IRDA interface EVA DTS SEL No You can determine how the selection numbers are reported to MDB here and in EVA DTS This setting has no effect on machines with selection numbers starting with 1 starts with 1 default The lowest selection number in the machine is 1 starts with 10 The number being t...

Страница 55: ...eted when the next vend is made as before save The statistics are not deleted after downloading Deletion must be started via IR INTERVAL EV CTL only for EVA DTS 6 1 Standard auto The errors are deleted once they have been read out and when the next vend is made as before save The errors are not deleted after having been read out deletion must be started via IR DTS data select Fields can be switche...

Страница 56: ...BE 0 05 0 CHANGE BLOCKED at 255 coins E L CORRECT CHANGE auto LIMIT COINS TUBE 0 10 0 LIMIT COINS TUBE 0 20 0 LIMIT COINS TUBE 0 50 0 E L E L E L TUBE COUNT by COINMECH default Tube fill level is not counted by the control board but by the coin mechanism The tube level transmitted by the coin mechanism is what should be available for coin return Please note that transmitting the tube level from th...

Страница 57: ...N 1 VALUE Enter the value of the token EUR 0 00 If the coin mechanism accepts tokens you can programme the values for up to three different tokens here LIMIT COINS Coins remaining in coin mechanism TUBE 0 05 9 The minimum number of coins for the value shown that must remain in the coin mechanism is entered using the number keys Using these settings the coin mechanism is filled or emptied in M9 TUB...

Страница 58: ...n the prices are stored in the coin mechanism and the price line corresponding to the selection must be programmed on the control board off Price lists are disabled INSTALLING MODE L SEL M E INSTALLING MODE MACHINE CARD REMOVAL after vend CHECK L SEL M E M 7 E L E L E L E L E L E L 4xM E PRICE LISTS off REVALUE on MIXED PAYM off P LIST READER L1 L2 all MIXED PAYM PRICE cashless price MDB comp mode...

Страница 59: ...n it is allowed to do so by the card reader and REVALUE is set to on If no card reader is connected the amount is converted into cash The credit remains for the amount of time set under CLEAR CREDIT in sub menu CREDIT SYSTEM MDB ITEM NUMBERS Defines how selection number data is transmitted in Vend Request and other MDB commands HEX VALUE Standard setting BCD Selection numbers are transmitted BCD c...

Страница 60: ...can still be returned if necessary This function only appears if a bill reader is installed This function affects the method of refund if a vend fails hold If a vend fails the last bill is returned stack This means the bill is stacked and the value is paid out in coins By stack means that the cassette is stacked with notes BILL 1 dis HG The bill can be disabled by linking keys 0 and 1 Its value 5 ...

Страница 61: ... will no longer start against the pressure build up 202M Check heater 203M Check illumination 204M Check evaporator fan 1L Processor voltage display 5L Check temperature and temperature sensor If a temperature of 99 C is displayed the sensor or the lead from the control board is faulty The reason could be a short circuit or break 21L Software version display 22L Control board run time display 24L ...

Страница 62: ...y applicable if the coin mechanism has this function all coins one coin Tube 1 111M 101M Tube 2 112M 102M Tube 3 113M 103M Tube 4 114M 104M Tube 5 115M 105M Tube 6 116M 106M SERVICE MODE M8 EMPTY TUBES M 8 E 111 M M CHECK L SEL M E SERVICE MODE L SEL M E SERVICE NO 0 SERVICE NO 101 empty tube 1 TUBES CONT 0 00 The tube content is dispensed ...

Страница 63: ...LING CONTROL second sensor BT TELEMETRY installed VEND DEMO ignore empty CASHCLOSE clear daily JOURNAL write disabled GELDKARTE transfer daily ALT PAYOUT enabled TUBECOUNT COIN MECH contr CARD REMOVAL after VEND HELIX STOP only by MotorSW MIXED PAYMENT allowed ROBIMAT connected BDTA3 0 strict try DRAVP D only BDV audit enabled IR readout enabled MDB comp mode standard BILLVAL usage with changer BI...

Страница 64: ...p at midnight no transfer transfer daily ALT PAYOUT see Menu M7 COIN MECHANISM disabled enabled TUBE COUNT see Menu M7 COIN MECHANISM VMC controlled COIN MECH contr CARD REMOVAL see Menu M7 COIN MECHANISM after VEND before VEND HELIX STOP only by MotorSW by MotSW or LB MIXED PAYM see Menu M7 CARDREADER allowed not allowed ROBIMAT Robimat lift control board is recognised automatically not connected...

Страница 65: ...n be emptied completely The surplus coins are ejected Display showing coin value in tube 1 and the coins to be filled The current tube status is displayed The tube content is displayed and all tubes are emptied completely 1 00 TUBE 1 FILLING 8 TUBES 32 00 AT LIMIT TUBES CONT 24 00 All tubes are emptied in turn M 9 E E M E E CHECK L SEL M E TUBE INVENT L SEL M E TUBE 24 00 FILL TO LIMIT 1 00 TUBE 1...

Страница 66: ... L L L L 5537230901000000 ResetXY The lift and the product basket will be moved to the defined zero position reference point bottom left The lift and the basket will return to this position after each delivery The control board determines how many shelves have been fitted into the machine This menu must be accessed if the shelves have been changed After pressing button E the basket moves from the ...

Страница 67: ... basket detected X Y HardwareTest HWT LIGHT LIGHT The illumination for the machine can be switched on and off here HWT INPUTS The status of limit switches and light barriers is displayed by 0 and 1 If a limit switch is actuated manually 0 will change to 1 which proves that it functions correctly Goto shelf Here the basket can be moved and stopped at every single product container to collect a prod...

Страница 68: ...d ramps use stair walkers Prior to moving the machine with a pallet truck or a fork lift please remove the kick plates The transportation locks prevent the product compartments from unhinging or the lift system from moving inadvertently Observe the machine s centre of gravity Due to its design the centre of gravity can be high Risk of tipping over 7 1 Transportation instructions 7 2 Suitable means...

Страница 69: ...F Robimat XL XM OPERATING INSTRUCTIONS Reinforcement Cut out showing the base of the machine The forklift forks must be placed under the complete machine base The base of the vending machine comprises two reinforcing plates to provide the necessary stability View from below ...

Страница 70: ...move the products Cleaning the product containers Leave the machine door ajar For recommissioning see chapt 3 7 6 Decommissioning and disposal If the machine cannot be operated any longer it must be decommissioned 1 Disconnect the mains plug 2 Disconnect the power supply leads For advice on the correct disposal of the vending machine please contact our Customer Service on 49 9825 18 31 51 08 The m...

Страница 71: ...use 8 K Kickplate 17 L Levelling the machine 18 Lock 45 Locking times 46 M Machine control board 35 Machine identification plate 6 Machine Menu M7 48 Main menu overview 36 Making the machine door move smoothly 19 Menu selection 35 Mounting site 16 P Patch Menu 62 POS 10 Power consumption 7 Power supply 11 Product basket 10 32 Product container 7 10 28 Product names 41 Programming keys 35 Program s...

Страница 72: ...or 30 000 1 24 Months or 60 000 1 36 Months or 90000 1 Lint filter directly under the slide out drawer Brush air 1 1 1 Condenser Brush air 1 1 1 Compressor Rinsing water 1 1 1 Evaporation tray Rinsing water 1 1 1 Connecting gaskets front rear left on the right side of the housing Vaseline rubber treatment 1 2 3 1 2 3 1 2 3 Glass door Resources Spare part number Action Frequency 1 clean 2 test chec...

Страница 73: ...tray Rinsing water 1 1 1 Coin return motor check if working 2 2 2 Coin mechanism card reader banknote reader Cleaning according to manufacturer s specifications Product to collection unit Internal area 1 1 1 Smooth operation of locking slide including spring 2 2 2 Delivery unit flap Even motorised travel movable by hand 2 2 2 Lifting capacity at least 250 g e g 0 25l can 2 2 2 Sliding clutch funct...

Страница 74: ...000 1 36 Months or 90000 1 Horizontal linear rail top Special lubricant e g Microlube GL 261 part no 998 90 037 01 1 3 1 3 1 3 Horizontal lower guide rail Rinsing water 1 1 1 Damage to horizontal toothed belt 2 2 2 Damage to vertical toothed belt 2 2 2 Deflection rollers belt drives 7x 2 3 2 3 2 3 Belt tensions Horizontal drive Measurement point upper centre vertical rail far left 1N with 15mm str...

Страница 75: ...on Frequency 1 clean 2 test check 3 lubricate 4 replace exchange OK 6 Months3 12 months 3 18 Moths3 Test key T on the FI circuit breaker press 2 2 2 Final Check Resources Spare part number Action Frequency 1 clean 2 test check 3 lubricate 4 replace exchange OK 12 Months or 30 000 1 24 Months or 60 000 1 36 Months or 90000 1 Start positions for selections 10 18 30 38 50 58 X direction Toothed wheel...

Страница 76: ...on Description Glas front vendor Machine Type GF EU EC directives applicable EC machinery directive 2006 42 EC The following standards also apply EN 60335 1 2012 EU directive to electromagnetic compatibility 2014 30 EU The following standards also apply EN 55011 2016 EN 55014 1 2006 A1 2009 A2 2011 EN 55014 2 2015 EN 61000 3 2 2014 EN 61000 3 3 2013 EN 62233 2008 EU directive RoHS 2011 65 EU The o...

Страница 77: ...rights reserved No part of this publication may be reproduced stored in a retrieval system or transmitted in any form or by any means electrical mechanical photocopying recording or otherwise without prior permission from Westomatic Vending Services Limited ...

Отзывы: