background image

Safety Notes 


Please read this manual carefully and use the unit  only according to this 
manual. 


Dispose of used packaging material carefully or store it out of the reach of 
children. There is a danger of suffocation! 


Make sure the voltage corresponds to the type label on the machine. 


Persons with limited physical, sensorial or mental abilities are not allowed to 
use the machine, unless they are supervised and briefed for their safety by a 
qualified person. 


Always attach the dust collection bag  while  working with the sander. Make 
sure that the integrated dust extraction system is functioning. 


Attention: The sander is not designed for wet sanding. 


Do not immerse the machine in liquids. 


Make sure the sanding paper is correctly in place before switching on. 


Avoid moving parts while working. There is danger of injury! 


Never sand materials containing asbestos. 


Please note that poisonous dust may be formed e. g. when sanding 
paint, which contains lead, while processing some kinds of wood or 
metal.  The dust forming during operation may be  hazardous to your 
health, combustible or explosive.  Wear safety goggles  and  dust 
protection. 


The unit is designed for operation in  altitudes of up to 2000 m above sea 
level. 


In the case of a malfunction please do not attempt to repair the machine 
yourself.  Contact  the Westfalia customer  support  department  or have it 
repaired by a professional. 


To avoid malfunction, damage, and physical injury please follow 
the included General Safety Notes and the following safety 
notes: 

Содержание 90 00 83

Страница 1: ...Tellerschleifer mit Gehrungslade 140 Watt Artikel Nr 90 00 83 Disc Sander 140 Watt Article No 90 00 83 Originalanleitung Original Instructions ...

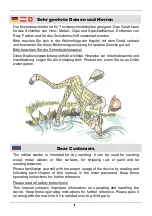
Страница 2: ...dhabung Legen Sie die Anleitung dem Produkt bei wenn Sie es an Dritte weitergeben Dear Customers The orbital sander is intended for dry sanding It can be used for sanding wood metal plaster or filler surfaces for stripping rust or paint and for sanding basecoat Please familiarize yourself with the proper usage of the device by reading and following each chapter of this manual in the order presente...

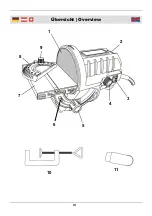
Страница 3: ...III Übersicht Overview 1 2 5 6 7 8 9 3 4 10 11 ...

Страница 4: ...g des Schleiftisches Sanding Table Bevel Angle Locking Knob 6 Befestigungsschraube des Schleiftisches Sanding Table Attachment screw 7 Schleiftisch Sanding Table 8 Schleifwinkelanschlag Mitre Gauge 9 Klemmschraube der Schleifwin keleinstellung Locking Knob of the Mitre Gauge 10 Schraubzwinge zur Montage an einer Werkbank Screw Clamp for Attachment to a Work Bench 11 Staubabsaugungsadapter Dust Ext...

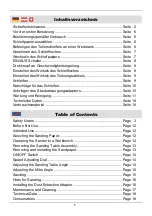
Страница 5: ...hleifen Seite 10 Anbringen des Staubabsaugungsadapters Seite 10 Wartung und Reinigung Seite 11 Technische Daten Seite 18 Verbrauchsmaterial Seite 18 Table of Contents Safety Notes Page 3 Before first Use Page 12 Intended Use Page 12 Selecting the Sanding Paper Page 12 Clamping the Sander to a Workbench Page 12 Removing the Sanding Table Assembly Page 13 Removing and installing the Sandpaper Page 1...

Страница 6: ...ten geeignet Tauchen Sie das Gerät nicht in Flüssigkeiten Vergewissern Sie sich dass das Schleifpapier richtig aufliegt bevor Sie das Gerät einschalten Vermeiden Sie das Berühren beweglicher Teile Es besteht Verletzungs gefahr Schleifen Sie unter keinen Umständen asbesthaltige Materialien Beim Schleifen können giftige Stäube entstehen z B bei bleihaltigen Anstrichen einigen Holzarten und Metallen ...

Страница 7: ... not immerse the machine in liquids Make sure the sanding paper is correctly in place before switching on Avoid moving parts while working There is danger of injury Never sand materials containing asbestos Please note that poisonous dust may be formed e g when sanding paint which contains lead while processing some kinds of wood or metal The dust forming during operation may be hazardous to your h...

Страница 8: ...appareil dans un liquide Assurez vous que le papier de verre est positionné correctement avant d utiliser l appareil Évitez de toucher les pièces mobiles Il ya toujours un risque de blessure Ne pas poncer aucun matériau contenant de l amiante Au cours de la ponçage se peuvent créer des poussières toxiques par exemple à la peinture contenant du plomb dans certains types de bois et métaux La poussiè...

Страница 9: ...o in un liquido Assicurarsi che la carta vetrata sia posizionata correttamente prima di utilizzare l apparecchio Evitare di toccare le parti in movimento Persiste pericolo di lesioni Non levigare in nessun caso materiali contenenti amianto Durante il levigare possono crearsi polveri tossiche ad esempio nelle vernici contenenti piombo in alcuni tipi di legno e metalli La polvere e i trucioli genera...

Страница 10: ...len Wählen Sie immer ein Schleifpapier aus das für das zu schleifende Material geeignet ist und auch die passende Körnung besitzt Je nachdem wie groß die Schleifkörner sind unterscheidet man gröbere von feineren Körnungen Die Körnung ist durch eine Zahl auf der Rücksei te des Schleifpapiers angegeben Je größer die Zahl ist desto feiner ist die Körnung Ein Papier bis Körnung 60 benutzt man für Grob...

Страница 11: ...en können 3 Ziehen Sie die Komplette Schleiftischbaugruppe B nach vorn vom Schleifteller weg Hinweis Nach dem Abnehmen des Schleiftisches kann das Schleifpapier abgenommen oder angebracht werden wie unten beschrieben 4 Um die Schleiftischbaugruppe wieder anzubringen setzen Sie sie von unten gegen das Motorgehäuse C und Schieben Sie es in Richtung des Schleiftellers Hinweis Achten Sie darauf dass d...

Страница 12: ...IN AUS Schalter 3 auf I Zum Ausschal ten des Tellerschleifers setzen Sie den EIN AUS Schalter auf O Der Tellerschleifer ist im Betriebsmodus S2 zu betreiben 15 Minuten Betrieb 10 Minuten Ab kühlen Drehknopf zur Geschwindigkeitsregelung Die Geschwindigkeit des Tellerschleifers kann nach Bedarf geregelt werden Drehen Sei zur Geschwindigkeitsregelung den Drehknopf 4 Für die höchste Geschwindigkeit st...

Страница 13: ...schte Winkel C mit der Markierung D übereinstimmt 4 Führen Sie Winkelanschlag so in den Schlitz dass das zum Schleifteller 1 gewandte Ende des Anschlages mindestens 6 mm innerhalb des äußeren Randes E des Schleiftellers liegt 5 Ziehen Sie die Klemmschraube an um den Winkelanschlag zu fixieren 6 Bearbeiten Sie ein Probestück um den Winkel zu überprüfen Schleifen Der Tellerschleifer ist gut für fein...

Страница 14: ...hleifen immer mit wenig Druck Wenn Sie mit zu viel Druck arbeiten wird der Vibrationsmechanismus eher blockiert und Sie bekommen ein ungleichmäßiges Schleifergebnis Außerdem kann zu viel Druck den Motor überhitzen Wählen Sie je nach Oberflächenzustand des Materials eine geeignete Schleifkorngröße Gehen Sie beim zweiten Schleifgang zu feinerem Schleifpapier über bis die gewünschte Glätte erreicht i...

Страница 15: ...aub mit einem Pinsel oder mit Druckluft aus den Lüftungsschlitzen Reinigen Sie den Schleifer niemals mit Wasser oder anderen Flüssigkei ten Verwenden Sie keine Lösungsmittel Scheuermittel oder aggressive Chemikalien um den Tellerschleifer zu reinigen Lagern Sie den Schleifer an einem trockenen und vor Schmutz geschützten Ort Lagern Sie das Gerät immer außerhalb der Reichweite von Kindern und zu be...

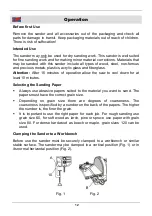
Страница 16: ...t least 10 minutes Selecting the Sanding Paper Always use abrasive papers suited to the material you want to sand The papers must have the correct grain size Depending on grain size there are degrees of coarseness The coarseness is specified by a number on the back of the papers The higher the number is the finer the grain It is important to use the right paper for each job For rough sanding use g...

Страница 17: ...e removed 3 Slide the sanding table assembly B outward away from the sanding plate Note Once the sanding table has been removed the sandpaper can be removed or installed as shown in below 4 To reinstall the sanding table assembly place it against the bottom of the motor housing C and slide it toward the sanding plate Note Make sure the positioning tabs are fully inserted into the matching slots in...

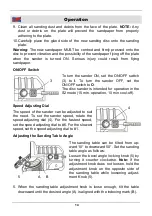
Страница 18: ...intended for operation in the S2 mode 15 min operation 10 min cool off Speed Adjusting Dial The speed of the sander can be adjusted to suit the need To set the sander speed rotate the speed adjusting dial 4 For the fastest speed set the speed adjusting dial to 6 For the slowest speed set the speed adjusting dial to 1 Adjusting the Sanding Table Angle The sanding table can be tilted from up ward 10...

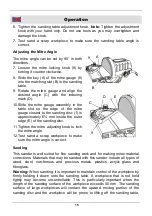
Страница 19: ...mm inside the outer edge E of the sanding disc 11 Tighten the mitre adjusting knob to lock the mitre angle 12 Test sand a scrap workpiece to make sure the mitre angle is correct Sanding This sander is well suited for fine sanding work and for making minor material corrections Materials that may be sanded with this sander include all types of wood steel non ferrous and precious metals plastics acry...

Страница 20: ...ressure will lead to jamming of the mechanism and will spoil the result Excessive pressure will overheat the machine Always select abrasive paper with coarseness suited the condition of the surface Use finer papers in the consecutive sanding until the desired smoothness is reached If you desire a very smooth finish you may slightly moisten the surface before the last sanding This will slightly swe...

Страница 21: ...nd free from obstructions at all times Clean out the slots after each use with a stiff brush or compressed air Do not use water or any other liquid to clean the sander Do not use solvents abrasives or aggressive chemicals to clean the sander Store the sander in a dry place and protect it from dirt Store the machine out of reach of children and persons in need of supervision ...

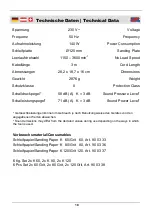
Страница 22: ...80 Grit 80 Art 90 03 36 Schleifpapier Sanding Paper K 120 Grit 120 Art 90 03 37 6 tlg Set 2x K 60 2x K 80 2x K 120 6 Pcs Set 2x 60 Grit 2x 80 Grit 2x 120 Grit Art 90 03 38 Spannung 230 V Voltage Frequenz 50 Hz Frequency Aufnahmeleistung 140 W Power Consumption Schleifplatte Ø 125 mm Sanding Plate Leerlaufdrehzahl 1150 3600 min 1 No Load Speed Kabellänge 3 m Cord Length Abmessungen 28 2 x 18 7 x 16...

Страница 23: ...19 Notizen Notes ...

Страница 24: ...20 Notizen Notes ...

Страница 25: ...nkung der Verwendung bestimmter gefährlicher Stoffe in Elektro und Elektronikgeräten RoHS Restriction of the Use of certain hazardous Substances in electrical and electronic Equipment RoHS 2014 30 EU 2014 30 EU Elektromagnetische Verträglichkeit EMV Electromagnetic Compatibility EMC EN 55014 1 2006 A1 A2 EN 55014 2 1997 AC A1 A2 EN 61000 3 2 2014 EN 61000 3 3 2013 2006 42 EG 2006 42 EC Maschinen M...

Страница 26: ...er Kunde bitte helfen Sie mit Abfall zu vermeiden Sollten Sie sich einmal von diesem Artikel trennen wollen so bedenken Sie bitte dass viele seiner Komponenten aus wertvollen Rohstoffen bestehen und wiederverwertet werden können Entsorgen Sie ihn daher nicht in die Mülltonne sondern führen Sie ihn bitte Ihrer Sammelstelle für Elektroaltgeräte zu Dear Customer Please help avoid waste materials If y...

Отзывы: