15
Operation
6. Tighten the sanding table adjustment knob.
Note:
Tighten the adjustment
knob with your hand only. Do not use tools as you may overtighten and
damage the knob.
7. Test sand a scrap workpiece to make sure the sanding table angle is
correct.
Adjusting the Mitre Angle
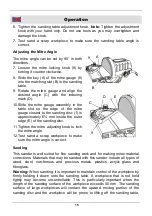
The mitre angle can be set by 90° in both
directions.
7. Loosen the mitre locking knob (9) by
turning it counter clockwise.
8. Slide the key (A) of the mitre gauge (8)
into the matching slot (B) in the sanding
table.
9. Rotate the mitre gauge and align the
desired angle (C) with the indexing
mark (D).
10. Slide the mitre gauge assembly in the
table slot so the edge of the mitre
gauge closest to the sanding disc (1) is
approximately 6½ mm inside the outer
edge (E) of the sanding disc.
11. Tighten the mitre adjusting knob to lock
the mitre angle.
12. Test sand a scrap workpiece to make
sure the mitre angle is correct.
Sanding
This sander is well suited for fine sanding work and for making minor material
corrections. Materials that may be sanded with this sander include all types of
wood, steel, non-ferrous and precious metals, plastics, acrylic glass and
fiberglass.
Warning:
When sanding, it is important to maintain control of the workpiece by
firmly holding it down onto the sanding table. A workpiece that is not held
tightly may become uncontrollable. This is particularly important when the
length of the sanding surface of the workpiece exceeds 50 mm. The sanding
surface of large workpieces will contact the upward moving portion of the
sanding disc and the workpiece will be prone to lifting off the sanding table,
B
A
9
E
1
D
C
8
Содержание 90 00 83
Страница 3: ...III Übersicht Overview 1 2 5 6 7 8 9 3 4 10 11 ...
Страница 23: ...19 Notizen Notes ...
Страница 24: ...20 Notizen Notes ...

