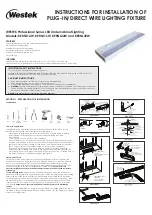
SECTION 2 - INSTALLATION
Plug-in Fixture Installation
Attach fixture to cabinet or wall by tightening screws securely. (Note: before mounting
to cabinet be sure fixture is within 6’ of an electrical outlet, considering path cord will
take to be neatly and securely mounted to cabinet and wall.) Connect 6’ Power Cord
to the Input port after removing Input Panel Cover with a small Phillips screwdriver. (See
Figure 2). Plug in Power Cord to a 15A circuit grounded outlet.
Warning: Do not conceal
power supply cord inside a wall, ceiling, soffit, kitchen cabinet, or similar permanent
structure. Do not run the power supply cord through holes in walls, ceilings or floors.
Use UL listed cable staples (not included) to route Power Cord to bottom of cabinet and
wall for a clean installation.
Direct Wire Installation
Remove Knockout
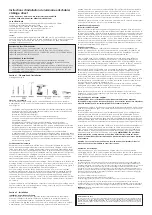
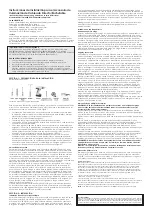
Locate and remove the desired knockout using a hammer and a screwdriver or punch
as shown in Figure 4. If knockout used is in the rear access panel, remove the screw
and rear access panel to gain access to the Quick Connect wire connectors inside the
fixture. If knockout is in another location you will need to remove the top cover to gain
access to the inside of the fixture to secure the Cable Connector.
Caution: there is a
ground wire that attaches to one of the cover screws that must be reattached when the
cover is replaced. Use pliers to remove the knockout completely. Attach the supplied
Cable Connector as shown in Figure 5.
Make Connections
WARNING: Make sure electrical power supply for installation circuit is shut down at
electrical service panel before starting installation. Do not re-energize circuit until
installation is fully completed. Ensure that no bare wires are exposed outside the
electrical connections.
Using either armored cable or non-metallic cable follow schematic in Figure 6 to make
electrical connections per National Electric Code (NEC) and local codes in your area.
AC supply should be 120V protected by circuit breaker or fuse. Use 12 or 14 AWG wires.
Figure 7 shows completed electrical connections using push in wire connectors.
Replace rear access panel or fixture cover making sure all connections are secure
before closing up fixture. Note: Be sure that the wires are not pinched or damaged
by any part of the housing or the cover. If fixture cover was removed to gain access
to other knockouts, be sure ground wire is reattached under cover screw. (Tip: use
a thin screwdriver or a scratch awl to locate and align grounding wire connector by
sliding round connector over locater tool and push into screw hole while closing cover.
Replace screw.)
CAUTION: Do not leave any knockouts uncovered. If more than one knockout was
removed, they must be covered with an approved 1/2” Knockout Plug per the NEC. (not
included)
Attach fixture to cabinet or wall by tightening screws securely. Insert screw plugs for a
clean installation. Re-energize electrical circuit at the service panel.
Interconnecting Multiple Fixtures
WARNING: In multiple fixture installations do not electrify fixture group until all electrical
connections have been made And fixtures have been securely mounted.
There are two ways to interconnect multiple Westek KERN Series fixtures using either the
In-Line Connector or the 12” Linking Cord supplied with this kit. See Figure 8.
Follow instructions above for either a Plug-In or Direct Wire Installation.
First mount fixture that receives incoming electrical supply. With a small Phillips
screwdriver remove the Input or Output Panel Covers as needed. When using the
In-Line Connector to join fixtures make sure the In-Line Connector is fully seated in both
fixtures. Fixtures should fit fully and squarely end-to-end when mounting is complete.
When using the Linking Cord, make sure plugs on both ends are fully inserted into ports
on both fixtures. There should be some slack in the Linking Cord so that the electrical
connectors are not stressed in any way. Use cord clips (not included) to keep cord
safely attached to mounting surface.
WARNING: Do not use Linking Cord as a means to
turn fixtures on and off. Do not link other manufacturer’s or other Westek brand fixtures
to this fixture.
Caution: Input and Output Panel Covers must be installed in all open ports before re-
energizing the circuit.
Fixture Dimming
This product is suitable for use in dimming circuits. For 10-100% light control, use an
electronic dimmer (which includes CFL/LED dimmer types) with a switched outlet.
Dimmer performance and range of dimming depend on model used.
FCC Statement
This equipment has been tested and found to comply with the limits for Part 15 of the
FCC rules. These limits are designed to provide reasonable protection against harmful
interference in a residential installation. This equipment generates, uses and can radiate
radio frequency energy and, if not installed and used in accordance with the instructions,
may cause harmful interference to radio communications.
However, there is no guarantee that interference will not occur in a particular installation. If
this equipment does cause harmful interference to radio or television reception, which can
be determined by turning the equipment off and on, the user is encouraged to try to correct
the interference by one or more of the following measures:
• Reorient or relocate the receiving antenna.
• Increase the separation between the equipment and receiver.
• Connect the equipment to an outlet on a circuit different from that to which the
receiver is connected.
This device complies with part 15 of the FCC rules. Operation is subject to the following
two conditions: (1) This device may not cause harmful interference, and (2) this device
must accept any interference received, including interference that may cause undesired
operation.
Note: Modifications to this product will void the user’s authority to operate this equipment.
One-Year Limited Warranty
AmerTac warrants to the original purchaser that this product will be free from defects in materials
and workmanship for a period of one year from the date of purchase. Additional details are
available at www.amertac.com. PROP. 65 WARNING: This product contains chemicals known to
the State of California to cause cancer and/or birth defects or other reproductive harm.
©2017 AmerTac™
250 Boulder Drive
Breinigsville, PA 18031
www.amertac.com
Made in China / Fabriqué en Chine / Fabricado en China
I17-0060-A


