16
OPERATION
ANGLE CUTTING (BEVELING)
1. Layout or secure design to workpiece.
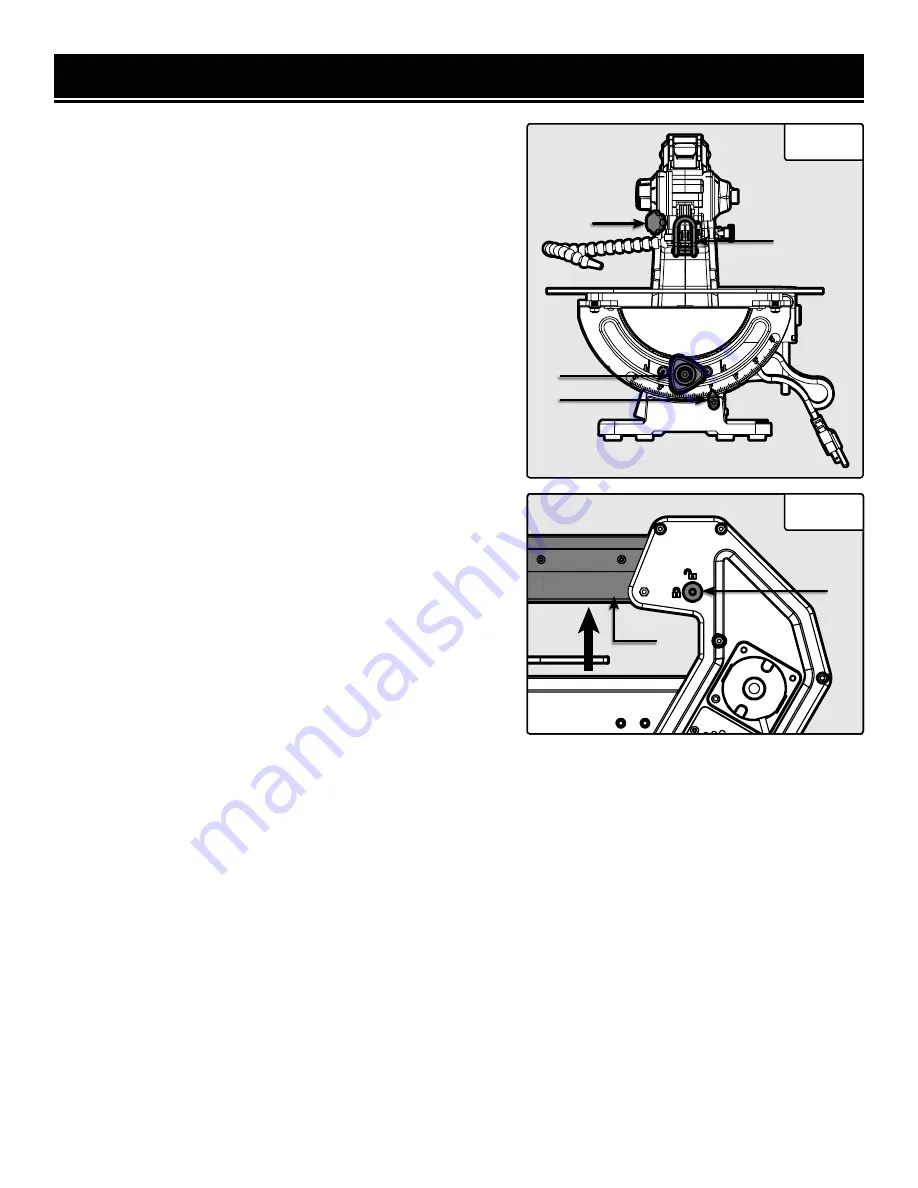
2. Loosen the height adjustment knob (Fig. 14 - 2), move the
blade guard foot (FIg. 14 - 1) to the highest position, and re-
tighten the knob.
3. Tilt the table to the desired angle by loosening the table bevel
lock knob (Fig. 14 - 3). Move the table to the proper angle using
the degree scale and the pointer (Fig. 14 - 4).
TIP:
The table has positive stops at 0, 22.5, 30, and 45 degrees.
4. Tighten the table bevel lock knob (Fig. 14 - 3).
5. Loosen the blade guard screw, and tilt the blade guard (Fig.
14 - 1) to the same angle as the table. Retighten the blade guard
screw. (See also Fig. 6 on p. 11.)
6. Position the workpiece on the right side of the blade. Lower
the blade guard foot against the surface by loosening the height
adjustment knob. Retighten.
7. Follow steps 5 to 7 under Freehand cutting.
INTERIOR CUTTING & FRETWORK
1. Lay out the design on the workpiece. Drill a 1/4” pilot hole in
the workpiece.
2. Remove the blade. See “Blade removal and installation” on
p. 13.
NOTE:
If you are not changing blades, only remove the blade
from the upper blade clamp. Leave it installed in the lower blade
clamp. If you are changing blades, install the new blade in the
lower blade clamp. Do not secure it in the upper blade clamp
yet.
2
1
4
3
Fig. 14
Fig. 15
3. Pull the upper arm release knob (Fig. 15 - 1) outward, and turn it clockwise so the pin rests in the shallow groove.
4. Gently press up on the upper arm (Fig. 15 - 2) of the saw to raise it.
5. Place the workpiece on the saw table, threading the blade through the hole in the workpiece.
6. Lower the upper arm. Pull the upper arm release knob outward, and turn it back so it rests in the deep groove.
This will lock the upper arm in place. Gently press up on the upper arm to make sure it is locked in place.
7. Secure the blade in the upper blade clamp, as directed in “Installing the Blade” on p. 13.
8. Follow steps 4 - 7 under “Freehand cutting” on p. 15.
9. When finished making the interior cuts, turn the scroll saw OFF and unplug it. Relieve blade tension and remove
the blade from the upper blade clamp. Raise the upper arm and remove the workpiece. Lower the upper arm and
lock it in place.
1
2


