WELL WRC7010N User’s Manual
97
WPA/WPA2/WPA2 Mixed + Personal (Pre-Shared Key)
Wi-Fi Protected Access (WPA and WPA2) is a class of systems
to secure wireless (Wi-Fi)
computer networks. WPA is designed to work with all wireless
network interface cards, but not necessarily with first generation
wireless access points. WPA2 implements the full standard, but
will not work with some older network cards. Both provide good
security, with two significant issues:
•
Either WPA or WPA2 must be enabled and chosen in
preference to WEP. WEP is usually presented as the first
security choice in most installation instructions.
•
In the "Personal" mode, the most likely choice for homes
and small offices, a pass phrase is required that, for full
security, must be longer than the typical 6 to 8 character
passwords users are taught to employ.
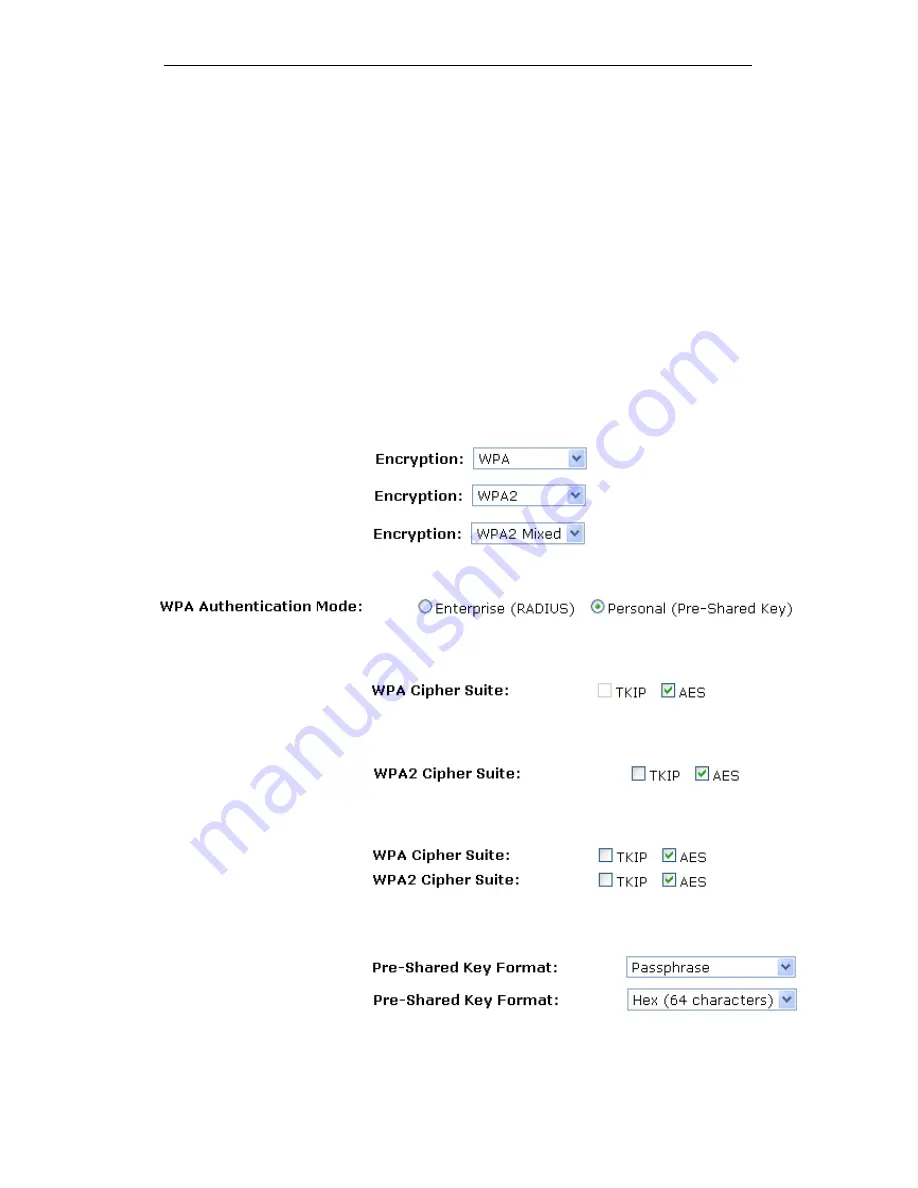
1. From the Encryption drop-down list, select WPA, WPA2 or
WPA2 Mixed setting.
2. Click on the ratio of Personal (Pre-Shared Key).
3. Check the option of TKIP and/or AES in WPA Cipher Suite
if your Encryption is WPA:
4. Check the option of TKIP and/or AES in WPA2 Cipher Suite
if your Encryption is WPA2:
5. Check the option of TKIP and/or AES in WPA/WPA2
Cipher Suite if your Encryption is WPA2 Mixed:
6. From the Pre-Shared Key Format drop-down list, select
Passphrase or Hex (64 characters) setting.
7. Enter the Pre-Shared Key depending on selected
Passphrase or Hex (64 characters).
Содержание WRC7010N
Страница 1: ...WELL WRC7010N User s Manual 1 WELL WRC7010N User s Manual ...
Страница 11: ...WELL WRC7010N User s Manual 11 1 2 3 4 Off No LAN link Blink Valid Ethernet packet being transferred ...
Страница 15: ...WELL WRC7010N User s Manual 15 2 Single RIGHT click on Local Area connection then click Properties ...
Страница 16: ...WELL WRC7010N User s Manual 16 3 Double click on Internet Protocol TCP IP ...
Страница 20: ...WELL WRC7010N User s Manual 20 3 Single RIGHT click on Local Area connection then click Properties ...
Страница 24: ...WELL WRC7010N User s Manual 24 2 In the Control Panel Home click on Change adapter settings to continue ...
Страница 25: ...WELL WRC7010N User s Manual 25 3 Single RIGHT click on Local Area Connection then click Properties ...
Страница 26: ...WELL WRC7010N User s Manual 26 4 Double click on Internet Protocol Version 4 TCP IPv4 ...
Страница 31: ...WELL WRC7010N User s Manual 31 4 Click Wireless Configuration ...
Страница 43: ...WELL WRC7010N User s Manual 43 3 Click on the ratio of Gateway and then click on Next ...
Страница 46: ...WELL WRC7010N User s Manual 46 ...
Страница 49: ...WELL WRC7010N User s Manual 49 2 Double click Network Connections ...
Страница 90: ...WELL WRC7010N User s Manual 90 Figure 9 Wireless Network page ...
Страница 119: ...WELL WRC7010N User s Manual 119 15 Connect successfully Click on OK button to confirm and return ...
Страница 128: ...WELL WRC7010N User s Manual 128 7 Click on Turn on network discovery and file sharing ...
Страница 129: ...WELL WRC7010N User s Manual 129 8 Click on No make the network that I am connected to a private network ...
Страница 130: ...WELL WRC7010N User s Manual 130 9 AP s icon will show up Double click on it ...
Страница 131: ...WELL WRC7010N User s Manual 131 10 Users could also Click Add a wireless device if the icon is not there Click next ...
Страница 132: ...WELL WRC7010N User s Manual 132 11 Enter AP s Self PIN Number and click next ...
Страница 133: ...WELL WRC7010N User s Manual 133 12 Choose a name that people who connect to your network will recognize ...
Страница 134: ...WELL WRC7010N User s Manual 134 13 Enter the Passphrase and then click Next ...
Страница 159: ...WELL WRC7010N User s Manual 159 5 Change setting successfully Click on Reboot Now button to confirm ...
Страница 161: ...WELL WRC7010N User s Manual 161 4 Change setting successfully Click on Reboot Now button to confirm ...
Страница 163: ...WELL WRC7010N User s Manual 163 5 Change setting successfully Click on Reboot Now button to confirm ...
Страница 165: ...WELL WRC7010N User s Manual 165 5 Change setting successfully Click on Reboot Now button to confirm ...
Страница 167: ...WELL WRC7010N User s Manual 167 5 Change setting successfully Click on Reboot Now button to confirm ...
Страница 170: ...WELL WRC7010N User s Manual 170 5 Change setting successfully Click on Reboot Now button to confirm ...
Страница 191: ...WELL WRC7010N User s Manual 191 ...
Страница 202: ...WELL WRC7010N User s Manual 202 6 Change setting successfully Click on Reboot Now button to confirm ...
Страница 206: ...WELL WRC7010N User s Manual 206 6 Change setting successfully Click on Reboot Now button to confirm ...
Страница 210: ...WELL WRC7010N User s Manual 210 5 Firmware update has been update complete The following page is displayed ...
Страница 217: ...WELL WRC7010N User s Manual 217 ...
Страница 226: ......


