INSTALLATION & OPERATIONS
IOM-013
Page 7 of 18
CP2 & CP5GM
Rev: D
Last updated: 4/14/2011
Figure 4 -
Product End Cap
1.
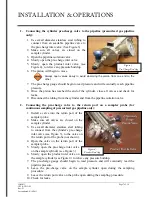
Connecting the cylinder pre-charge valve to the pipeline (pressurized gas pipeline
only):
1.
Use small diameter stainless steel tubing to
connect from an available pipeline valve to
the pre-charge inlet valve. (See Figure 3).
2.
Make sure all valves are closed on the
sample cylinder.
3.
Open the pipeline isolation valve.
4.
Slowly open the pre-charge inlet valve.
5.
Slowly open the product inlet valve (see
Figure 4), to relieve any pressure buildup.
6.
The piston will begin to move.
Always open valves slowly to avoid slamming the piston from one end to the
other.
7.
The pre-charge gauge should begin to read pressure and will eventually reach pipeline
pressure.
8.
Once the piston has reached the end of the cylinder, close all valves and check for
leaks.
9.
Disconnect the tubing from the cylinder and from the pipeline isolation valve.
2.
Connecting the pre-charge valve to the return port on a sampler probe (for
continuous sampling of pressurized gas pipeline only):
1.
Install a valve into the return port of the
sampler probe.
2.
Make sure all valves are closed on the
sample cylinder.
3.
Use small diameter stainless steel tubing
to connect from the cylinder’s pre-charge
inlet valve (see Figure 3), to the valve on
the return port of the probe (not shown).
4.
Open the valve on the return port of the
sampler probe.
5.
Slowly open the pre-charge inlet valve
on the sample cylinder (see Figure 3).
6.
Slowly open the product inlet valve on
the sample cylinder (see Figure 4) to relieve any pressure buildup.
7.
The pre-charge gauge should begin to read pressure and will eventually read the
pipeline pressure.
8.
Leave the pre-charge valve on the sample cylinder open during the sampling
procedure.
9.
Leave the return port valve on the probe open during the sampling procedure.
10.
Check for leaks.
Figure 3 -
Pre-Charge End Cap


