background image

Part Number: 9294045  07/19

Technical Information 

Section 2

3 - INSTALLATION

,

,

All stages of installation must be carried out in 

compliance with the national standards in force 

according to the manufacturer’s instructions and 

by professionally qualified personnel.

Installation of the appliance and of the refrigerating 

unit must only be carried out by technicians of the 

manufacturer or by skilled personnel.
If the machine was supplied with a remote condesing 

unit, it is the installer’s responsibilty to check all the 

connections in accordance with the instructions provided 

for the installation of the systems and machinery.
The installer is advised to use the appropriate personal 

protective equipment necessary for processing and in 

compliance with the regulations in force.

3.1 - Transportation and handling

The net and gross weight of this appliance can be found 

on the external packaging.
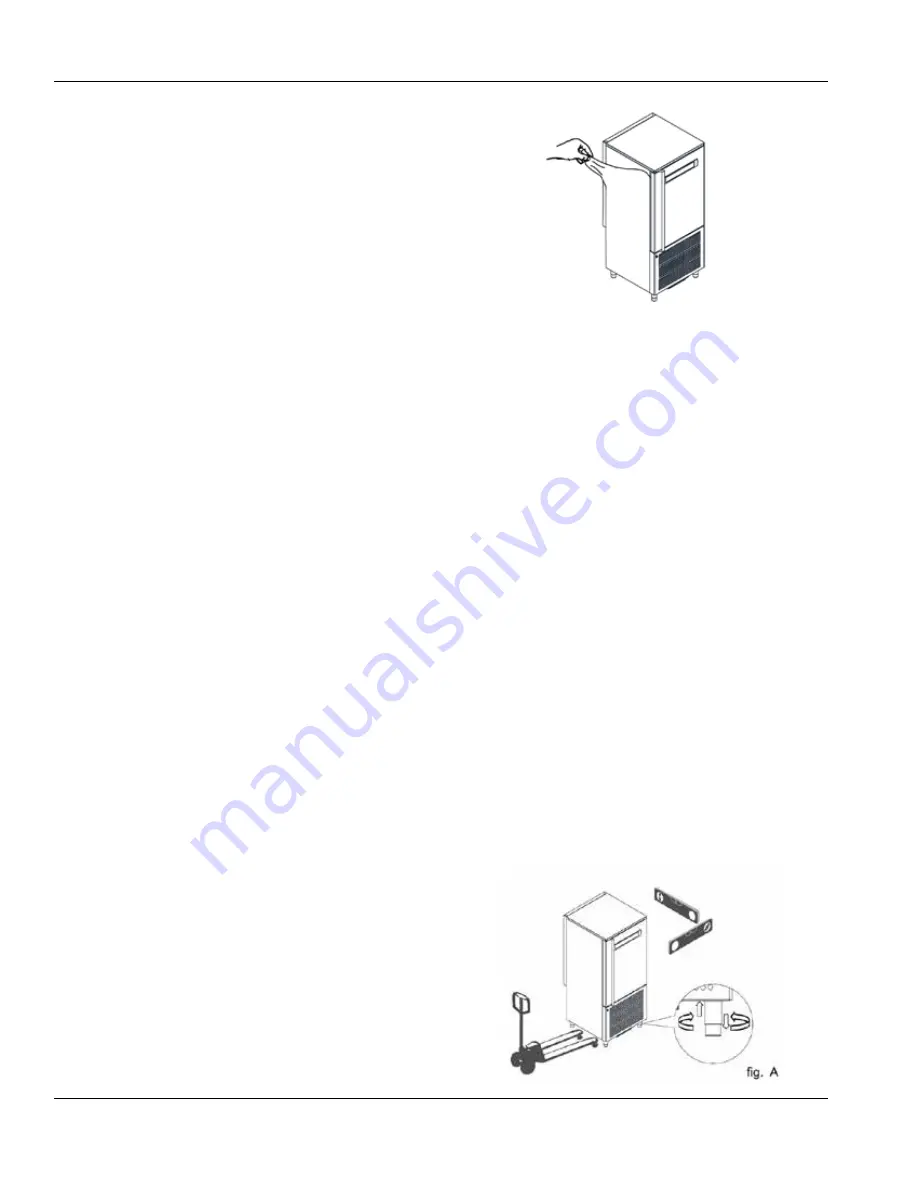
Loading and unloading of the appliance and/or of the sub-

systems from the means of transport can be performed 

using a forklift truck or fork pallet truck, the length of 

which is more than half that of the unit or using cranes 

where the apppliance/sub-system is fitted with eyebolts. 

The lifting equipment must be chosen according to the 

size of the packaged machine/components and with 

sufficient capacity. For handling of the appliance/sub-

systems, every precaution must be taken not to damage 

them, respecting the indications on the packaging.

3.2 - Unpackaging and disposal
Remove all cardboard or the wooden crate from the base 

on which the machine is placed. Then lift the machine/

sub-assemblies with a suitable means (forklift truck); 

remove the wooden base and position the machine/sub-

assemblies in the place provided.
After removing the packaging, verify the integrity of the 

machine/sub-assemblies in case of uncertainty do not use 

it and contact the distributor.
Remove the protective PVC film on the stainless steel 

panels from all sides both internally and externally.

NOTE: All the various components of the packaging must 

be disposed of according to the regulations in force in the 

country where the appliance is being used. In any case 

nothing must be disposed of into the environment.

3.3 - Positioning

The appliance:
•  must be installed in places where it can be checked by 

qualified personnel

•  it must not be installed outdoors.
•  it must not be installed in dusty environments.
•  it must not be placed in locations with the presence of 

water jets.

•  it must not be washed with water jets.
•  it must be installed and tested in full compliance with 

safety laws, traditional systems and with the regulations 

in force.

•  it must be positioned at a minimum distance of 120mm 

from the rear wall.

The installer must verify any requirements for fire safety 

(refer to the command of the local fire department for the 

relevant indications.)
Level the appliance through adjustment of the feet. For 

the setting up of heavier machines, use dedicated hoists 

(fig. A - chap. 3.1). 
If the appliances are not levelled their functioning and the 

flow of condensates could be impaired.

Содержание Delfield CV10E

Страница 1: ... 2 and T40 Original Instructions Installation Operation and Maintenance Manual This manual is updated as new information and models are released Visit our website for the latest manual Fresh Solutions Fit for You Part Number 9294045 07 19 ...

Страница 2: ...eset minimum pressure swtich alarm 16 7 Auto reset Kriwan Alarm 16 8 Input alarm HT 1 Fusable 16 9 Overtemperature 16 10 Black Out Alarm 16 11 Compressor preventative maint alarm 16 12 Temperature not reached in time alarm 16 13 Power keypad card connection alarm 16 14 Maximum pressure switch alarm 17 HACCP ALARM MEMORIES RESET 18 HACCP DATA READING 19 HACCP DATA EXPORT WITH USB 19 1 Extracted dat...

Страница 3: ...g 6 APPLIANCE FUNCTIONS 6 1 Date and time settings 6 2 Ice cream surface hardening 6 3 Muting the beeper and alarm 6 4 Program storage 6 5 Displaying the three latest HACCP alarms 6 6 printing out stored data 6 7 Forced ventilation function 6 8 Manual defrosting 6 9 Automatic defrost cycles 6 10 Printer operation 7 ALARM MANAGEMENT 7 1 Storage of data errors 7 2 Software controls 33 34 34 35 35 36...

Страница 4: ...pose you to airborne particles of glasswool or ceramic fibers crystalline silica and or carbon monoxide Inhalation of airborne particles of glasswool or ceramic fibers is known to the State of California to cause cancer Inhalation of carbon monoxide is known to the State of California to cause birth defects or other reproductive harm nWarning Do not use electrical appliances inside the food storag...

Страница 5: ... in the refrigerant circuit entail the immediate discharge of all the refrigerant into the environment The appliance s climate class is stated on the serial plate 2 2 Refrigerant The appliance contains flourinated greenhouose gases covered by the Kyoto Protocol in the quantities indecated on the serial plate The type of refrigerant gas present in the refrigerant circuit of the appliance is shown o...

Страница 6: ...6 Part Number 9294045 07 19 Technical Information Section 2 CV10E 10 trays CV15E 15 trays 2 3 Measurements CV5E 5 trays ...

Страница 7: ...0kg 15T 2800oz 80kg 700oz 20kg 30T 3000oz 85kg 700oz 20kg 2 4 2 Maximum trays capacity trays not supplied with the appliance Standard internal support structure Model Size Trays 5t 10T 15T 30T 153 4 x 235 8 600x400mm 5 10 15 30 123 4 x 203 4 530x325mm 5 10 15 30 235 8 x311 2 600x800mm n a n a n a 15 123 4 x 411 2 530x650mm n a n a n a 15 Optional internal support structure Model Size Trays 5t 10T ...

Страница 8: ...s on the packaging 3 2 Unpackaging and disposal Remove all cardboard or the wooden crate from the base on which the machine is placed Then lift the machine sub assemblies with a suitable means forklift truck remove the wooden base and position the machine sub assemblies in the place provided After removing the packaging verify the integrity of the machine sub assemblies in case of uncertainty do n...

Страница 9: ...be made according to existing national rules and by experienced qualified personnel Before connecting the appliance to the mains make sure that the mains voltage corresponds to the voltage indicated on the data plate Verify that the electrical installation is adequate to the maximum power of the appliance as indicated on the plate Upstream of each device it is mandatory to install a differential t...

Страница 10: ...nction Safety pressure switch this operates in the case of excess pressure in the refrigerant circuit Fusible plug this intervenes in the case of overpressure and failure of the afore mentioned safety pressure switch Chamber temperature control this is operated by the electronic card via the probe positioned inside the cell Defrost termination temperature control this is managed by the electronic ...

Страница 11: ...ring assumes the following colors depending on the following relative connected states BLUE Phase of chilling deep freezing or storage ORANGE Thawing GREEN BLUE Machine on stand by WHITE Machine at standstill RED FLASHING Serious alarm FLASHING YELLOW Non serious alarm door opening maintenance 15 Thawing button Button that when pressed starts the defrost cycle 16 Program button Programs recall or ...

Страница 12: ...hase that is used to achieve the time set Time chilling or for reaching of the product temperature set Temperature chilling changing to the unlimited duration storage cycle takes place automatically except for the the HARD HARD negative chilling cycle It is possible to stop the chilling or storage at any time by pressing the Start Stop button 22 Chilling time During this type of chilling the displ...

Страница 13: ...5C This method accelerates cooling in the presence of products that are resistant and very hot initially Once the MEDIUM or FAST cycles are started to modify the HARD phase duration simply press the button 2 that will show on the display 19 the words Hard and will result in flashing on the display 18 the value in minutes of the HARD phase With the buttons it is possible to increase or decrease the...

Страница 14: ...t is possible to change during the storage phase the temperature set which appears flashing on the display 18 while on the display 19 the wording SET appears To adjust the value within 6 seconds press the buttons 8 DEFROST MODE Gas hot or air defrosting takes place in automatic mode only during the storage phase and with a default time of 8 hours that is editable or manuallybothwithmachineinstorag...

Страница 15: ...e changed with the buttons 2 the next press of the button 10 will acquire the new value 3 now using the buttons it is possible to chance the flashing set represented on the display 18 with a value that can range from the minimum value to a maximum one this theoretically allows setting of the long softening cycles for ice cream which extracted from the storage machine must be placed on display 4 pr...

Страница 16: ...dent program the user must 1 press the PROG button short press the LED lights up andwiththe buttons selectoneofthesavedprograms 2 press START If the save button is pressed by accident pressing it again will exit that function While a program is running by pressing the PROG button the display shows the name of the program in progress 16 ALARMS Summerized here are the main alarms that can appear and...

Страница 17: ... The alarm is inhibited during pump downs Effect It places the machine in STOP Inhibition of the Start Stop and Defrost buttons Beeper The beeper sounds 3 seconds and then pauses for 30 seconds until the silencer button is pressed Display LED The display shows the scrolling text AL07 PRESSIONE MINIMA MIN PRESSURE Flashing RED symbol 14 Reset Pressing the off beeper alarm silencer button or switchi...

Страница 18: ...arm silencer beeper off button 16 13 Power keypad card connection alarm Cause when there is no connection between the interface and the power card Effect All the buttons are disabled All the relays are deactivated All the inputs are ignored The LED comes on correponding to the button that was pressed Beeper the beeper sounds 3 seconds and then pauses for 30 seconds indefinitely Display LED The dis...

Страница 19: ...ture Date cycle start time Cycle type txt In the event of positive SOFT chilling we will have 05_04_2014 13h54 POS2 txt By cycle type it is meant Positive chilling POS2 POS1 POS3 depending on the LEDs lit Negative chilling NEG1 NEG2 NEG3 NEG4 depending on the LEDs lit Chilling program PROG no Defrost THAW Ice Cream GEL Ozone Cycle OZN The cycle start and end conditions will typically be recorded a...

Страница 20: ...circulation of air Recommended frequency operation to be performed every 30 days or in any case according to the working condintions of the appliance the presence of dust and flourintheworkenvironmentoftheappliancesignificantly affects dirt accumulation of the condenser thus making it less efficient 20 2 2 Condenser filter cleaning for air cooled models only Recommended frequency operation to be p...

Страница 21: ...55 1940 55 240 21 4 How to load the machine A In order to grant chilling freezing time ensure that food to be chilled frozen in seperated pieces max thinkness 2 50mm B Ensure a sufficient distance is maintained between the trays to allow adequate air circulation If the machine is not completely loaded distribute the trays and the load over the entire useful height avoiding concentrations A B C Pla...

Страница 22: ...22 Part Number 9294045 07 19 Troubleshooting Section 4 T40 BLast Chiller Shock Freezer ...

Страница 23: ...h Pressure Switch Set Point 450 pisg 380 psig re set Low Pressure Switch Set point 25 psig Range 15in to 100psig Oil Pressure Differential Switch Sensotronic Oil Pressure Switch Compressor Reliability Crankcase Heater 65 watts Flow Control Condensor Capacity control Head Pressure Control Set at 84F 185psig Reciever Capacity 55 4lbs 90 liquid refrigerant fill 37 5lbs max refrigerant charge Accumula...

Страница 24: ... are not included Installation must be made by a qualified refrigeration technician Piping runs of greater than 100 feet require consultation with the factory Delfield Model T40CU Refrigerant 404A Compressor and Wiring Compressor and Capacity 6HP Compressor 24 950 BTUH 4 1 gpm waterflow 32F 90 amb 102 2 Cond 18 090 BTUH 40F 85F inlet water 105F Condensign Condensing Unit Wiring 208 230V 60Hz 3ph M...

Страница 25: ...Part Number 9294045 07 19 25 Section 4 Troubleshooting T5 T14D Refrigeration System Schematic ...

Страница 26: ...26 Part Number 9294045 07 19 Troubleshooting Section 4 T5 T14D Wiring Diagram ...

Страница 27: ...allation and Assembly Supplied Equipment List T40 Base T40 LS Wall Panel T40 Back Panel T40RS Wall Panel T40 Control Box T40 Front Panel With Door T40Top Panel Alignment Blocks Cam Lock T Handle Cam Hole Covers T40 Remore Condensing Unit T40 Air Deflection Sheilds ...

Страница 28: ...re placing any panels Make sure the skirt on the vertical panels covers the outside of the mounting floor Lock botton locking cams on the outside of the first panel Insert T Handle wrench and twist clockwise until a positive stop is acheived The panel will now stand on its own NOTE Do not lean or push on unsupported panels 3 Attach the back panel to the mounting floor in the same manner as the fir...

Страница 29: ...he panel is in position Insert T handle wrench and twist clockwise until a positive stop is achieved Attache the left side deflector shield to the front panel with the provided screws The shield should cover the coner 6 Place the top panel on to the top of the cabinet with the refrigeration holes facing the first panel Thread the refrigeration pipes through the supplied holes and ensure there is n...

Страница 30: ...ming out of the top of the cabinet This should be done by qualified refrigeration expert Put the compressor system in a suitable well aired place no farther than 25 feet from cabinet 11 Place interior probes Interior probe 1 Place on wall next to the evaporator Food probe Place in food product for monitoring Interior probe 2 Place on opposite side of cabinet from evaporator 3 4 of the way to the t...

Страница 31: ...Part Number 9294045 07 19 31 Section 4 Troubleshooting Controller Buttons ...

Страница 32: ...YCLE 0F 18C END CYCLE BY TIME PROBE TEMPERATURE PROBE CHILLING INDICATOR LED TIME CHILLING INDICATOR LED CYCLE START STOP INCREASE VALUE DECREASE VALUE RECIPE PROGRAMS CHILLING CYCLES HACCP AND PRINTER OPTIONAL DEFROSTING FORCED VENTILATION CHILLING FREEZING CYCLE INDICATOR LED STORAGE INDICATOR LED TIME DISPLAY TEMPERATURE DISPLAY Controller Functions ...

Страница 33: ...G 0 F 18 C This function freezes the product completely to a temperature of 0 F 18 C in approximately 4 hours The rapidityoftheprocesspreventsformationofmacrocrystals essential to ensure that the product retains its original consistancy and quality when thawed for consumption AUTOMATIC CONSERVATION Attheendofcycle chillingandfreezing theappliancewill automatically switch to the required storage te...

Страница 34: ...5B and push button LEDs remain on the LEDs 13 flash throughout the cycle Internal cell temperature is shown on display 15 When the maximum chilling time has counted back to 0 the chilling cycle is completed and the appliance automatically switches to the set positive storage temperature for an indefinite interval LEDs illuminate and the beep is activated when the cycle is finished as in the chilli...

Страница 35: ... button 3 flashes then with temperatures arounf 32 F 0 C LED on push button 3 on For example HARD timed chilling cycle 90 minutes First stage of 40 minutes with negative air temperatue Second cycle stage or 50 minutes with air temperature around 32 F 0 C When the maximum chilling time has counted back to 0 the chilling cycle is completed and the appliance automatically switched to the set posoitiv...

Страница 36: ...ure is shown on display 15 When the maximum chilling time has counted back to 0 the cycle is completed and the appliance automatically switches to the set negative storage temperature for an indefinite interval LEDs illuminate and the beep is activated when the cycle is finished as in the freezing cycle by temperature The same applies for the storage function The factory setting for negative stora...

Страница 37: ...er is off automatically if alarm conditions are removed see also section 7 Alarm managment 6 4 PROGRAM STORAGE PUSH BUTTON 9 The programming function is used for the cycles for processing products with the same characteristics Ep to 99 programs can be stored Select the type of chilling process Soft Hard Timed Freezing or by Temperature then press and holf push button 9 until display 15 shows the a...

Страница 38: ...Units post 4 16 The USB data recorder will register into a txt file all the data during the cycles of the machine Blast Chilling or Freezing and also during conservation phase The data is registered every minute and will include Date and Time Cabinet Temperature Core Probe Temperature Type of Cycle Start and Stop Cycle Door Openings Alarms The data is constantly stored on the internal recorder and...

Страница 39: ...er 30 seconds Probe is defective replace probe Effect Any current chilling cycle is interrupted If a storage phase is in progress the compressor and the fan are set to Stand By When the appliance is in Stop press the Start to set the compressor and fan to Stand By Beeper Activated 3 seconds than a pause of 30 seconds until the mute button is pressed Display Alternates message ALL 03 with standard ...

Страница 40: ...with relative alarm delta This alarm is disregarded if the storage probe is already in alarm status Compressor Preventive Maintenance Alarm ALL 13 Cause Compressor operating time is a whole multiple of hours set under passsword Temperature Not Reached In Set Time Alarm ALL 14 Cause Blast chilling by temeprature has lasted longer than the time set for Timeout Effect Store the alarm in HACCP memory ...

Страница 41: ...Part Number 9294045 07 19 41 Section 4 Troubleshooting THIS PAGE INTENTIONALLY LEFT BLANK ...

Страница 42: ...lutions Fit for You Welbilt provides the world s top chefs and premier chain operators or growing independents with industry leading equipment and solutions Our cutting edge designs and lean manufacturing tactics are powered by deep knowledge operator insights and culinary expertise All of our products are backed by KitchenCare our aftermarket repair and parts service CLEVELAND CONVOTHERM DELFIELD...

Отзывы: