background image

7 of 11

WX-501-0534 • 01.22

The 

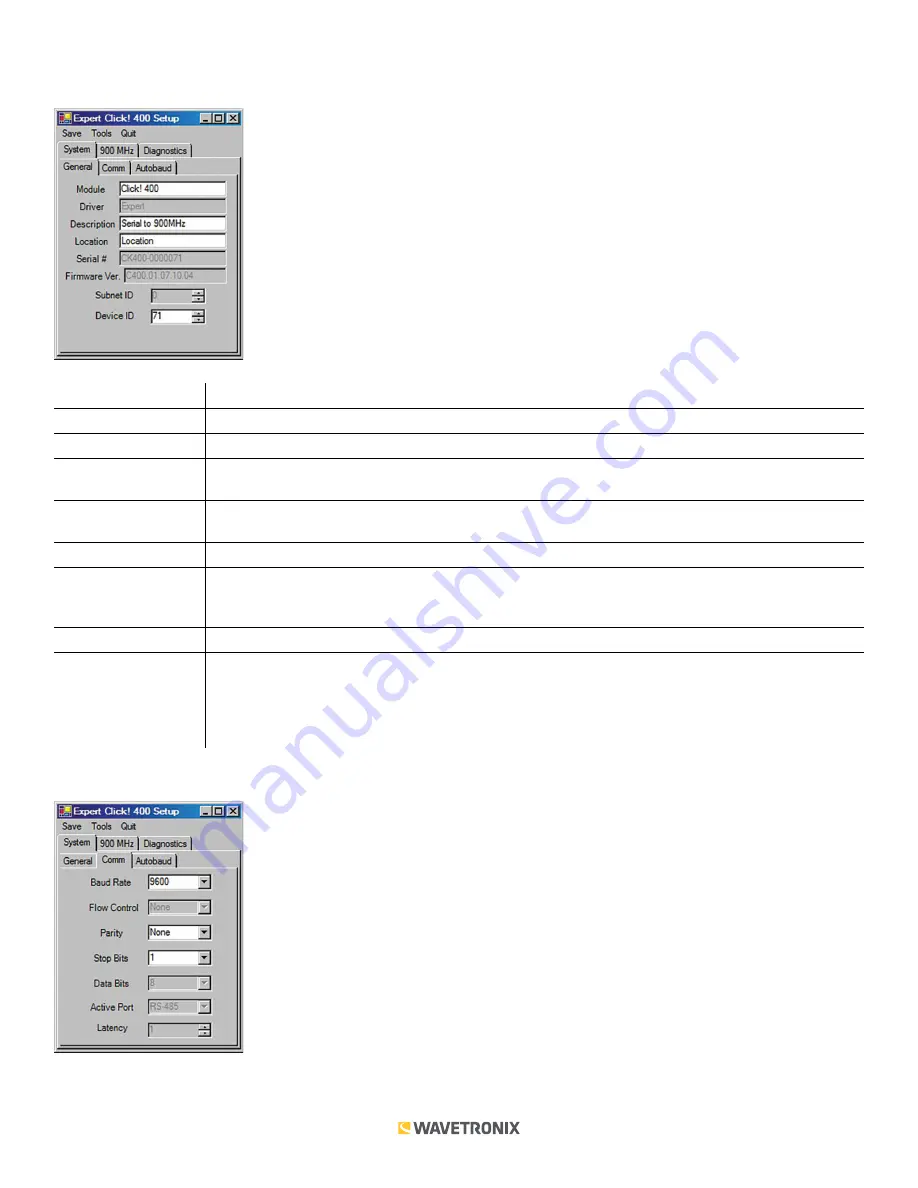
System > General tab

 combines elements of the 

Setup

 and 

About

 tabs from the other drivers (see the figure 

and table below).

Setting

Description

Module

Allows you to enter a name for the device.

Driver

Names the driver you are currently working with.

Description

Shows a description of the device being configured. This is only for your information and does not 

affect the operation of the device.

Location

Displays the location of the device being configured. This is only for your information and does not 

affect the operation of the device.

Serial Number

Displays the serial number of your device.

Firmware Version

Shows the version of firmware your device currently has installed. If Click Supervisor detects a 

discrepancy between this version and the most current version it currently has access to, you will be 

prompted to upgrade when you connect to the device.

Subnet ID

Shows the subnet ID number. This option is currently not available.

Device ID

Gives the ID number of the device being configured, which is used to identify the device when 

you are connecting to it. By default, this number is the last five digits of the serial number, which 

can be found under the About tab or on the barcode sticker on the bottom of the device. It is 

recommended that you do not change this number unless another device on your network has the 

same ID number.

The 

System > Comm

 tab allows you to configure how the Click device communicates (see the figure and table below).

Содержание Click 400

Страница 1: ...nicate perfectly Physical Features The Click 400 has several communication ports as well as features for configuration T Bus Connector RS 485 Connector RS 232 Connector Antenna Connector LED Indicator...

Страница 2: ...ion section of this document The front also has a push button labeled Mode Switch which is used to cycle the Click 400 through operation modes This will be discussed in the On device Configuration sec...

Страница 3: ...LED will be solid If the blue LED does not turn on then the client cannot find a server 4 Once you re sure the client has found a server watch the LEDs on the client to see the results of the link tes...

Страница 4: ...the SmartSensor Server driver To see advanced settings use the Expert driver This driver which exposes every available field for the Click 400 should only be used under the direction of Wavetronix Sup...

Страница 5: ...f the device It is recommended that you do not change this number unless another device on your network has the same ID number RF Channel Specifies the frequency channel of the device the channels ran...

Страница 6: ...the top of the screen to save your settings return to the Select Driver screen and more The Save menu allows you to save your settings Select Save to File to save your settings to a file Selecting th...

Страница 7: ...Shows the version of firmware your device currently has installed If Click Supervisor detects a discrepancy between this version and the most current version it currently has access to you will be pro...

Страница 8: ...see the figure and table below Setting Description Command Allows you to set the command sent from the device during the autobaud process Don t change these values unless instructed to by Wavetronix...

Страница 9: ...t Address RF Delivery Allows you to send to a specific address or broadcast to all radios If the device is set up as a client select Address if the device is set up as a server select Broadcast Auto D...

Страница 10: ...ntil your buffer is full before sending Transmit Retries Allows you to set the number of times the radio will transmit after not getting a response Address mode Broadcast Attempts Allows you to set a...

Страница 11: ...electing this will open a directory box allowing you to name your settings file This file will always be saved in the Wavetronix folder created when you installed Click Supervisor under Wavetronix Cli...

Отзывы: