background image

4 of 8

© 2020 tekmar  087_D - 02/20

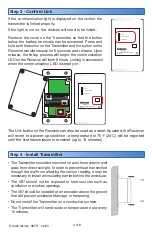
Step 3 - Confirm Link

If the communication light is displayed on the control, the 

transmitter is linked properly.
If the light is not on, the devices will need to be linked. 

Remove the cover on the Transmitter so that the button 

below the battery terminals can be accessed. Press and 

hold both the button on the Transmitter and the button on the 

Receiver simultaneously for 5 seconds and release. Upon 

release, the linkup process will begin; the communication 

LED on the Receiver will flash 8 times.  Linking is successful 

when the communication LED is steady on.

Communication

Power

Low Battery

Link

Wireless Outdoor Sensor 087

Receiver

Communication

Power

Low Battery

Link

Wireless Outdoor Sensor 087

Receiver

Step 4 - Install Transmitter

• The Transmitter should be mounted on a northern exterior wall 

away from direct sunlight. In order to prevent heat transmitted 

through the wall from affecting the sensor reading, it may be 

necessary to install an insulating barrier behind the enclosure.

• The 087 should not be exposed to heat sources such as 

ventilation or window openings.

• The 087 should be installed at an elevation above the ground 

that will prevent accidental damage or tampering.

• Do not install the Transmitter on a conductive surface.
• The Transmitter will send outdoor temperature data every 

10 minutes.

The Link button on the Receiver can also be used as a reset. If pushed, the Receiver 

will revert to a power-up condition; a temperature of 75

°F (

24

°

C) will be reported 

until the first transmission is received (up to 10 minutes).

Содержание tekmar 087

Страница 1: ...C to 60 C Long battery life minimum 10 years with included 1 5V lithium AA batteries 5000 ft 1500 m open range 8 walls 250 ft 75 m indoor range Transmits outdoor temperature every 10 minutes The tekma...

Страница 2: ...nges or modifications not expressly approved by the party responsible for compliance could void the user s authority to operate the equipment Industry Canada This Device complies with Industry Canada...

Страница 3: ...hamber through the back or bottom of the enclosure Step 2 Provide Power 1 Power 2 C R 24 V ac R C Batteries in the Transmitter unit Remove the cover from the Transmitter unit Insert the included batte...

Страница 4: ...er Low Battery Link Wireless Outdoor Sensor 087 Receiver Step 4 Install Transmitter The Transmitter should be mounted on a northern exterior wall away from direct sunlight In order to prevent heat tra...

Страница 5: ...please call Customer Support at 250 545 7749 or email tekmar customerservice wattswater com LED Indicator Status Description Power Green Normal operation Off No power Check that the wires are securel...

Страница 6: ...52 95 F 35 C 5592 104 F 40 C 4655 113 F 45 C 3893 122 F 50 C 3271 131 F 55 C 2760 140 F 60 C 10K Type 3 NTC Thermistor ON Sensor Resistance Settings DIP switches in the right side of the wiring chambe...

Страница 7: ...25 C Resistance Temperature 4028 86 F 30 C 3265 95 F 35 C 2663 104 F 40 C 2184 113 F 45 C 1801 122 F 50 C 1493 131 F 55 C 1244 140 F 60 C 5K NTC Thermistor ON Resistance Temperature 309396 40 F 40 C 2...

Страница 8: ...r labor to remove or transport the defective Product or to reinstall the repaired or replacement Product all such costs and expenses being subject to Purchaser s agreement and warranty with its custom...

Отзывы: