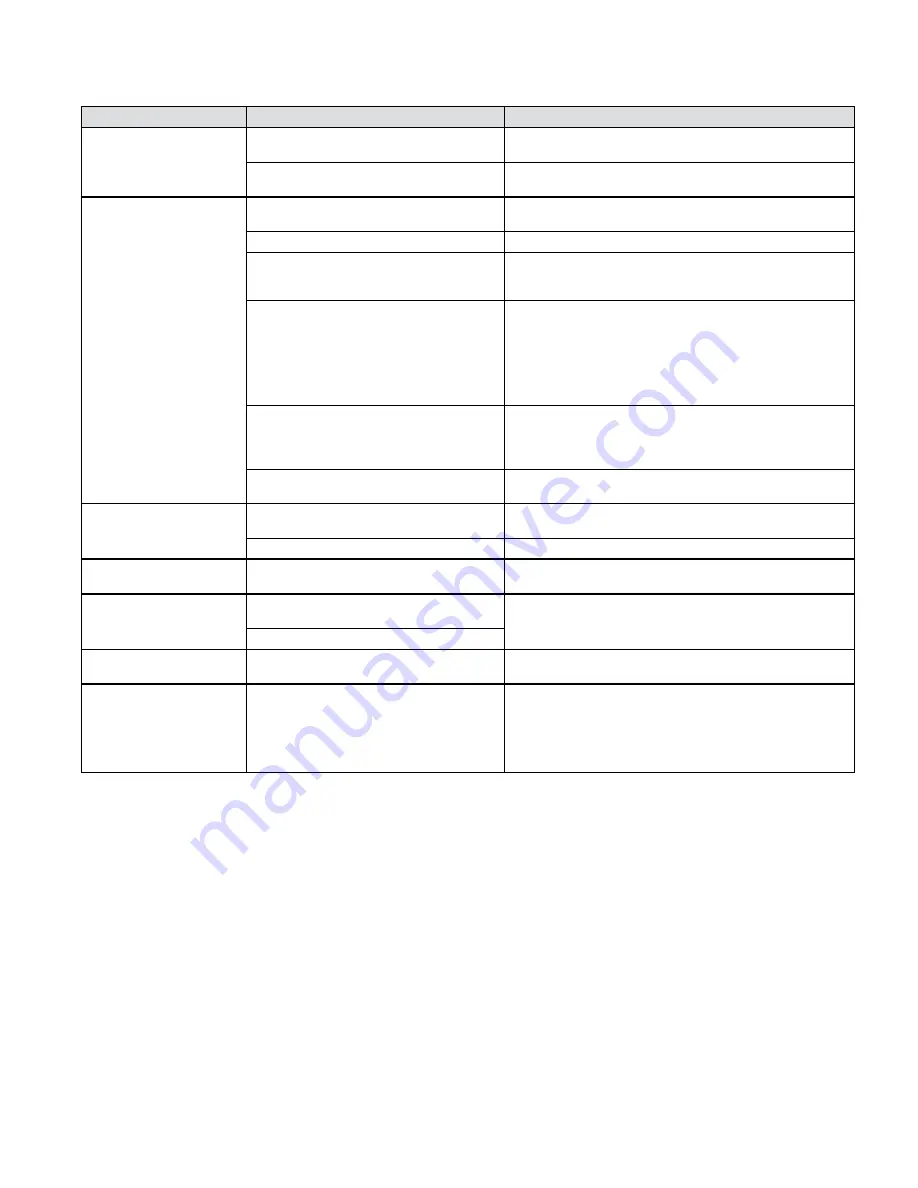
background image

7

Problem

Cause

Solution

Valve spits periodically 

from the vent.

Fluctuating supply pressure.

Install a soft seated check valve immediately upstream of 

the  de vice. 

Fluctuating downstream pressure.

Install a soft seated check valve downstream of the device, 

as close as possible to the shutoff valve. 

Valve drips continually 

from the vent.

Fouled first check.

Flush valve. If flushing does not resolve problem, disassemble 

valve and clean or re place the first check.

Damaged or fouled relief valve seat.

Clean or replace the relief valve seat.

Relief valve piston O-ring not free to move 

due to pipe scale, dirt, or build 

up of mineral deposits.

Clean, grease, or replace the piston O-ring. 

Excessive back pressure, freezing, or water 

hammer has distorted the second check.

 Elim i nate source of excessive backpressure or water hammer 

in the system downstream of the device. Use Watts No. 15 

to eliminate water hammer. Replace defective second check 

assembly. 

In case of freezing, thaw, disassemble, and inspect internal 

components.
Replace as necessary.

 Electrolysis or relief valve seat or first 

check seats.

Replace relief valve seat or inlet cover. 
Electrically ground the piping system and/or electrically 

isolate the device with plastic pipe immediately upstream 

and down stream of the device.

Valve improperly reassembled.

If valve is dis as sem bled during installation, exercise caution 

when reinstalling check springs in their proper location.

Valve exhibits high  

pressure drop.

Fouled strainer.

Clean strainer element or replace.

Valve too small for flows encountered.

Install proper size device based upon flow requirements.

No water flows down-

stream of valve.

Valve installed backward.

Install valve in accordance with flow direction arrow.

Valve does not test properly. Manufacturer’s test procedure not followed. Clean or replace gate valve with full port ball valves or 

resilient wedge shutoff valves.

Leaky downstream gate valve.

Valve quickly and repeatedly 

fouls following servicing.

Debris in pipeline is too fine to be trapped 

by strainer.

Install finer mesh strainer element in the strainer.

Performance of backflow 

preventers affected during 

winter season.

Cold temperatures.

Electric heat-tape wrap closely together around the valve 

body. Build a small shelter around the valve with a large 

light bulb installed and left on at all times. 

If the supply line is not used during the winter, removal of 

the com plete body is the best. This creates an air gap to 

eliminate any possible backflow.

Troubleshooting

Содержание LF909-FS

Страница 1: ...ion A retrofit sensor connection kit is available for existing installations See Add on and Retrofit Sensor Connection Kits on the last page How It Operates The unique relief valve construction incorporates two channels one for air the other for water When the relief valve opens the right channel admits air to the top of the reduced pressure zone relieving the zone vacuum The left channel then dra...

Страница 2: ... or other equipment with periodic flow requirements discharge from the relief vent may occur due to water supply pressure fluctuation during static no flow conditions See Troubleshooting before installation Observe the direction of the flow arrows on the valve assembly The backflow preventer is designed so that the critical level of the relief valve is positioned below the first check This unique ...

Страница 3: ...ng A discharge line should be piped from the air gap at the relief valve connection making sure there is adequate drainage Never pipe the discharge line directly into a drainage ditch sewer or sump The assembly should never be installed where any part of the unit could become submerged in standing water Consideration should be given to the installation of external support structure as applicable I...

Страница 4: ...se needle valve A high red and open test cock No 2 2 Close test cock No 4 Disconnect the bypass hose yellow at test cock No 4 3 Open needle valves B low blue and C bypass yellow bleeding to atmosphere Then close needle valve B blue to restore the system to a normal static condition 4 Observe the pressure differential gauge If there is a decrease in the indicated value the No 1 check valve is repor...

Страница 5: ...is attached with a bayonet type locking arrangement 3 Holding the check valve module in both hands rotate the assembly quarter turn This disengages the disc assembly spring and seat cover into individual components 4 Clean and reassemble the disc assembly or depending upon its condition discard and replace it with a new assembly from the service kit O rings should be cleaned or replaced as necessa...

Страница 6: ...ver handy to reassemble the relief valve assembly Figure 2 Depress the assembly carefully guiding it against the 2 pound spring load When properly aligned the piston is in the cylinder bore Insert the screwdriver along the right channel wall positioning the screwdriver tip to the left of the relief valve O rings to hold the assembly in place Figure 3 Let go of the screwdriver and use both hands to...

Страница 7: ...ound the piping system and or electrically isolate the device with plastic pipe immediately upstream and down stream of the device Valve improperly reassembled If valve is dis as sem bled during installation exercise caution when reinstalling check springs in their proper location Valve exhibits high pressure drop Fouled strainer Clean strainer element or replace Valve too small for flows encounte...

Страница 8: ...ivation module with cable ground wire and power adapter Use this kit to activate the integrated flood sensor and enable flood detection capabilities on the relief valve of a new installation working with a BMS controller not included 88003058 FP RFK BF BMS CFS 1 11 2 BMS Sensor Retrofit Connection Kit Series LF909 Small Sizes to 1 Includes flood sensor sensor activation module with cable mounting ...

Отзывы: