


IS-HF-M100+-29293 Rev 5
9
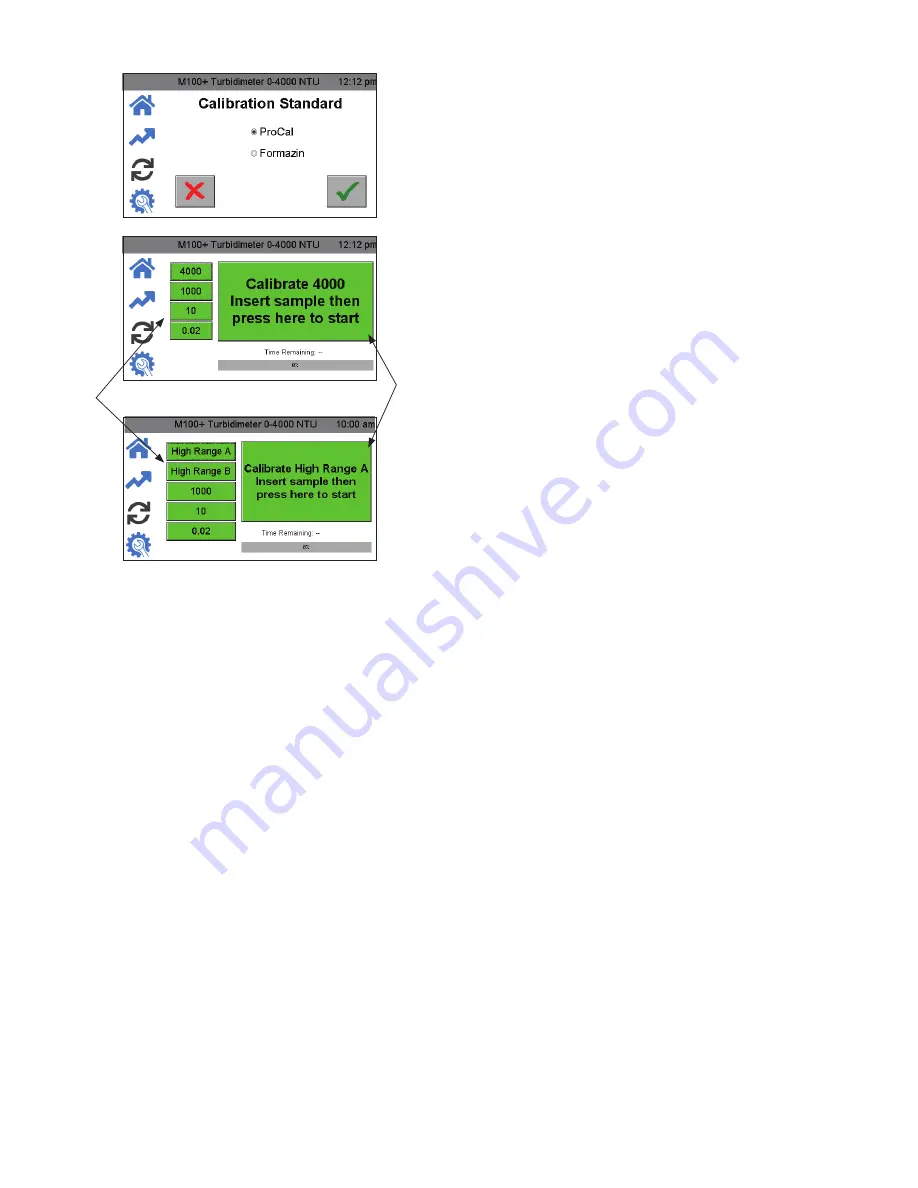
Calibration Procedures (continued)
1. Select the calibration function by pressing the
Calibrate
icon.
2. Select the appropriate calibration standard (Formazin or ProCal) and
then press
to save the selection.
3. The calibration menu will be displayed as shown above. On the
left-hand side are selections for the range for calibration. Select the
highest value required for your application.
4. Ensure standards are indexed as described in Indexing Calibration
Cuvettes section prior to calibration.
5. Press the command button. The command button dialogue will
guide you through the calibration.
Calibrating using ProCal Standards
1. Press the High Range A button on the left side of the screen.
2. Insert the High Range A standard.
3. Press the Command button in the middle of the screen to start
calibration. A countdown from 30 will appear on the screen. When
the countdown is complete, the screen will request the High Range
B.
4. Press the High Range B button on the left side of the screen.
5. Insert the High Range B standard.
6. Press the Command button to continue the calibration. A
countdown from 30 will appear on the screen. When the
countdown is complete, the screen will request the 1000 NTU
standard.
7. Press the 1000 NTU button on the left side of the screen.
8. Insert the 1000 NTU standard.
9. Press the Command button to continue the calibration. A
countdown from 60 will appear on the screen. When the
countdown is complete, the screen will request the 10 NTU
standard.
10. Press the 10 NTU button on the left side of the screen.
Select
Range
Command
button:
Follow
directions
that appear
here for
calibration.
Formazin Calibration Screen
ProCal Calibration Screen
11. Insert the 10 NTU standard.
12. Press the Command button to continue the calibration. A
countdown from 60 will appear on the screen. When the
countdown is complete, the screen will request the 0.02 NTU
standard.
13. Press the 0.02 NTU button on the left side of the screen.
14. Inert the 0.02 NTU standard.
15. Press the Command button to continue the calibration. A
countdown from 30 will appear on the screen.
When the countdown is complete, all buttons on the left side of
the screen should be green and the Command button should say
Calibration Good.
Calibrating Using Formazin Standards
1. Press the 4000 button on the left side of the screen.
2. Insert the 4000 NTU standard.
3. Press the Command button in the middle of the screen to start
calibration. A countdown from 30 will appear on the screen. When
the countdown is complete, the screen will request the 1000 NTU
standard.
4. Press the 1000 NTU button on the left side of the screen.
5. Insert the 1000 NTU standard.
6. Press the Command button to continue the calibration. A
countdown from 60 will appear on the screen. When the
countdown is complete, the screen will request the 10 NTU
standard.
7. Press the 10 NTU button on the left side of the screen.
8. Insert the 10 NTU standard.
9. Press the Command button to continue the calibration. A
countdown from 60 will appear on the screen. When the
countdown is complete, the screen will request the 0.02 NTU
standard.
10. Press the 0.02 NTU button on the left side of the screen.
11. Insert the 0.02 NTU standard.
12. Press the Command button to continue the calibration. A
countdown from 30 will appear on the screen.
When the countdown is complete, all buttons on the left side of
the screen should be green and the Command button should say
Calibration Good.
Alternate Calibration Ranges
Alternately you could choose to calibrate to 1000 NTU, which requires
1000 NTU, 10 NTU and 0.02 NTU. Press the 1000 button on the left
side and start at step 5 of the previous section.
A calibration for only 10 NTU requires only the 10 NTU and 0.02 NTU
standards. Press the 10 NTU button on the left side and start at step 8
of the previous section.
For the two alternate ranges, these will still read the full range with a
reduced accuracy above the range of calibration.
Failed Calibration
In the case of a failed calibration, the last good calibration is restored
once the user exits to the Home screen. A failure will be evident when
the calibration screen shows all red.
The instrument can be used with this calibration with a potentially
reduced accuracy. The bad calibration will be noted in the calibration
log and as a reminder, a yellow diagnostic banner will show on the
home screen. The yellow banner indicates that the last calibration had
failed and that the instrument is using the previous calibration. The only
way to remove this indication is to successfully complete a calibration.
Check the standards for cleanliness. If everything looks good, attempt
the calibration again. If the calibration fails after the second attempt,
the most likely cause is that the standards are bad or the lamp needs
replacement.


