5
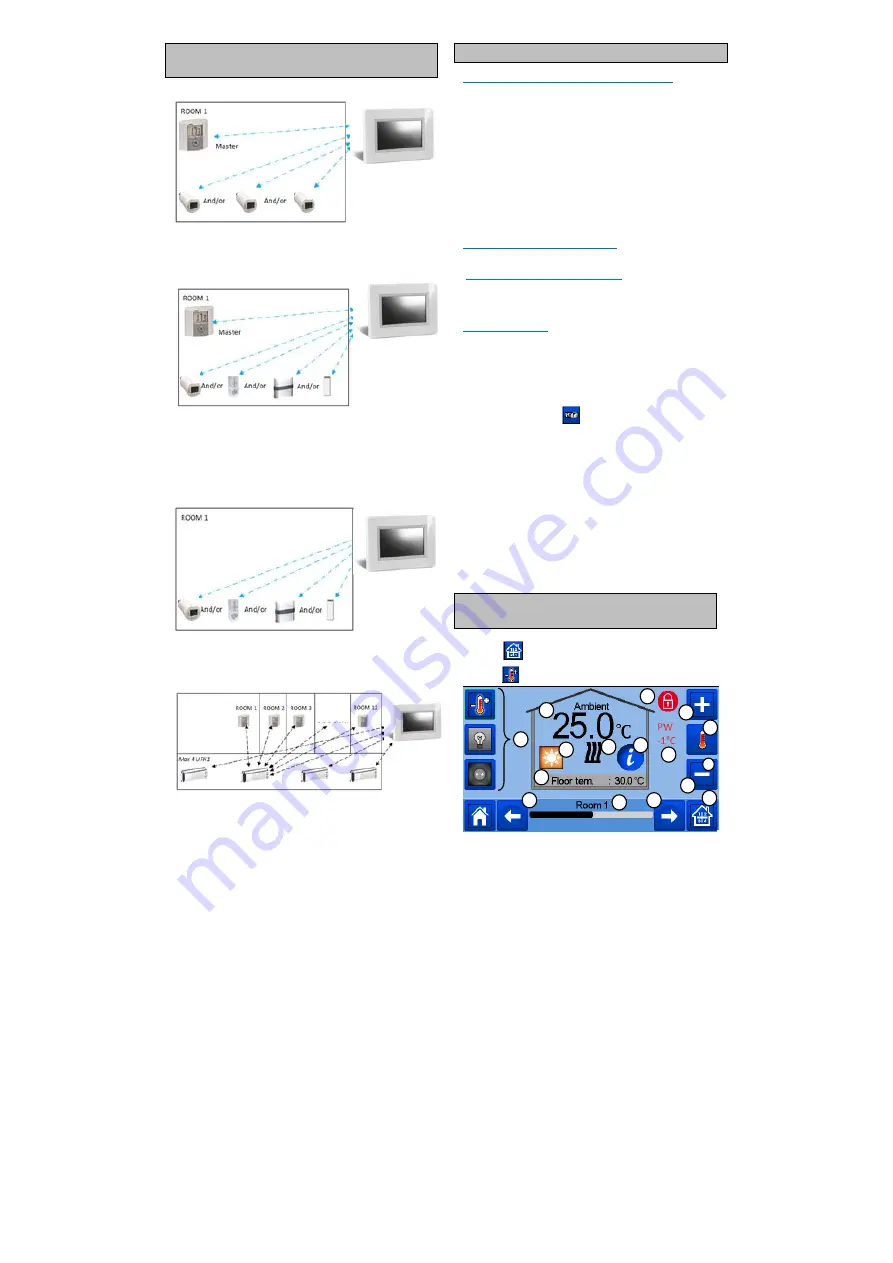
INSTALLATION TYPES
(HEATING/COOLING)
Type 1 :
In this configuration:
Pair first the thermostat (master) with the Central before
pairing the other devices (
configured as heating devices).
The actuators regulate on thermostat temperature.
Type 2 :
In this configuration:
Pair first the thermostat
(master - configured as a heating
device)
with the Central before pairing the other devices.
The other devices regulate on thermostat temperature.
Warning! In this installation type, the BT (MASTER) must be in
regulation Air mode (not floor or Air + Floor)
Type 3 :
In this configuration
(no thermostat)
;
BT-TH configured as heating device.
BT-PR, BT-FR, BT-WR can be configured as an On/Off or
lighting devices.
Type 4 :
In this configuration:
Each
thermostat is first paired with the appropriate UFH1
and then the UFH1(s) are paired with the Central
During the pairing, the Central
automatically creates
rooms
according to the number of thermostats (rooms) of UFHs.
5 SET UP REMOTE CONTROL
1 Connect the central unit to your WiFi network:
To do this;
Go to installation menu (long press)
Choose WiFi settings
Choose Research Networks (searches for your wifi)
Choose your WiFi from the list
Enter your regular WiFi password
Observe unit counting down from 120 to zero
Make sure that the central is now connected to the WiFi
network with an IP address
(WiFi status should read 1/2)
Press the home key to go back to front screen
If after several attempts, connection is unsuccessful, connect
the central unit to WiFi manually (see WiFi settings page 9).
2 Download the app to your device;
For PC; link to the WEB page
(http://smarthome.wattselectronics.com/),
For Smartphone; download WATTS® Vision™ application from
App store or Google Play.
3 Create an Account
Enter your details and select language.
Select “Validate” (email will be sent to you with link).
Go to your email and click on the link.
Go back to your App account and follow the on screen
instructions.
Request a pairing code to link your central unit. The pairing
code (valid 24h) is sent to your email inbox.
In the WiFi status menu
of the central unit, enter the
pairing code (internet access password)..
Your central unit should appear after a few minutes in the
application or the web page
.
Click the refresh button if
necessary.
WiFi status should read 2 /2.
Please note!
It may take up to a few hours to display all rooms
and devices in the application. You can then
operate
your
central unit from
anywhere.
Watts is not responsible for the correct operation of the
connected devices, and potential damage caused by
malfunction or improper use of the connected devices and
appliances.
6 HEATING/COOLING DEVICES
MANAGEMENT & PROGRAMMING
Press on
in the main screen and after selecting the room,
press
on
7
13
3
2
4
5
6
7
8
9
10
11
1
2
7
12


