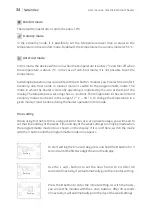
To avoid accidental operation of the heater, the user can set a child lock to block control of
the device. The child lock can be activated by simultaneously pressing and holding the
+
and
-
buttons for 5 seconds until the child lock icon appears on the display. In this mode, all
buttons except
on/off
are inactive. The child lock can be turned off by pressing and holding
the
+
and
-
buttons for 5 seconds until the child lock icon disappears from the display.
Child lock
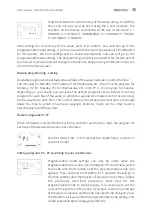
Go to the program settings for Monday or select the day you want to program by pressing
the
V
button. If you want to program the heater for Tuesday, press the
V
button until the
display shows the program corresponding to Tuesday, i.e. P2. To enter the program edit
mode, press and hold the
V
button. P2:00 will appear on the display. By pressing
+
and
-
you
assign a given operating mode (comfort mode - button
+
or economy mode - button
-
) to
each hour, starting from 00 and ending with 23. If you already assign modes to all 24 hours,
press the
V
button to confirm the selection and V again to advance to the programming of
the next day. After 30 seconds of inactivity, it will automatically go to the next day's settings.
With the
V
button you can move to the next days and program them in the same way as
described above. Once you have programmed your desired days, click the
V
button until
you return to the start screen.
(F0) Temperature measurement calibration
(F1) Open window detection function
(F2) Anti-scald function
In the standby mode (the heater is connected to the power supply, but not turned on), press
and hold the
+
button for 10 seconds. Using the
V
button, you can switch the set item in the
menu, and using the
+
or
-
buttons change its parameters:
Settings
Temperature measurement calibration (F0)
It is used to correct the temperature reading when it is incorrect. In the settings menu at the
F0 item, use the
+
and
-
buttons to set the calibration. The setting range is 5°C to -5°C (every
1°C). The default calibration value is -2°C. Press the
V
button to save the settings and move
to the next menu item.
User manual - electric bathroom heater
36
Содержание VARILLA
Страница 1: ...v 1 02 PL ELEKTRYCZNY GRZEJNIK AZIENKOWY EN ELECTRIC BATHROOM HEATER...
Страница 7: ...2 2 2 2 7 Instrukcja obs ugi elektryczny grzejnik azienkowy Kolejno monta u akcesori w...
Страница 9: ...9 Instrukcja obs ugi elektryczny grzejnik azienkowy 2 2 2 2 Suwak mo na przesuwa w g r i w d...
Страница 10: ...10 Instrukcja obs ugi elektryczny grzejnik azienkowy...
Страница 11: ...11 Instrukcja obs ugi elektryczny grzejnik azienkowy...
Страница 12: ...12 Instrukcja obs ugi elektryczny grzejnik azienkowy...
Страница 21: ......
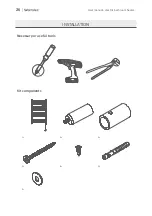
Страница 26: ...Kit components 1 4 4 4 4 4 4 INSTALLATION Necessary or useful tools User manual electric bathroom heater 26...
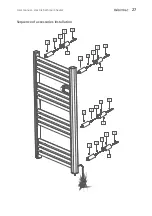
Страница 27: ...2 2 2 2 Sequence of accessories installation User manual electric bathroom heater 27...
Страница 29: ...2 2 2 2 The slider can be moved up and down User manual electric bathroom heater 29...
Страница 30: ...User manual electric bathroom heater 30...
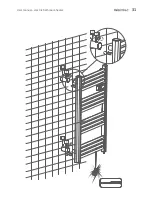
Страница 31: ...User manual electric bathroom heater 31...
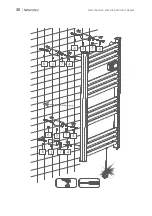
Страница 32: ...User manual electric bathroom heater 32...
Страница 41: ...NOTATKI User manual electric bathroom heater 41...
Страница 42: ...User manual electric bathroom heater 42...
Страница 43: ...User manual electric bathroom heater 43...
Страница 44: ...www warmtec pl www warmtec pl v 1 02...


