background image

–  Observe  the  generally  recognized  accident  preven on  regula ons  and  the  enclosed  safety 
instruc ons.
– Follow these instruc ons!

– The device is intended for non-commercial use only as a hea ng device for small rooms.

– Do not lift the device by the cable and do not use the cable for purposes other than intended.
– Inspect the plug and cable before each use.

– The fuse must be a residual current device with a measured residual current power of not more than 
30 mA.

– If the power cord is damaged, disconnect the plug immediately. Never use the device if the power 
cord is damaged.

– Before using the device for the first  me, the user is obliged to read and understand this manual in 
order to use it safely.

Do not use the device in case of alcohol consump on, illness or a er consump on of other substances 
that may affect the state of consciousness

– Never use the device in a room where there is a risk of explosion or near flammable liquids or gases.

– Be careful and use the device only when you are in good physical condi on.

– The device may only be connected to a socket that is properly installed and grounded.

– Before connecting, make sure that the power supply complies with the connection specification of 
this device.

– Do not overload the device. Do not use the device for purposes for which it is not intended.

– Follow all safety instruc ons! Skipping some procedures can cause harm to you and others.

– If the device is sold or transferred, the user must also hand over these opera ng instruc ons.

– Always comply with all applicable na onal and interna onal safety, health and occupa onal laws.

– The manufacturer is not liable for damage caused by improper use.

– Do not touch the mains plug with wet hands! From the mains socket, always pull by the plug and not 
by the cable.

– Keep all opera ng instruc ons and safety instruc ons for future reference.

– The device may only be used within the specified voltage range (see rating plate).

– Do not bend, crush, pull or run over the device cable, protect it from sharp edges, oily substances and 
from overheating.

– Always ensure that there is no chance of the device accidentally turning on a er it has been turned 
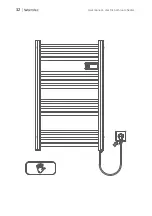
off.

Due to con nuous work aimed at improving the quality of the product, there may be 
changes in the product design that are not included in this manual, but do not affect the 
product's  performance.  The  latest  version  of  the  manual,  including  all  changes,  is 
available at www.warmtec.pl.

Please read this manual before installing and using the device.

SAFETY RULES

User manual - electric bathroom heater

24

Содержание VARILLA

Страница 1: ...v 1 02 PL ELEKTRYCZNY GRZEJNIK AZIENKOWY EN ELECTRIC BATHROOM HEATER...

Страница 2: ...iecze stwapodanymiwniniejszejinstrukcji Symbole u yte w niniejszej instrukcji maj na celu zwr cenie uwagi na mo liwe zagro enia Symbole bezpiecze stwa i towarzysz ce im obja nienia musz by prawid owo...

Страница 3: ...dzeniem 18 Ochrona rodowiska i recykling 20 19 Specyfikacja techniczna SPIS TRE CI Zobacz najnowsz wersj instrukcji na www warmtec pl Dzi kujemy za wyb r naszego produktu jakim jest ten elektryczny gr...

Страница 4: ...ieciowej mokrymi r kami Z gniazda sieciowego zawsze wyci gaj trzymaj c za wtyczk anieprzezkabel Nigdy nie u ywaj urz dzenia w pomieszczeniu w kt rym wyst puje niebezpiecze stwo wybuchu lubwpobli u atw...

Страница 5: ...em e urz dzenie znajdowa si b dzie lub zainstalowane zostanie w swojej normalnej pozycji u ytkowej oraz je li b d pod nadzorem lub zostan przeszkolone w zakresie bezpiecznego u ytkowania urz dzenia i...

Страница 6: ...6 Sk ad zestawu 1 4 4 4 4 4 4 Instrukcja obs ugi elektryczny grzejnik azienkowy MONTA Niezb dne lub przydatne narz dzia...

Страница 7: ...2 2 2 2 7 Instrukcja obs ugi elektryczny grzejnik azienkowy Kolejno monta u akcesori w...

Страница 8: ...przypadkugrzejnikaVarilla Instrukcja obs ugi elektryczny grzejnik azienkowy 60 cm 60 cm 225 cm 60 cm Strefa 1 Strefa 2 Strefa 3 Przed zamontowaniem grzejnika zaznacz otwory na ko ki do uchwyt w cienny...

Страница 9: ...9 Instrukcja obs ugi elektryczny grzejnik azienkowy 2 2 2 2 Suwak mo na przesuwa w g r i w d...

Страница 10: ...10 Instrukcja obs ugi elektryczny grzejnik azienkowy...

Страница 11: ...11 Instrukcja obs ugi elektryczny grzejnik azienkowy...

Страница 12: ...12 Instrukcja obs ugi elektryczny grzejnik azienkowy...

Страница 13: ...z blokami grzewczymi w czona funkcja zabezpieczenia przed oparzeniem 0 3 6 9 12 15 18 21 Urz dzenie mo na uruchomi tylko wtedy kiedy nie posiada usterek Przycisk w cz wy cz Przycisk trybu Przycisk zw...

Страница 14: ...ci nast pi automatyczne przej ciedoustawie dniatygodnia miganie Domy lnatemperaturawtrybiekomfortowymto19 C W trybie ekonomicznym mo liwe jest ustawienie temepratury mniejszej lub r wnej temperaturze...

Страница 15: ...wierdzenia dnia tygodnia przyciskiem V przez 30 sekund ustawienia czasu zostan zapisane automatycznie i nast pi przej cie do ustawie trybu programowalnego Proces programowania opisano w dalszej cz ci...

Страница 16: ...omfortowy przycisk lubtrybekonomiczny przycisk doka dejgodziny zaczynaj cod 00 ako cz c na 23 Je li ju przypiszesz tryby do wszystkich 24 godzin naci nij przycisk V aby zatwierdzi wyb r i ponownie prz...

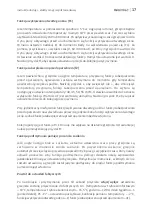
Страница 17: ...cowa z ustawieniem temperatury r wnym 10 C przez pewien czas Ten czas wybiera u ytkownik Mo etoby 60lub90minut Poup ywiewyznaczonegoczasugrzejnikwr cido trybu pracy aktywnego przed uruchomieniem si fu...

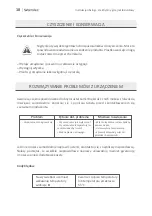
Страница 18: ...temperatury lub temperatura przekracza 55 C Urz dzenie nie nagrzewa si Problem Pytanie dot problemu Mo liwe rozwi zania Czy urz dzenie jest wy czone Czy ustawienia temperatury nie s ustawione zbyt nis...

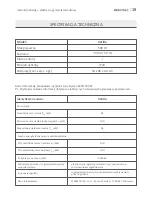
Страница 19: ...szcze Nominalna moc cieplna P kW nom Minimalna moc cieplna orientacyjna P kW min Maksymalna sta a moc cieplna P kW max Zu ycie energii elektrycznej na potrzeby w asne Przy nominalnej mocy cieplnej el...

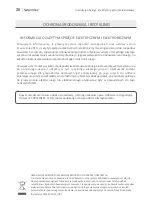
Страница 20: ...ilo ci odpad w powsta ych ze sprz tu zapewnienie odpowiedniego poziomu zbierania odzysku i recyklingu zu ytego sprz tu oraz zwi kszenie wiadomo ci spo ecznej o jego szkodliwo ci dla rodowiska naturaln...

Страница 21: ......

Страница 22: ...fetyrulesgiveninthismanual The symbols used in this manual are intended to draw your attention to possible hazards The safety symbols and accompanying explanations must be properly understood Warnings...

Страница 23: ...rotection and recycling 40 39 Technical specifications TABLE OF CONTENT The latest version of the Manual is available on our website www warmtec pl Please read this user manual carefully before using...

Страница 24: ...he connection specification of thisdevice Donotoverloadthedevice Donotusethedeviceforpurposesforwhichitisnotintended Followallsafetyinstruc ons Skippingsomeprocedurescancauseharmtoyouandothers Ifthede...

Страница 25: ...tinuse makesurethattheplugispulledout Thedevicemustnotbeusednearflammable explosivesubstancesandmaterials Thedeviceheatsupduringoperation Thereisariskofinjury Alwayskeepthisinstructionmanualwithinreac...

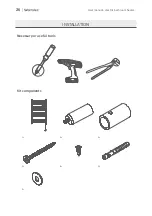
Страница 26: ...Kit components 1 4 4 4 4 4 4 INSTALLATION Necessary or useful tools User manual electric bathroom heater 26...

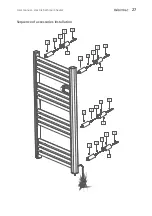
Страница 27: ...2 2 2 2 Sequence of accessories installation User manual electric bathroom heater 27...

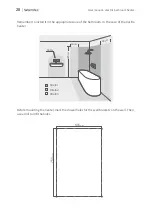
Страница 28: ...hroom In the case of the Varilla heater 60 cm 60 cm 225 cm 60 cm Strefa 1 Strefa 2 Strefa 3 Before mounting the heater mark the dowel holes for the wall brackets on the wall Then useadrilltodrilltheho...

Страница 29: ...2 2 2 2 The slider can be moved up and down User manual electric bathroom heater 29...

Страница 30: ...User manual electric bathroom heater 30...

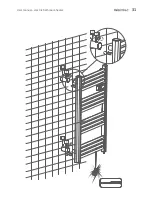
Страница 31: ...User manual electric bathroom heater 31...

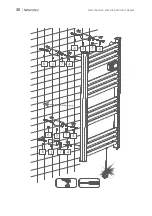
Страница 32: ...User manual electric bathroom heater 32...

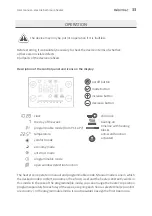
Страница 33: ...i scald function activated 0 3 6 9 12 15 18 21 The device may only be put into operation if it is faultless on off button mode button increase button decrease button The heater can operate in manual a...

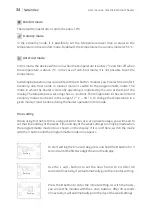
Страница 34: ...ratureincomfortmodeis19 C In the economy mode it is possible to set the temperature lower than or equal to the temperatureinthecomfortmode Bydefault thetemperatureineconomymodeis15 5 C In this mode th...

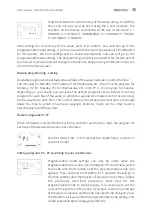
Страница 35: ...nds the time settings will be saved automatically and you will go to the programmable mode settings The programming process is described in the further part of the manual If you do not want to program...

Страница 36: ...ending with 23 If you already assign modes to all 24 hours press the V button to confirm the selection and V again to advance to the programming of thenextday After30secondsofinactivity itwillautomati...

Страница 37: ...a period of time This time is selected by the user It can be 60 or 90 minutes After the set time has elapsed the heater will return to the operating mode that was active before the open window detecti...

Страница 38: ...55 C The device does not heat up Issue Questions concerning the issue Solution Is the device turned off Are the temperature settings set too low No mains voltage Switch on the device and set the desi...

Страница 39: ...put P kW nom Minimum heat output indicative P kW min Maximum constant heat output P kW max Consumption of electricity for own needs At nominal heat output el kW max At minimum heat output el kW min In...

Страница 40: ...mountofwaste However youshouldrememberthatproductsbelongingtothegroupofelectricalorelectronic equipmentshouldbedisposedofbyanauthorisedpersontotheircollec onpoints You can return spent device to the s...

Страница 41: ...NOTATKI User manual electric bathroom heater 41...

Страница 42: ...User manual electric bathroom heater 42...

Страница 43: ...User manual electric bathroom heater 43...

Страница 44: ...www warmtec pl www warmtec pl v 1 02...

Отзывы: