


SL20K Self-Steering Axle and Suspension System Installation Manual
6
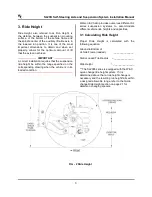
To mount the suspension to the vehicle:
1. Place the vehicle on a level surface.
2. Mark the approximate location of the
suspension side rail assemblies on the
vehicle frame rails.
3. Check for interference with any existing
brackets or mounting bolts.
4. Locate the auxiliary axle mounting position.
5. From the centerline of the axle at the wheel
center, mark the location of this axle
measurement on the outside of the vehicle
frame rail.
6. Raise the back end of the frame using either
a lift, jack or driving the rear axles and tires
onto a lift.
7. Raise the suspension into position using the
marked axle, front hanger rail and upper bag
plate center line as locators.
NOTE
If, while raising the SL series suspension into
place, the hangers get stuck on the frame
because they are too narrow, loosen the bolts on
one side of the crossmember. This will allow the
hangers to separate enough to move into
position. If you have a welded crossmember you
will not be able to loosen in this way.
8. Using clamps, clamp the suspension rail to
the vehicle frame rail.
IMPORTANT
Both the side and bottom mounting surfaces
must sit flush with the side and bottom of the
vehicle frame rails or spacers, or the suspension
warranty is invalid. See Figure 6
.
FIG – 5 Suspension Mounting Position


