

WWW.
WAMBAM
FENCE.COM
7
ASSEMBLY
INSTRUCTIONS
BL19101
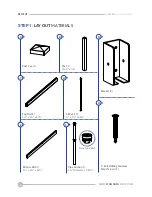
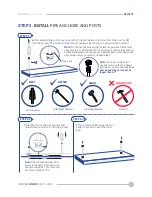
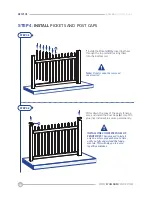
STEP 2
:
INSTALL
PIPE ANCHORS AND POSTS
Note:
Try to drive the pipe anchor as level as possible. Check level
about every 12”. After about 18” the trajectory of the pipe anchor is
usually established and you cannot manually pull it level (donut will
not compensate for a severely crooked pipe).
Note:
If you are using a post
pounder, remove the top donut
and slide it up over the pipe.
Your
post pounder barrel cannot be
longer than 24”.
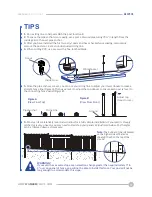
BEST
BETTER
GOOD
DO NOT USE
F
After establishing your fence lines with string and stakes, drive your first Pipe Anchor
(F)
into the ground. The bottom of the donut should sit just above the ground when finished.
Identify the location of your second
pipe anchor and drive it into the ground.
If you removed the upper donut,
slide it back down over the inner
gear
.
Post Pounder
10lb Sledgehammer
5lb Sledgehammer
Hammer
STEP 2.2
STEP 2.3
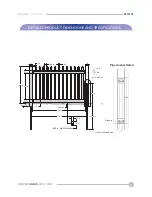
Note:
The distance between the
inner plastic gears (not donuts) to
the pipe should be 70⅜” (or center
to center of pipe at 72”).
72”
STEP 2.1
70⅜”
String line


