background image

WX520, WX520L, WX520T

Trailer Wood Splitter

Service and Maintenance

31

7.  Storing the Wood Splitter

After the season's use and the wood splitter is going to 

be put away in storage, it should be thoroughly inspected 

and prepared. Repair or replace any worn or damaged 

components to prevent any unnecessary down time at the 

start of next season. The wood splitter can have a long, 

trouble-free life by following these steps:

IMPORTANT!  Refer to the engine manufacturer's 

manual for information specific to engine storage.

1. 

Fully retract the cylinder ram.

2. 

Add a stabilizer to the fuel tank. Top up the tank and 

run the engine outdoors for 10 minutes to be sure that 

treated gasoline has replaced the untreated gasoline 

in the carburetor.

3. 

Turn fuel valve OFF.

4. 

Thoroughly wash the machine using a pressure 

washer to remove all dirt, mud, debris, and residue.

5. 

Inspect the cylinder ram, push block and wear plates 

for damage or entangled material. Repair or replace 

damaged parts. Remove all entangled material.

6. 

Touch up all paint nicks and scratches to prevent 

rusting.

7. 

If the splitter is to be stored for longer periods 

(over 6 months), follow the engine manufacturers 

recommendations for storage preparation.

8. 

Store the machine in an area away from human 

activity. 

9. 

Select an area that is dry, level and free of debris to 

park the wood splitter.

10. 

If the wood splitter is not stored inside a building, 

cover with a waterproof tarp. Tie securely in place.

11. 

Do not allow children to play on or around the stored 

machine.

7.1  Removing from Storage

1. 

Review and follow the Pre-operation Checklist. See 

page 34


2. 

Review safety and operation procedures. See 

page 

9.

8.  Service and Maintenance

 WARNING!

Risk of serious personal injury. Stop engine 

before performing ANY service or maintenance 

procedure. Reinstall all covers and guards 

removed before putting machine back into 

service.

W033

IMPORTANT!  Refer to the engine manufacturer's 

manual for engine maintenance and service 

information.

8.1  Maintenance Safety

1. 

Follow good shop practices:

•  Keep service area clean 

and dry.

•  Be sure electrical outlets 

and tools are properly 

grounded.

• 

Use adequate light for 

the job at hand.

2. 

Never operate the machine or the towing vehicle in 

a closed building. The exhaust fumes may cause 

asphyxiation.

3. 

Before servicing or repairing, place the machine in a


Safe Condition

. See 

page 10

4. 

Allow the engine to cool before performing 

maintenance. Engine components and oil may be hot 

enough to cause injury.

5. 

Never work under equipment unless it is properly 

supported.

6. 

When performing any service or maintenance work 

always use personal protective equipment.

7. 

Where replacement parts are necessary, use only 

OEM parts to restore your equipment to original 

specifications. The manufacturer is not responsible 

for injuries or damages caused by use of unapproved 

parts or accessories.

8. 

Inspect and tighten all bolts, nuts and screws. Check 

that all electrical and fuel connections are properly 

secured.

9. 

When completing a maintenance or service function, 

make sure all safety shields and devices are installed 

before placing splitter in service.

10. 

When cleaning any parts, do not use gasoline. Use a 

cleanser designed for that purpose.

Содержание WX520L

Страница 1: ...OPERATOR S MANUAL TrailerWoodSplitter WX520 L WX520T Part Number Z97135_En Rev May 2019...

Страница 2: ...il lights WX520T tall frame Units of measurement in Wallenstein Equipment technical manuals are written as US Customary SI metric Keep this manual handy for frequent reference and to pass on to new op...

Страница 3: ...Hydraulic Valve 20 5 3 Stroke Limiter Accessory 22 6 Operating Instructions 23 6 1 Operating Safety 23 6 2 Before Starting the Engine 23 6 3 Pre operation Checklist 24 6 4 Machine Break In 24 6 5 Eng...

Страница 4: ...h Ball Hitch Review Operating and Safety Instructions _________________________________________ Customer s Name _________________________________________ Contact Name _________________________________...

Страница 5: ...dering parts or requesting service or other information The product information plate location is shown in the illustration For future convenience record the product Model and Serial Number in the spa...

Страница 6: ...de the original purchase receipt with any claim This warranty does not cover the following 1 Normal maintenance or adjustments 2 Normal replacement of wearable and service parts 3 Consequential damage...

Страница 7: ...provides additional information to the operator or explains the operation of a control Product Decals indicate machine model and serial number and other important information VIN NLV MODEL Manufacture...

Страница 8: ...ardous situation that if not avoided will result in death or serious injury This signal word is to be limited to the most extreme situations typically for machine components which for functional purpo...

Страница 9: ...nderstand ALL Safety and Operating instructions in the manual and follow them The most important safety device on this equipment is a SAFE operator DO review safety related items annually with all per...

Страница 10: ...instructions is not qualified to use the machine Untrained operators expose themselves and bystanders to possible serious injury or death If elderly people are assisting with the work their physical l...

Страница 11: ...ank 9 DO NOT choke carburetor to stop engine Whenever possible gradually reduce engine speed before stopping 10 DO NOT run engine above rated speeds This may result in injury 11 DO NOT tamper with gov...

Страница 12: ...round should be firm and level 4 Operate only in daylight or good artificial light 5 Make sure machine is properly adjusted and in good operating condition 6 Store fuel well away from the wood pile 7...

Страница 13: ...ning the sign off sheet provided below can be used Make periodic reviews of Safety and Operation a standard practice for all operators Review again at the startup of every season The design and manufa...

Страница 14: ...equipment are shown in the illustrations that follow Good safety requires that you familiarize yourself with the various safety signs the type of warning and the area or particular function related t...

Страница 15: ...ective glasses goggles or face shield 2 Caution Refer to the operator s manual Read ALL operating instructions in the manual and learn the meaning of ALL safety signs on the machine The best safety fe...

Страница 16: ...safety signs are available from your authorized Distributor or Dealer Parts Department or the factory 3 3 1 How to Install Safety Signs Ambient temperature must be above 50 F 10 C to install decals 1...

Страница 17: ...d splitter can provide many years of trouble free service IMPORTANT Make sure all operators understand how to put the wood splitter in a Safe Condition before working with this machine See Safe Condit...

Страница 18: ...Hydraulic Cylinder 2 Splitter Control Valve 3 Sliding Push Block 4 Splitter Bed 5 Splitter Wedge 6 Trailer Tongue 7 Safety Chains 8 Front Jack Stand 9 Product Manual Storage Tube 10 Hydraulic Oil Rese...

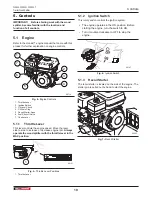
Страница 19: ...Lever 5 1 1 Throttle Lever This lever controls the engine speed Move the lever side to side to increase or decrease engine rpm Always operate the wood splitter with the throttle lever in the MAX posit...

Страница 20: ...starting a cold engine Move the choke lever to the OPEN position 2 after the engine starts When restarting a warm engine leave the lever in the OPEN position 00188 1 2 3 Fig 9 Choke Lever 1 Choke Lev...

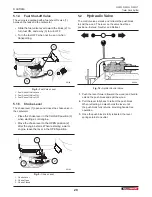
Страница 21: ...1 Center Neutral Position Extend Push the lever forward toward the wood and hold to extend the push block and split the wood Releasing the lever returns it to Neutral 00634 Fig 12 Extend Push Block to...

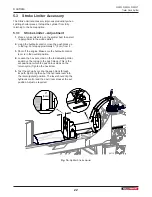
Страница 22: ...the log but stop approximately 3 8 cm from it 3 Shut off the engine Make sure the hydraulic control lever is in the neutral position 4 Loosen the hex set screw on the rod adjusting collar and move the...

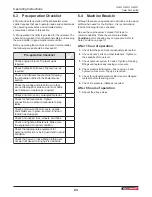
Страница 23: ...perating 5 Keep hands out of splitting area Do not rest hands on the log being split 6 Do not step over or straddle splitter during operation 7 Do not try to split more than one log at a time The logs...

Страница 24: ...vers guards and shields are in place secured and can function as designed Check and inspect tires wheels and hubs Check and tighten all fasteners Make sure the equipment is in good condition Check tha...

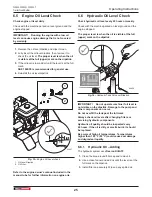
Страница 25: ...oils 6 6 Hydraulic Oil Level Check Check hydraulic oil level every 40 hours or weekly Check with the machine parked on level ground and the engine stopped The proper level is when the oil is visible a...

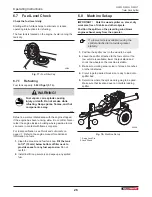
Страница 26: ...uels 1 Clean the area around fuel tank cap Fill the tank to 1 2 12 mm below bottom of filler neck to provide space for any fuel expansion Do not overfill 2 Install fuel fill cap securely and wipe up a...

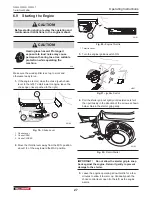
Страница 27: ...ight 00188 1 2 3 Fig 19 Choke Lever 1 Choke Lever 2 Choke OPEN 3 Choke CLOSED 2 Move the throttle lever away from the MIN position about 1 3 of the way toward the MAX position 00191 1 Fig 20 Engine Th...

Страница 28: ...ing material onto the splitter bed 2 Decrease engine speed to MIN 3 Turn the ignition switch OFF 6 11 Log Placement WARNING Risk of pinching or crushing hazard between the wedge or push block and the...

Страница 29: ...ty and transporting of machinery on public roads 2 Do not exceed 50 mph 80 km h when towing this machine Slow down for rough terrain and cornering 3 Do not transport or move the wood splitter with the...

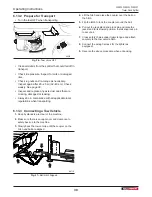
Страница 30: ...ns when transporting 6 13 3 Connecting a Tow Vehicle 1 Keep bystanders are clear of the machine 2 Make sure there is enough room and clearance to safely back up to the machine 3 Slowly back the tow ve...

Страница 31: ...stored machine 7 1 Removing from Storage 1 Review and follow the Pre operation Checklist See page 34 2 Review safety and operation procedures See page 9 8 Service and Maintenance WARNING Risk of seri...

Страница 32: ...ficiency only if clean lubricants are used Use clean containers to handle all lubricants Store them in an area protected from dust moisture and other contaminants 8 3 Maintenance Schedule Perform main...

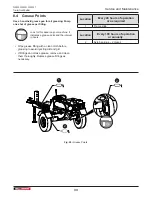
Страница 33: ...ndicates a grease point and the interval in hours Wipe grease fitting with a clean cloth before greasing to avoid injecting dirt and grit If fittings do not take grease remove and clean them thoroughl...

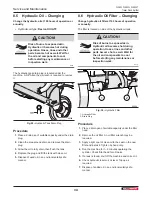
Страница 34: ...Dispose of used oil in an environmentally safe manner 8 6 Hydraulic Oil Filter Changing Change hydraulic oil filter at 100 hours of operation or annually The filter is located on side of the hydraulic...

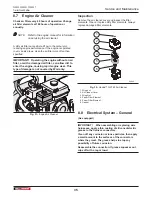
Страница 35: ...his type of damage is not covered by Warranty 00202 Fig 31 Engine Air Cleaner Inspection Remove the air cleaner cover and inspect the filter elements Clean or replace dirty filter elements Always repl...

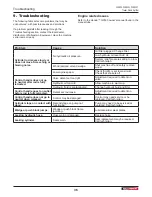
Страница 36: ...ve wood Low engine speed Check throttle is set to maximum Check that choke is off Control handle does not go to neutral after rod is fully retracted Valve detent set too tight Adjustment required to d...

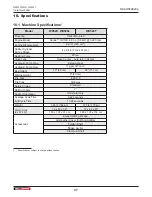
Страница 37: ...c Pump Type 2 stage Gear Hydraulic Pump Flow 11 gpm 47 Lpm Bed Height 19 48 cm 28 71 cm Wedge Height 9 23 cm Tire Size 4 80 X 8 Tire Type Highway Safety Chains Standard Ball Hitch Size 2 Splitter Orie...

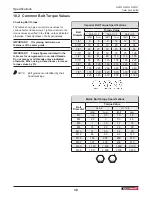
Страница 38: ...r increase torque values by 5 NOTE Bolt grades are identified by their head markings Imperial Bolt Torque Specifications Bolt Diameter Torque Value SAE Gr 2 SAE Gr 5 SAE Gr 8 lbf ft N m lbf ft N m lbf...

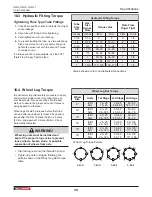
Страница 39: ...portant safety procedure to apply and maintain proper wheel mounting torque on your trailer axle Torque wrenches are the best method to assure the proper amount of torque is being applied to a fastene...

Страница 40: ...itting Torque 39 Hydraulic Oil 32 Hydraulic Oil Adding 25 Hydraulic Oil Changing 34 Hydraulic Oil Level Check 25 Hydraulic Oil Type 25 I Ignition Switch 19 Informative Labels 7 Introduction 2 Foreword...

Страница 41: ...anging 34 Hydraulic Oil Filter Changing 34 Maintenance Schedule 32 Sign off form 13 Specifications 37 Common Bolt Torque Values 38 Hydraulic Fitting Torque 39 Machine Specifications 37 Wheel Lug Torqu...

Страница 42: ......

Страница 43: ......

Страница 44: ...paration 12 Recommandations relatives la s curit et l quipement 10 S curit relative l entretien 31 S curit relative au fonctionnement 23 S curit relative au moteur essence 11 S curit relative au remp...

Страница 45: ...D D marreur 19 E crou de roue 39 Emplacement du num ro de s rie 5 Entreposage de la fendeuse bois 31 Remise en marche apr s l entreposage 31 quipement de protection individuelle EPI 9 tat s curitaire...

Страница 46: ...0 25 26 32 5 35 40 45 5 52 50 60 65 78 14 po lb pi N m 20 25 26 32 5 50 60 65 78 90 120 117 156 15 po lb pi N m 20 25 26 32 5 50 60 65 78 90 120 117 156 16 po lb pi N m 20 25 26 32 5 50 60 65 78 90 12...

Страница 47: ...filets augmentez la valeur de couple de 5 REMARQUE Les cat gories des boulons sont indiqu es sur leur t te Sp cifi cations relatives au couple de serrage des boulons en unit s imp riales Diam tre du...

Страница 48: ...grenages D bit de pompe hydraulique 11 gal min 47 l min Hauteur du lit 19 po 48 cm 28 po 71 cm Hauteur du coin 9 po 23 cm Dimensions des pneus 4 80 8 Type de pneus Pour route Cha nes de s curit Standa...

Страница 49: ...de commande ne revient pas la position neutre une fois que le v rin est enti rement rentr La soupape de d tente est trop serr e Ajustez la soupape de d tente L huile hydraulique est trop froide Laiss...

Страница 50: ...t son usure rapide Ce type de dommage n est pas couvert par la garantie 00202 Fig 31 Filtre air du moteur Inspection Enlevez le couvercle du filtre air et inspectez les l ments filtrants Nettoyez ou r...

Страница 51: ...ez l huile us e de fa on environnementalement responsable 8 6 Filtre huile hydraulique Changement Changez le filtre huile hydraulique toutes les 100 heures de fonctionnement ou une fois par an Le filt...

Страница 52: ...ntre chaque graissage Essuyez les raccords graisseurs l aide d un chiffon propre avant de proc der au graissage et ce pour viter d injecter des poussi res et des salet s Si les raccords ne laissent pa...

Страница 53: ...nts L quipement peut fonctionner efficacit maximale uniquement si on emploie un lubrifiant propre Ayez recours des contenants propres pour manipuler les lubrifiants Entreposez les dans un endroit l ab...

Страница 54: ...dement en place 11 Ne laissez jamais les enfants jouer avec l quipement entrepos ni proximit de celui ci 7 1 Remise en marche apr s l entreposage 1 Passez en revue la liste de v rification avant la mi...

Страница 55: ...ation d un v hicule remorqueur 1 Assurez vous que personne ne se trouve proximit de l quipement 2 Assurez vous qu il y a suffisamment d espace et de d gagement pour faire reculer le v hicule jusqu l q...

Страница 56: ...lentissez lorsque la surface de la route est mauvaise et lors des virages 3 Il ne faut pas transporter ou d placer la fendeuse lorsque le moteur est en marche 4 Assurez vous que la remorque est bien a...

Страница 57: ...te 1 Arr tez de charger du mat riel sur le lit de la fendeuse 2 R duisez la vitesse du moteur jusqu MIN 3 Tournez l interrupteur de d marrage sur la position OFF 6 11 Positionnement des billes AVERTIS...

Страница 58: ...8 1 2 3 Fig 19 Manette d trangleur 1 Manette d trangleur 2 trangleur en position OUVERTE 3 trangleur en position FERM E 2 D placez la manette de commande des gaz vers la position MAX en vous arr tant...

Страница 59: ...ir Fluides et lubrifiants sur la page 32 Pour de plus amples renseignements sur les carburants consultez le manuel du moteur 1 Nettoyez l aire autour du bouchon du r servoir de carburant Remplissez le...

Страница 60: ...manuels pour obtenir de plus amples renseignements sur les huiles moteur 6 6 Huile hydraulique V rification du niveau V rifiez le niveau d huile hydraulique toutes les 40 heures ou hebdomadairement Ef...

Страница 61: ...bien fi x s et qu ils peuvent fonctionner comme pr vu V rifi ez et inspectez les pneus les roues et les moyeux V rifi ez et serrez toutes les fi xations Assurez vous que l quipement est en bon tat V...

Страница 62: ...dage Ne posez pas les mains sur la bille que vous fendez 6 Ne montez pas sur la fendeuse lorsqu elle fonctionne et ne l enjambez pas 7 Ne tentez pas de fendre plus d une bille la fois La deuxi me bill...

Страница 63: ...i 3 Arr tez le moteur Assurez vous que la manette de commande hydraulique se trouve la position Neutre 4 Desserrez la vis de r glage hexagonale du col d ajustement du v rin puis avancez le v rin jusqu...

Страница 64: ...D ploiement Poussez la manette vers l avant vers le bois et tenez la pour d ployer le bloc de pouss e et fendre le bois La manette revient la position Neutre lorsqu elle est rel ch e 00634 Fig 12 D pl...

Страница 65: ...r un moteur froid D placez la manette d trangleur sur la position OUVERTE 2 une fois le moteur d marr Pour red marrer un moteur chaud laissez la manette sur la position OUVERTE 00188 1 2 3 Fig 9 Manet...

Страница 66: ...az Cette manette contr le la vitesse du moteur D placez la manette lat ralement pour augmenter ou r duire le nombre de tours minute du moteur Faites toujours fonctionner la fendeuse bois avec la manet...

Страница 67: ...mande de la fendeuse 3 Bloc de pouss e coulissant 4 Banc de fendage 5 Coin de fendage 6 Fourche d attelage de la remorque 7 Cha nes de s curit 8 Chandelle de levage avant 9 Tube de rangement du manuel...

Страница 68: ...breuses ann es sans n cessiter de r parations IMPORTANT Assurez vous que tous les op rateurs comprennent comment mettre la fendeuse bois en tat s curitaire avant de l utiliser Voir tat s curitaire Pag...

Страница 69: ...ge aupr s d un distributeur autoris du service des pi ces d un concessionnaire ou de l usine 3 3 1 Comment installer les symboles de s curit Pour installer les autocollants la temp rature ambiante doi...

Страница 70: ...ettes de s curit ou un cran facial 2 Attention Consultez le manuel de l utilisateur Lisez TOUTES les consignes de fonctionnement dans le manuel et apprenez la signification de TOUS les symboles de s c...

Страница 71: ...dessous Afin d observer de bonnes pratiques en mati re de s curit il est essentiel de se familiariser avec les divers symboles de s curit le type d avertissement et domaine ou la fonction particuli re...

Страница 72: ...ignature fournie ci dessous peut tre utilis e Faites en sorte que cette r vision p riodique portant sur la s curit et le fonctionnement devienne une pratique courante pour tous les op rateurs Effectue...

Страница 73: ...encieux de temps autre afin de vous assurer qu il fonctionne de fa on efficace Un silencieux us ou qui fuit doit tre r par ou remplac au besoin 4 Utilisez de l essence fra che De la vieille essence pe...

Страница 74: ...raulique avant d y travailler 2 10 S curit relative au moteur essence ATTENTION Avant de d marrer le moteur revoir les instructions de fonctionnement et d entretien dans le manuel du moteur W019 1 NE...

Страница 75: ...2 Formez le nouveau personnel et passez souvent en revue les instructions avec les op rateurs Seuls les op rateurs physiquement aptes qui ont suivi la formation appropri e devraient utiliser cet quip...

Страница 76: ...ES les consignes de s curit et d utilisation dans le manuel et suivez les La caract ristique de s curit la plus importante de l quipement est un op rateur qui l utilise PRUDEMMENT PASSEZ en revue tous...

Страница 77: ...la mort L emploi de ce mot indicateur se limite aux situations extr mes habituellement pour les composants de l quipement qui ne peuvent tre prot g s par un garde pour des raisons fonctionnelles AVERT...

Страница 78: ...e panneaux Ce type d autocollant fournit des renseignements importants l op rateur ou explique le fonctionnement d une commande Les autocollants sur le produit indiquent le mod le et le num ro de s ri...

Страница 79: ...d achat original avec toute r clamation Cette garantie ne couvre pas ce qui suit 1 Maintenance normale ou ajustements 2 Remplacement normal des pi ces d usure et de service 3 Dommages cons cutifs dom...

Страница 80: ...ces demander que l on proc de des r parations ou pour tout autre renseignement L emplacement de la plaque de renseignements sur le produit est indiqu dans l illustration Pour plus de commodit notez le...

Страница 81: ...l attelage boule Passez les instructions d utilisation et de s curit en revue _________________________________________ Nom du client _________________________________________ Nom de la personne ress...

Страница 82: ...5 2 Soupape hydraulique 20 5 3 Limiteur de course accessoire 22 6 Consignes de fonctionnement 23 6 1 S curit relative au fonctionnement 23 6 2 Avant le d marrage du moteur 23 6 3 Liste de v rification...

Страница 83: ...ues de Wallenstein Equipment sont crites de la fa on suivante Syst me am ricain syst me m trique Conservez le pr sent manuel port e de main pour pouvoir le consulter souvent et pour pouvoir le remettr...

Страница 84: ...Fendeuse bois sur remorque WX 520 L WX 520T Num ro de pi ce Z97135_Fr R v juin 2019 MANUEL DE L OP RATEUR...

Отзывы:

Похожие инструкции для WX520L