


51
BXTR6438
5.10 Sheave Alignment
A set of V-belts transmits rotational power to the rotor.
They must be kept properly tensioned and the sheaves
aligned to obtain the expected performance and life.
For maximum accuracy, have your sheaves aligned
with a laser alignment tool. Contact your dealer for
information on laser alignment.
Alignment may be carried out using a straight edge, to
check the alignment, follow this procedure:
1. Clear the area of bystanders, especially small
children.
2.
Turn machine off, stop engine, remove ignition key
and place in pocket and wait for all moving parts to
stop.
3. Remove the belt guard and upper belt guard.
4. Have a straight edge at least 50" (127 cm) in
length.
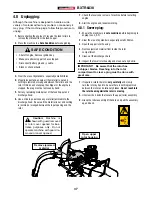
5. Place the straight edge along the face on the back
of the clutch, and place the opposite end along the
back face of the rotor sheave.
6. Check to see if there is a gap between the straight
edge and the sheaves, measure the gap (A).
7.
If there is more than 1/32" (.8 mm) offset then ad-
justment is required.
8. To adjust alignment:
a. Loosen the set screw on the bushing attached
to rotor sheave.
b. Remove the 3 hex bolts on the bushing, and
thread them into the tapped holes on the bush
-
ing.
c. Tighten the hex bolts progressively with 1/4
turns until bushing is free from the sheave taper.
d. Move the sheave to the required position
to align the belt.
e.
If the offset is 1/32 (.8 mm) or less then no more
adjustment is necessary.
f. Align drilled holes with tapped holes on the
sheave, replace and hand tighten the 3 hex
bolts.
g. Tighten the set screw and recheck alignment.
Engine
Sheave
Top view of belt drive system
A
Rotor
Sheave
Straight
Edge
Rotor
Sheave
Engine
Sheave
Belt Drive
Straight
Edge
Set Screw
Bushing
A
Note: movement of the sheave
may occur when tightening the
bushing, some allowance for
movement may be required.
h. Carefully tighten hex bolts progressively (1/4
turns) and uniformly until firmly seated.
i. Recheck belt tension and assemble belt guards.
Содержание BXTR6438F
Страница 15: ...15 BXTR6438 Z94207 Z94120 Z94237 175mm 7 0 Z94120 Z94207 Z94203 Z94419 L Safety Signs 1 1 5 5 8 8 9 9 10 11...
Страница 66: ......
Страница 67: ......
Страница 68: ......


