48
BXTR6438
5.8 Servicing the Battery
Read Section
2.14
on battery safety for safe handling
of the battery
Caution
: Battery posts, terminals and related
accessories contain lead and lead compounds,
chemicals known to cause cancer and reproductive
harm. Wash hands immediately after handling bat
-
tery.
Remove
1.
Disconnect negative (–) cable first, then positive
(+) cable.
2.
Remove battery hold-down bracket and battery
from unit.
Install
1.
Install battery on unit with battery hold-down
bracket.
2.
Connect positive (+) cable first, then negative (–)
cable.
3. Coat terminals with dielectric grease or petroleum
jelly.
Cleaning the Battery
1.
Disconnect negative (–) cable first, then positive
(+) cable.
2. Clean battery cable ends and terminals with wire
brush. Rinse with a weak baking soda solution.
3.
Connect positive (+) cable first, then negative (–)
cable.
4. Coat terminals with dielectric grease or petroleum
jelly.
Charging the Battery
DO NOT fast charge. Charging at a higher rate will
reduce battery life.
ALWAYS follow information provided on battery and
battery charger. Contact battery manufacturer and bat
-
tery charger manufacturer for detailed instructions.
1. Remove battery from unit.
2. Use a battery carrier to lift the battery or place
hands at opposite corners to avoid spilling acid
through the vents
3.
Place battery on bench or other well-ventilated
area.
4. Connect positive (+) lead of charger to positive
(+) terminal, and negative (–) lead to negative (–)
terminal.
5. Charge battery according to the instructions from
battery charger manufacturer and battery manufac
-
turer.
Jump Starting Battery
WARNING: frozen batteries can explode and
result in death or serious injury. DO NOT
charge a frozen battery. Let battery thaw before
charging.
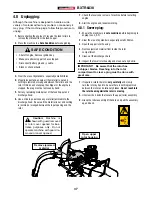
Unit used for jump-starting should have a 12-volt bat-
tery and a negatively grounded system.
1. Connect positive (+) jumper cable to positive termi
-
nal of discharged battery.
2. Connect the other end of the same jumper cable to
positive (+) terminal of booster battery.
3. Connect one end of the second jumper cable to
negative (–) terminal of booster battery.
4.
Make the final jumper cable connection to engine
block or the furthest ground point away from the
discharged battery.
5. Start engine.
6. After engine starts leave cables connected for one
to two minutes.
7. Disconnect jumper cables in reverse order of
installation.
8. Operate unit as normal to charge battery.
Z94215
!
0°
Содержание BXTR6438F
Страница 15: ...15 BXTR6438 Z94207 Z94120 Z94237 175mm 7 0 Z94120 Z94207 Z94203 Z94419 L Safety Signs 1 1 5 5 8 8 9 9 10 11...
Страница 66: ......
Страница 67: ......
Страница 68: ......


