background image

23

14� Ensure that the PTO driveline has been 

cut to size (see section 4�5) Install the 

PTO drive line: 

a. Slide the collar back on the yoke, align 

the  splines  and  slide  the  yoke  on  the 

tractor.

b. 

Release the collar and make sure the 

locking pin clicks into position.

NOTE

Be  sure  the  telescoping  portion  of 

the shaft is greased and free of dirt.

PTO Driveline

NOTE

BX52S: Ski adjustment may be re

-

quired for best PTO operating angle. 

(see Section 4.8 Machine Setup)

Install 

Retainers

9. 

Engage the tractor park/lock brake, dismount 

the tractor, make any final adjustments, and 

slide the left and right lower arm holes onto 

the link pins. 

10. 

Install the retainers on the link pins.

11. 

Remove the top pin and install the top link.  

12. 

Use the turnbuckle to align the top link.  Insert 

the pins and install the retainers.  

13. 

Return  the  turnbuckle  to  its  original  length 

and lock.

Содержание BX52S

Страница 1: ...ANADA REV 310117 PART NUMBER Z97085 Keep this manual with the machine at all times Do not attempt to start or operate the equipment without thoroughly reviewing this manual for safe and proper operati...

Страница 2: ...JUSTABLE SKI HEIGHT 26 4 9 FIELD OPERATION 27 4 9 1 PREPARE 27 4 10 STARTING PROCEDURE 28 4 10 1 TRACTOR 28 4 10 2 STOPPING 28 4 10 3 EMERGENCY STOPPING 28 4 10 4 CHIPPING OPERATION 29 4 10 5 OPERATIN...

Страница 3: ...vice contact your local engine dealer Under no circumstances will the manufacturer be liable for any consequential damage or expense of any kind including loss of profits The manufacturer is under no...

Страница 4: ...and reviewed the manuals _________________________________________ Dealer s Rep Signature __________ __________ __________ Delivery Date The product manuals have been received by me and I have been th...

Страница 5: ...ls are pictorial with a blue background and gener ally rectangular with single or multiple symbols The label illustrates requirements for safe operation safety equipment housekeeping etc These labels...

Страница 6: ...This manual covers all variations of the Wallenstein 3 Point Hitch Wood Chipper BX series Your particular model may vary from the illustrations shown depending on your options package Use the Table o...

Страница 7: ...699 9283 or Fax 519 699 4146 DANGER Indicates an imminently hazardous situation that if not avoided will result in death or serious injury This signal word is to be limited to the most extreme situat...

Страница 8: ...NOT expect a person who has not read and understood all use and safety instructions to operate the machine An untrained operator is not qualified and exposes himself and bystanders to possible seriou...

Страница 9: ...ions and of how it works Review the safety instructions with all users annually 6 This equipment is dangerous to children and persons unfamiliar with its operation The operator should be a responsible...

Страница 10: ...lified to use the machine An untrained operator exposes himself and bystanders to possibleseriousinjuryordeath Iftheelderlyare assisting with the work their physical limitations need to be recognized...

Страница 11: ...essible while performing maintenance on this equipment 9 Periodically tighten all bolts nuts and screws andcheckthatallelectricalandfuelconnections are properly secured to ensure unit is in a Safe Con...

Страница 12: ...g or moving 9 Turn machine off stop and disable engine remove ignition key and place in your pocket set park brake and wait for all moving parts to stop before servicing adjusting repairing or unplugg...

Страница 13: ...yone else to use this chipper until such information has been reviewed Annually review this information before the season start up Make these periodic reviews of SAFETY and OPERATION a standard practi...

Страница 14: ...informed SAFE operator 3 2 SAFETY SIGN EXPLANATIONS 3 1 HOW TO INSTALL SAFETY SIGNS Be sure that the installation area is clean and dry Be sure temperature is above 50 F 10 C Determine exact position...

Страница 15: ...ve been damaged removed become illegible or parts are replaced without safety signs new signs must be applied New safety signs are available from your authorized dealer The types of safety signs and l...

Страница 16: ...R If safety signs have been damaged removed become illegible or parts are replaced without safety signs new signs must be applied New safety signs are available from your authorized dealer Models BX52...

Страница 17: ...safe travel speed when transporting Keep the working area clean and free of debris to prevent tripping Operate only on level ground Do not point discharge at people animals or buildings Rotor can exp...

Страница 18: ...ent descriptions here are used throughout the manual to explain function and safety For a detailed parts breakdown see your dealer or visit the Wallenstein website to download the Parts Manual Models...

Страница 19: ...Housing Hood Deflector Discharge Chute Adjustable Ski Folding Feed Hopper Discharge Latch Handle Manual Tube Ledger Blade Twig Breaker PTO Shaft Lower Link Pins Top Link Rotor Lock Feed Hopper Latch...

Страница 20: ...vided for the operator It is important for both the personal safety and maintaining good mechanical condition that this checklist is followed Before operating the Wood Chipper and each time thereafter...

Страница 21: ...between the locking grooves on the tractor PTO shaft and the machine input shaft e Measure the same dimensions on the compressed drive line f If the compressed drive line dimension B exceeds the machi...

Страница 22: ...point you will need a 7 8 pin not supplied Use the existing bolt in implement pin for the inside or outside points 4 6 ATTACH TO TRACTOR When attaching the chipper to a tractor follow this procedure 1...

Страница 23: ...ree of dirt PTO Driveline NOTE BX52S Ski adjustment may be re quired for best PTO operating angle see Section 4 8 Machine Setup Install Retainers 9 Engage the tractor park lock brake dismount the trac...

Страница 24: ...is section to familiarize yourself with the location and function of each control before starting Familiarizing yourself with the controls will enable you to take advantage of all the features availab...

Страница 25: ...hute is equipped with a hood deflector on the end of the chute to direct the chips exactly where desired The deflector is held in place by clamping bolts on each side 1 Loosen the clamping bolts on ea...

Страница 26: ...the machine so the prevailing wind breeze blows the exhaust gases fumes away from the operator s station Feed Hopper Lock Pin IMPORTANT The chipper must be resting on the ground during operation usin...

Страница 27: ...hesizeandshapeofthematerial crotchety branches and logs can move in unpredictable ways as they pass through the feed rollers and could cause injuries Large curved pieces should be cut to smaller strai...

Страница 28: ...stable with no unusual vibration and proceed with work 4 10 2 STOPPING a Stop feeding material into the hopper b Place the feed control bar in neutral position c Slow engine RPM d Place tractor hydrau...

Страница 29: ...ghter sections c Hold small diameter branches limbs together in a bundle and feed in simultaneously d Place short branches on top of longer ones to avoid reaching into the hopper e Before beginning to...

Страница 30: ...is clear of machine before restarting the machine 7 Start the tractor and resume working 4 11 2 SEVERE PLUG 1 Enure the machine is in Safe Condition Section 4 11 1 before beginning to unplug 2 Clear...

Страница 31: ...t hitch mechanism 3 Check that the SMV sign is in place and all the lights and reflectors required by the highway authorities are in place clean and working 4 Check that the tractor is in safe working...

Страница 32: ...ith a pressure washer or water hose to remove all dirt mud or debris 6 1 PLACING IN STORAGE 4 Inspect all rotating parts for entangled material Remove all entangled material 5 Run the machine a few mi...

Страница 33: ...are properly secured to ensure unit is in a Safe Condition When completing a maintenance or service function make sure all safety shields and devices are installed before placing unit in service 7 SE...

Страница 34: ...se Points 50 hrs or Annually 1 Rotor Main Shaft Front Roller Flange 2 PTO Main Shaft Front Roller Flange On a regular basis check all nuts bolts and screws and ensure they are all properly secured Led...

Страница 35: ...entangledmaterial woodchips small debris D C Location Grease Points 50 hrs or Annually 3 Rotor Main Shaft Rear Roller Flange 4 PTO Main Shaft Rear Roller Flange Grease with one shot of grease 3 8 Hour...

Страница 36: ...tor Main Shaft Front Roller Flange On a regular basis check all nuts bolts and screws and ensure they are all properly secured Twig Breaker check every 8 hrs Ledger blade check daily test sharpness ev...

Страница 37: ...entangledmaterial woodchips small debris D C Location Grease Points 50 hrs or Annually 2 Rotor Main Shaft Rear Roller Flange Grease with one shot of grease 2 8 Hours or daily all models grease PTO Lub...

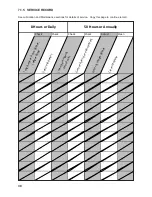
Страница 38: ...Check Check Check Adjust Clean 50 Hours or Annually 8 Hours or Daily T w i g B r e a k e r R o t o r B l a d e s L e d g e r B l a d e S e c u r e f a s t e n e r s L u b r i c a t e H i n g e s P i v...

Страница 39: ...g and lubrication is recommended to insure that all components function as intended Ensure that the universal joints are lubricated inspect and lubricate every 8 hours When reassembling the driveline...

Страница 40: ...at hold the twig breaker to the housing remove the twig breaker 3 Reverse the steps to install the new twig breaker Twig Breaker Twig Breaker Bolts Twig Breaker Nuts Lower Rotor Housing 7 2 3 ROTOR LO...

Страница 41: ...e slowly rotate chipper rotor plate until the rotor lock lines up with lock hole in the rotor plate 4 Engage the rotor lock and ensure it snaps into the lock hole Do not allow the rotor lock to snap i...

Страница 42: ...remove the blade pull it down and slightly to the side to clear the axle 4 Rotate the blade and replace or replace with new or re sharpened blade 5 Hand tighten the bolts 6 Set the clearance between t...

Страница 43: ...maintenance as described in the owners manual 3 Remove the bolt that secures the upper rotor housing and carefully open the rotor housing 4 Carefully move the rotor so the a rotor blade overlaps the...

Страница 44: ...per is being used V Belts Adjusting Bolt 7 2 8 DRIVE BELT TENSION AND ALIGNMENT MODEL BX32 SERIES 5 To adjust belt tension Use the adjusting bolt on the spring loaded tensioning pulley to set the belt...

Страница 45: ...soles and steel toes Obstructed discharge Clear debris from discharge chute Ensure machine is o Rotor plugged Inspect and clear chipper hopper lower rotor housing and rotor Ensure machine is o Broken...

Страница 46: ...pect and clear chipper hopper lower rotor housing and rotor Ensure machine is o Green material will not discharge Allow material to dry or alternate dry wet material Chipper blade clearance too large...

Страница 47: ...m x 130cm x 208cm Hopper Closed 71 x 71 x 89 Open 59 x 57 x 89 Hopper Closed 180cm x 180cm x 226cm Open 150cm x 145cm x 226cm Hopper Closed Hopper Opening 12 5 x 11 5 32cm x 30cm 20 x 24 51cm x 61cm 2...

Страница 48: ...19 33 53 80 115 160 290 420 630 17 36 63 100 155 220 305 540 880 1320 12 27 45 75 115 165 220 400 650 970 METRIC TORQUE SPECIFICATIONS 8 8 N m lb ft Bolt Torque Bolt Diameter A 10 9 N m lb ft M3 M4 M...

Страница 49: ...tting the critical clearancesbetweentheledgerbladeandtherotor chipper blade Call your dealer for pricing and availability For replacement parts go to www wallensteinequipment com and click on Parts an...

Страница 50: ...PPER 19 G GREASING 33 H HEARING LOSS 10 I INFORMATIVE LABELS 5 L LEDGER 18 19 36 42 43 LEDGER SETTING GAUGE 18 19 LOUD NOISE 10 LOWER LINK 18 19 22 M LABELS 5 14 15 16 O OPERATOR ORIENTATION 6 ORIENTA...

Отзывы: