background image

P.2

Copyright  

©

 2018 by Walker Edison Furniture Co., LLC. All rights reserved.

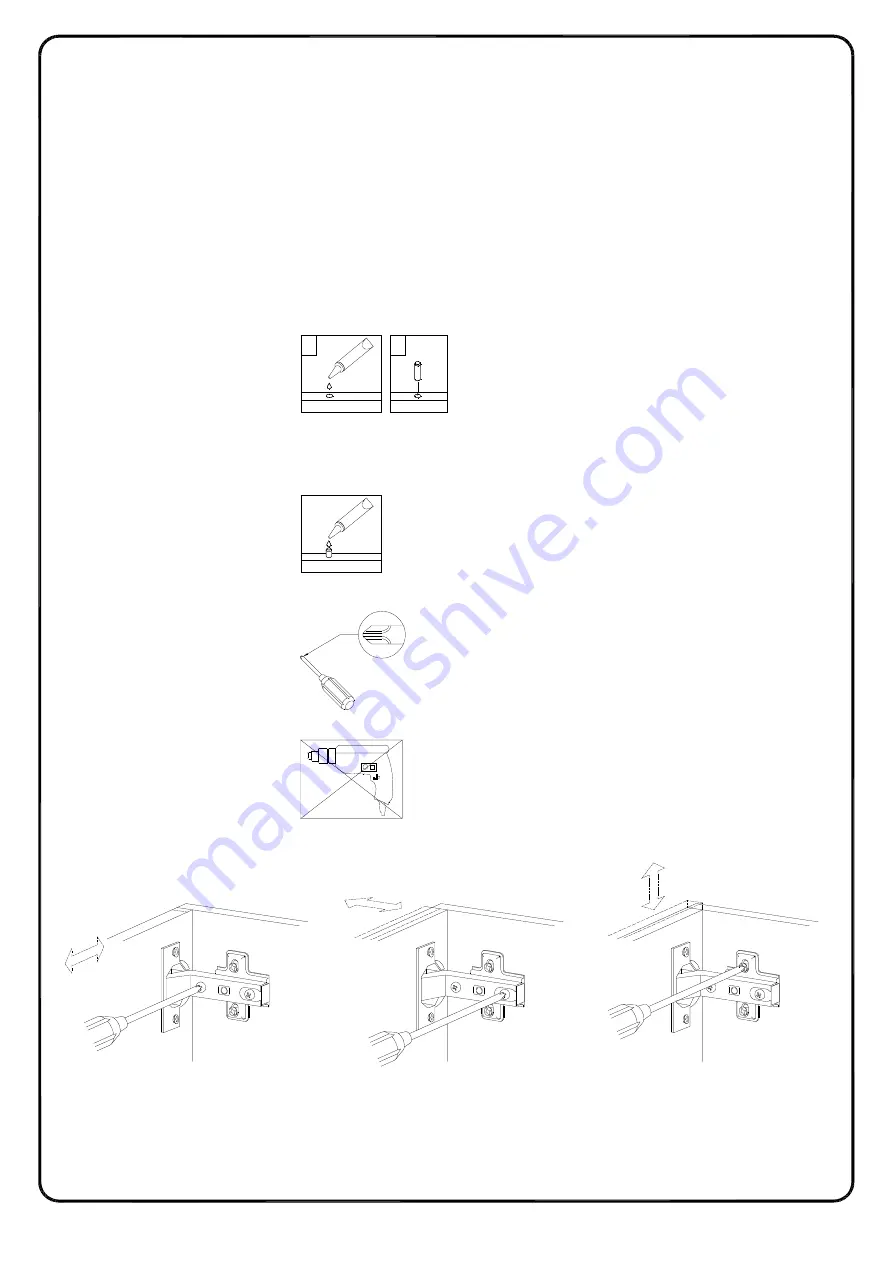
General Assembly Guidelines

I

.        Ensure that all parts and hardware are available before beginning assembly.

II

.       


Follow each step carefully to ensure the proper assembly of this product.

III

.      Two people are recommended for ease in the assembly of this product.

I

V.      The three main types of hardware used to assemble this product are: wood

           dowels, screws and bolts.
V.       The provided glue is to secure wood dowels in place. When first inserting dowels,
           locate the appropriate hole for the dowel, place a small amount of glue in the hole
           and insert the dowel. Wipe away excess glue immediately.

In future assembly steps when dowels are necessary to attach assembly parts

together, place a small amount of glue on the end of the dowel before attaching

parts together. Wipe away excess glue immediately.

V

I

.      A Phillips head screwdriver is required for the assembly of this product.

V

II

.     Power tools should not be used to assemble this product.

.      Concealed hinges are three-way adjustable.

V

III

.    Drill may be needed for securing product to wall.

(EN)

2

1

Horizontal
by screw adjustment

Door

Side panels

In-and-Out

by loosening the hinge-arm
mounting screw or via cam

adjustment

Side panels

Door

Vertical
Via slots in the mounting

plate or via cam adjustment

Side panels

Door

 2 

Содержание W70JACSD

Страница 1: ...P 1 Copyright 2018 by Walker Edison Furniture Co LLC All rights reserved Revised 24 06 2021 I W70JACSD tem N Artikel W70JACSD W70JACSD W70JACSD TM 1...

Страница 2: ...a small amount of glue in the hole and insert the dowel Wipe away excess glue immediately In future assembly steps when dowels are necessary to attach assembly parts together place a small amount of g...

Страница 3: ...e dans le trou et ins rez le goujon Essuyez l exc s de colle imm diatement Dans les prochaines tapes de montage lorsque des goujons sont n cessaires pour assembler les pi ces d posez une petite quanti...

Страница 4: ...osteriores del ensamblaje cuando las clavijas sean necesarias para fijar las partes del ensamblaje coloque una peque a cantidad de pegamento en el extremo de la clavija antes de unir las partes Limpie...

Страница 5: ...en wenn D bel zur Befestigung von Montageteilen ben tigt werden eine kleine Menge Klebstoff auf das Ende des D bels geben bevor die Teile miteinander befestigt werden bersch ssigen Kleber sofort abwis...

Страница 6: ...1 19 19 19 8 3 7 7 6 4 9 10 2 11 11 12 12 11 11 15 17 14 16 13 18 5 Lista de piezas P 6 Copyright 2018 by Walker Edison Furniture Co LLC All rights reserved 6...

Страница 7: ...wedge 12 pcs F 3x17mm Screw 12 pcs G Hinge 4 pcs H Hardware List Liste du mat riel Liste des pi ces Cheville en bois Boulon came Serrure came Boulon Cale en plastique Vis Charni re Clavija de madera...

Страница 8: ...hipping purposes and must be disassembled to complete the desk assembly Curseur du tiroir Deslizador del caj n Schubladenschieber Remarque Cette pi ce est livr e pr assembl e des fins d exp dition et...

Страница 9: ...e Tube de colle Mango Tubo de pegamento Griff Kleber in Tube Vis Tornillo Schraube The hardware quantities listed above are required for proper assembly Some extra hardware may also have been included...

Страница 10: ...tez ce processus pour les deux curseurs de tiroir P Fixez le bras coulissant P au panneau 5 6 et au panneau du tiroir 15 16 avec la vis Q Desmonte el deslizador del caj n P por medio de la separaci n...

Страница 11: ...rez la cheville en bois A dans le panneau lat ral 3 4 5 6 et fixez le boulon came B au panneau lat ral 3 4 5 6 panneau lat ral 5 6 Inserte la clavija de madera A en los paneles laterales 3 4 5 6 y as...

Страница 12: ...lle en bois A dans les pi ces 7 8 18 puis fixez le boulon came B dans les pi ces 1 13 avec le tournevis cruciforme conform ment au sch ma ESP Inserte la clavija de madera A en las partes 7 8 18 luego...

Страница 13: ...verrou came C pour fixer les pi ces 3 5 dans la pi ce 7 avec un tournevis cruciforme conform ment au sch ma ESP Fije las partes 3 5 en la parte 7 luego use el cierre de leva C para fijar las partes 3...

Страница 14: ...verrou came C pour fixer les pi ces 5 6 dans la pi ce 8 avec un tournevis cruciforme conform ment au sch ma ESP Fije las partes 5 6 en la parte 8 luego use el cierre de leva C para fijar las partes 5...

Страница 15: ...verrou came C pour fixer les pi ces 4 6 dans la pi ce 7 avec un tournevis cruciforme conform ment au sch ma ESP Fije las partes 4 6 en la parte 7 luego use el cierre de leva C para fijar las partes 4...

Страница 16: ...m panel 2 to side panel 3 4 5 6 with bolt E Utilisez la cl hexagonal N pour fixer le panneau inf rieur 2 au panneau lat ral 3 4 5 6 avec le boulon E Use la llave hexagonal N para fijar el panel inferi...

Страница 17: ...DE Use Hex key N to secure leg 11 12 to bottom panel 2 with bolt M Utilisez la cl hexagonal N pour fixer le pied 11 12 au panneau inf rieur 2 avec le boulon M Use la llave hexagonal N para fijar la pa...

Страница 18: ...erved 19 19 19 EN FR ESP DE Slide back panels 19 into grooves as per diagram Faites glisser le panneau 19 dans les rainures conform ment au sch ma Deslice el panel trasero 19 en las ranuras seg n el d...

Страница 19: ...au sup rieur 1 dans le panneau lat ral 3 4 5 6 puis ins rez et fixez le verrou de came C au panneau lat ral 3 4 5 6 pour le verrouiller Inserte el panel superior 1 en el panel lateral 3 4 5 6 luego in...

Страница 20: ...F F F F F F 19 19 19 EN FR ESP DE Secure plastic wedge F to back panel 19 with screw G Fixez le cale en plastique F au panneau arri re 19 avec la vis G Asegure la cu a de pl stico F al panel trasero 1...

Страница 21: ...Fixez la poign e R la pi ce 9 10 13 en utilisant la vis noire S fixez la charni re H en utilisant la vis J la pi ce 9 10 avec un tournevis Fije el manija R con el tornillo negro S a la parte 9 10 13 f...

Страница 22: ...le panneau lat ral 15 16 et fixez le verrou came C dans les pi ces 18 pour le verrouiller Fije los paneles laterales del caj n 15 16 y la parte 18 a el panel trasero del caj n 14 con el tornillo K lue...

Страница 23: ...All rights reserved EN FR ESP DE Place door hinge H to part 3 4 using screw J Placez la charni re de porte H la pi ce 3 4 en utilisant la vis J Coloque la bisagra de la puerta H a la parte 3 4 con el...

Страница 24: ...All rights reserved EN FR ESP DE Place sticker L over holes as per diagram Placez l autocollant L sur les trous conform ment au sch ma Coloque la pegatina L para cubrir los agujeros seg n el diagrama...

Страница 25: ...e Co LLC All rights reserved EN FR ESP DE Insert the drawer into slider to lock it ins rez le tiroir dans le curseur pour le verrouiller Inserte el caj n en el deslizador para bloquearlo Stecken Sie d...

Страница 26: ...Final Assembly P 26 Copyright 2018 by Walker Edison Furniture Co LLC All rights reserved 26...

Отзывы: