background image

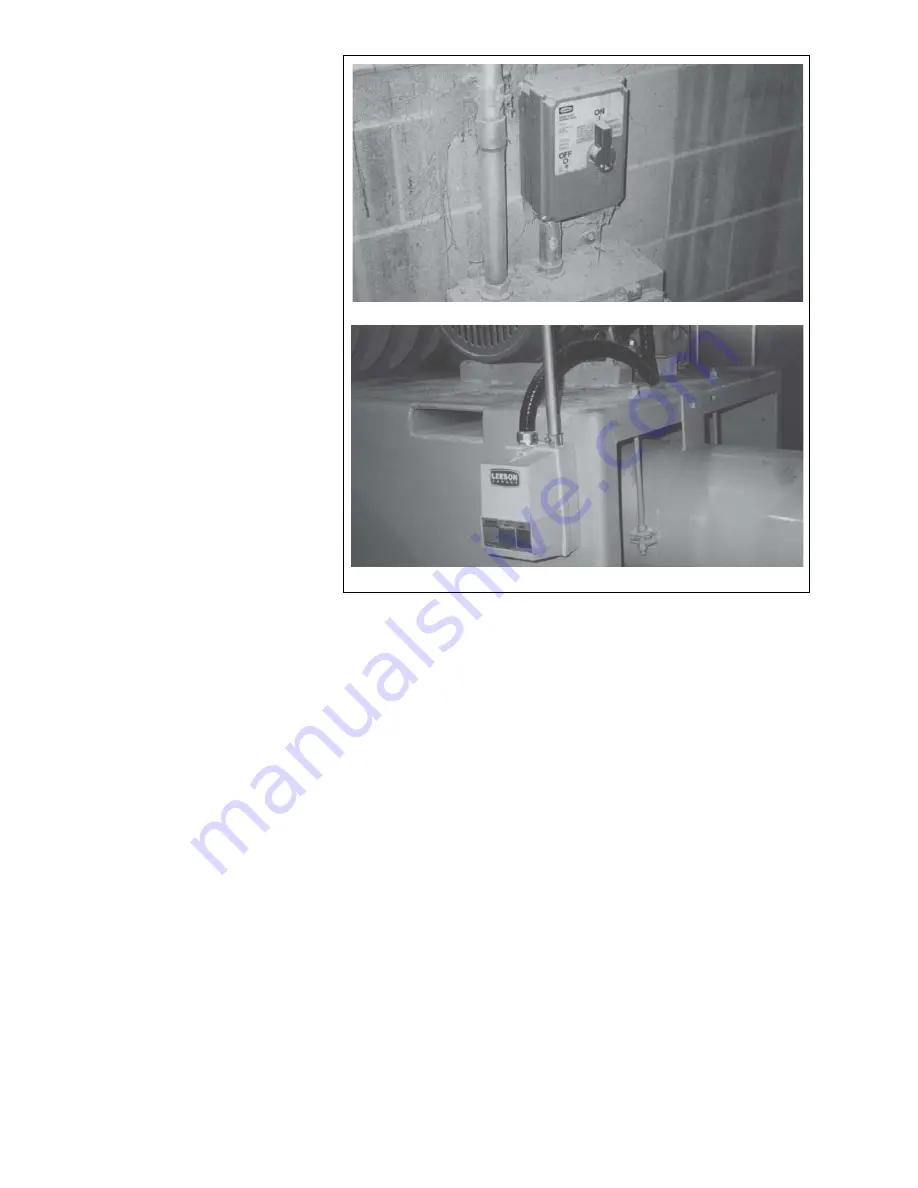
Fig. 4- 5   SWITCHES (TYPICAL)

Master

On/Off

4.

Starting Machine:

a.

Check that the master
panel is not locked out.
If it is, identify cause and
retrieve the tag.  Turn
master panel on.

b.

Turn machine on at the
On/Off switch.

5.

Stopping Machine:

Turn the machine off using
the On/Off switch.  This will
shut down both the blower
and the airlock.

23

Содержание Central Vac

Страница 1: ......

Страница 2: ......

Страница 3: ...ATION Blower Serial Number Machine Serial Number Always give your Dealer the Serial Number of your Walinga Central Vacuum System when ordering parts or requesting service or other information Airlock...

Страница 4: ...nga com Parts Department Fax 519 824 0367 Manitoba and Western Canada Wayne Weidenhammer 204 745 2951 waw walinga com USA John VanMiddlekoop 800 466 1197 ext 3 jvm walinga com SALES MANAGER Tom Linde...

Страница 5: ...Airline Intake Caps Secured All Safety Signs Installed Airlock Access Door Closed and Secured Review Operating and Safety Drive Chains and Belts Tensioned and Aligned Instructions Lubricate Machine Ch...

Страница 6: ...ds available for correction d In respect of any Equipment or part thereof supplied hereunder which are manufactured by others the Seller gives no warranty whatsoever and the warranty given by the manu...

Страница 7: ...4 2 Machine Components 19 4 3 Break In 20 4 4 Pre Operation Checklist 20 4 5 Controls 21 4 6 Operating 22 4 7 Storage 30 5 Service and Maintenance 31 5 1 Service 31 5 1 1 Fluids and Lubricants 31 5 1...

Страница 8: ...be operating or maintaining the machine read and understand the Safety Operation Mainte nance and Trouble Shooting information contained within the Operator s Manual This manual covers all Central Vac...

Страница 9: ...and includes hazards that are exposed when guards are removed It may also be used to alert against unsafe prac tices Indicates a potentially hazardous situation that if not avoided may result in mino...

Страница 10: ...bility to read and under stand ALL Safety and Operating instructions in the manual and to follow these Most accidents can be avoided Walinga feels that a person who has not read understood and been tr...

Страница 11: ...shocks or electrical dis charge 3 Follow good shop practices Keep service area clean and dry Be sure electrical outlets and tools are properly grounded Use adequate light for the job at hand 4 Use on...

Страница 12: ...llest portion of the split backing paper Align the sign over the specified area and carefully press the small portion with the exposed sticky backing in place Slowly peel back the remaining paper and...

Страница 13: ...tion presented in this manual Do not operate or allow anyone else to operate this equipment until such information has been reviewed Annually review this information with all personnel Make these peri...

Страница 14: ...feet hair and clothing away from moving parts 5 Clear the area of bystanders especially small children before starting 7 Wear hearing protection for prolonged expo sure to excessive noise 8 Review saf...

Страница 15: ...e or parts replaced without signs new signs must be applied New signs are available from your authorized dealer or factory direct C WARNING ROTATING AIRLOCK BLADES HAZARD To prevent serious injury or...

Страница 16: ...take tube into material Submer sion in material can cause suffocation DANGER The types of safety signs and locations on the equipment are shown in the illustration below Good safety requires that you...

Страница 17: ...PERATOR OR OWNER The Walinga Central Vacuum System is specifi cally designed to vacuum up grain powder or other granular material and move it in a stream of pressurized air to an airlock discharge A h...

Страница 18: ...granular material is drawn into the system through the wands and hose pipes Material drops out of the air stream when it enters the cyclone From the receiver cy clone the material drops into the turn...

Страница 19: ...defined in the Maintenance Section 4 4 PRE OPERATION CHECKLIST Efficient and safe operation of the Walinga Central Vacuum System requires that each operator reads and understands the operating proced...

Страница 20: ...ion carefully to familiarize yourself with the function and movement of each control before starting 1 Electrical Switches It is recommended that the electrical controls be set up to include a master...

Страница 21: ...tart up 3 Do not operate when any guards are dam aged or removed Install and secure guards before starting 4 Lock out tag out master panel before open ing airlock access door 5 Keep hands feet clothin...

Страница 22: ...b Attach wand or tube to the end of hose Hose Wands Fig 4 4 GATHERING COMPONENTS...

Страница 23: ...that the master panel is not locked out If it is identify cause and retrieve the tag Turn master panel on b Turn machine on at the On Off switch 5 Stopping Machine Turn the machine off using the On O...

Страница 24: ...ntake tube into material Sub mersion in material can cause suffocation 53 15639 6 8 Nozzle Position Do not place the nozzle between your feet when picking up a deep pile of granular material The nozzl...

Страница 25: ...ach Fig 4 8 CAM LOCK GROUNDING TYPICAL fitting and metal pick up components to maintain electrical ground continuity and through the entire system Only when non metal components are used or the electr...

Страница 26: ...y and dirty environments the blower life is not compro mised from contaminants entering the system Open the flapper valve on the bottom of the filter cannister and remove the accumulated material at t...

Страница 27: ...moved to be sure airlock turns freely and has not been damaged Repair airlock if damaged before resuming work 13 Lock Out Tag Out Procedure It is recommended that the customer institute a formal lock...

Страница 28: ...nents to prevent sparks shock or electrical dis charges Do not use plastic components c Clean the intake filter whenever the vacuum relief valve goes off Replace filter when cleaning frequency is too...

Страница 29: ...ire machine thoroughly using the Central Vac to remove all dirt debris or residue 2 Gather all hoses inlets and wands and store them so they will not be damaged during the down time 3 Lubricate all gr...

Страница 30: ...ittings will not take grease remove and clean thoroughly Also clean lubricant pas sageway Replace fitting if necessary 1 Follow ALL the operating maintenance and safety information in the manual 2 Sup...

Страница 31: ...Remove the bottom cone and check the condition of the input filter Clean or change as required Machine is shown with guard removed for illustrative purposes only Do not operate machine with guard remo...

Страница 32: ...4 Check the oil level in the blower reservoirs 2 locations Schematic Rear Front Fig 5 3 RESERVOIRS...

Страница 33: ...ARD BEARING 2 Check for component lines hoses and wands grounding Use an ohmmeter to be sure Do not operate unless the system is completely grounded 3 Lubricate the blower outboard bearing 1 location...

Страница 34: ...oil in the blower reservoirs 2 reservoirs and clean head plate vent holes Fig 5 7 BLOWER RESERVOIRS Fig 5 8 RELIEF VALVE 2 Check the function of the vacuum relief valve Fig 5 9 CAM LOCKS 3 Check condi...

Страница 35: ...C CHANGE CHECK CL CLEAN HOURS SERVICED BY MAINTENANCE 8 Hours or Daily Tens Align Input Drive Belts Input Filter Oil Level in Blower Reservoirs 40 Hours Airlock Drive Chain Component Grounding L Blowe...

Страница 36: ...ot transmit the required power and will slip overheat and wear quickly Pulleys that are not aligned will result in rapid belt wear Follow this procedure when checking and adjust ing belt tension and p...

Страница 37: ...djusting bolt to set the tension Turn both bolts the same amount to maintain pulley alignment c Check the tension again Overtightening will cause belt stretch ing and overload the bearing Belts that a...

Страница 38: ...edge exceeds 1 16 inch 1 5 mm the pulleys must be realigned c Review the types of alignment before starting Fig 5 13 PULLEYS WARNING Fig 5 14 MISALIGNMENT 1 Shafts are not parallel to one another 2 Sh...

Страница 39: ...motor base anchor bolts and jam nuts when alignment has been completed Machine is shown with guard removed for illustrative purposes only Do not operate machine with guard removed e Set the belt tensi...

Страница 40: ...remove the belt drive covers 4 Checking Oil Level a Remove the level plug in each reservoir or check the sight glass Rear Schematic Fig 5 16 BLOWER IMPORTANT Check the level only when the oil is cold...

Страница 41: ...tion forms and collects inside the reservoirs during machine operation Changing oil removes this water and prevents it from damaging the gears and bearings h Install and tighten the level and fill plu...

Страница 42: ...seal between the vacuum and atmosphere sides of the machine and is located at the bottom of the collector cyclone tank As the airlock rotor turns a pocket is filled with material when it points upward...

Страница 43: ...the housing g Mount the blades to their respective vane and tighten bolts finger tight h Loosen and remove drive chain i Rotate airlock rotor slightly to set the clearance between the blade and the ca...

Страница 44: ...small children 2 Turn machine off lock out tag out master control panel and wait for all moving parts to stop before starting maintenance work 3 Remove guard over chain drive system 4 Pull on the midd...

Страница 45: ...ght edge the sprockets must be aligned c Use the position adjusting bolts on the motor base to move motor sprocket for alignment d Be sure chain is properly tensioned e Tighten motor base bolts and ja...

Страница 46: ...ll your Walinga dealer Before you call please have this Operator s Manual and the serial number from your Central Vac ready PROBLEM Slow pick up of material CAUSE Air leaks Dirty or plugged intake fil...

Страница 47: ...lace intake filter Check clearance between lobes and case Excessive clearance will decrease air flow Consult your dealer Check that tip clearance is 0 004 inches Adjust or replace tips as required Ope...

Страница 48: ...ection door or discharge line Lock out tag out master panel Loosen bolts Refer to airlock maintenance Replace motor or gearbox as required Adjust tips to decrease clearance to 0 006 inches Loosen bolt...

Страница 49: ...red Check cross section dimension a If narrow pulley spinning b If swollen belt failing internally Defective belts Replace with matched set Belts failed or worn out Replace belts with matched set Belt...

Страница 50: ...7 SPECIFICATIONS 7 1 MECHANICAL SPECIFICATIONS SUBJECT TO CHANGE WITHOUT NOTICE...

Страница 51: ...0 290 420 630 17 36 63 100 155 220 305 540 880 1320 12 27 45 75 115 165 220 400 650 970 METRIC TORQUE SPECIFICATIONS 8 8 N m lb ft Bolt Torque Bolt Diameter A 10 9 N m lb ft M3 M4 M5 M6 M8 M10 M12 M14...

Страница 52: ...nce 31 Maintenance 37 Airlock 43 Belt Tension and Alignment 37 Blower Oil Changing and Breather Cleaning 41 Chain Tension and Alignment 45 Service 31 Fluids and Lubricants 31 Greasing 31 Service Recor...

Страница 53: ...PARTS ACCESSORIES...

Страница 54: ...TOOL HOLDER 6 Wands 6 Gaylord Wand 6 Crevice Tool 6 Gulper 6 Squeegee Gulper 6 Squeegee Brush Wand 6 Tool Holder 6 OPERATOR TOOLS FOR 3 HOSE 7 SELF DUMPING HOPPER BINS 7 Sweep 7 Nozzle 7 Self Dumping...

Страница 55: ...065 Wall X 7 1 2 CLR Straight Ends 51 18956 6 3 X 065 Wall X 24 CLR Straight Ends 51 18957 6 3 X 065 Wall X 30 CLR Straight Ends 51 80285 6 4 X 065 Wall X 10 CLR Straight Ends 51 18961 6 4 X 065 Wall...

Страница 56: ...51 80294 6 2 Straight W 2 Inlets 065 Wall Straight Ends 51 18917 6 3 Straight W 3 Inlets 065 Wall Straight Ends 51 18918 6 4 Straight W 4 Inlets 065 Wall Straight Ends DOUBLE 90 Y s GALVANIZED PART N...

Страница 57: ...o 3 065 Wall Straight Ends COUPLING ADAPTORS PART NO DESCRIPTION 38 80297 6 Adaptor KM3 TO KF2 38 43218 6 Adaptor DM4 TO KF2 38 43219 6 Adaptor DM4 TO KF3 COMPRESSION COUPLINGS PART NO DESCRIPTION 38...

Страница 58: ...uminum With KM2 Coupling CREVICE TOOL PART NO DESCRIPTION 38 43217 5 Crevice Tool 24 Chrome Steel With KM2 Coupling GULPER PART NO DESCRIPTION 38 18530 6 Gulper Tool 13 Aluminum SQUEEGEE GULPER PART N...

Страница 59: ...ozzle 20 3 X 37 With KM3 Coupling SELF DUMPING HOPPER BINS DESCRIPTION 10 ga Steel Hopper Self Dump C W Safety Chains PART NO Capacity CY L in W in H in Steel Lid Optional Part No 11 78297 6 5 47 33 3...

Страница 60: ...CRIPTION 36 41037 5 2 Rubber Hose X 25 Ft W KM2 KF2 36 40505 5 3 Rubber Hose X 12 Ft W KM3 KF3 36 41039 5 3 Rubber Hose X 20 Ft W KM3 KF3 TUBING PART NO DESCRIPTION 89 80295 1 Tube Steel Aluminized 2...

Страница 61: ...Male Aluminum 2 Hose Shank KM2 Hose 38 13998 6 Coupling Camlock Male Aluminum 3 Hose Shank KM3 Hose 38 00397 5 Coupling Walinga Male 4 ID DM4 COUPLINGS FEMALE QUICK CONNECT PART NO DESCRIPTION 38 188...

Страница 62: ...H CHAIN PART NO DESCRIPTION 38 18880 6 Dust Plug 2 KP2 38 13204 6 Dust Plug 3 KP3 PART NO DESCRIPTION 38 04465 5 Dust Plug 4 DP4 CLAMP SADDLE GALVANIZED PART NO DESCRIPTION 28 16800 6 Clamp Saddle 2 2...

Страница 63: ...ow Galvanized 90 Deg 4 X 065 Wall X 36 CLR Straight Ends 51 80286 6 Elbow Galvanized 90 Deg 5 X 065 Wall X 12 1 2 CLR Straight Ends 51 80290 6 2 Straight W 2 Inlet 065 Wall Straight Ends 51 80291 6 3...

Страница 64: ...5 Wall ft 89 00392 2 Tube Aluminum 4 OD X 072 Wall ft 89 08073 2 Tube Aluminum 5 OD X 078 Wall 38 18883 6 Coupling 2 Camlock Aluminum Male 2 ID KM2 Tube 38 18152 6 Coupling 3 Camlock Aluminum Male 3 I...

Страница 65: ......

Страница 66: ......

Отзывы: