background image

GB

16

Renuvo

• 

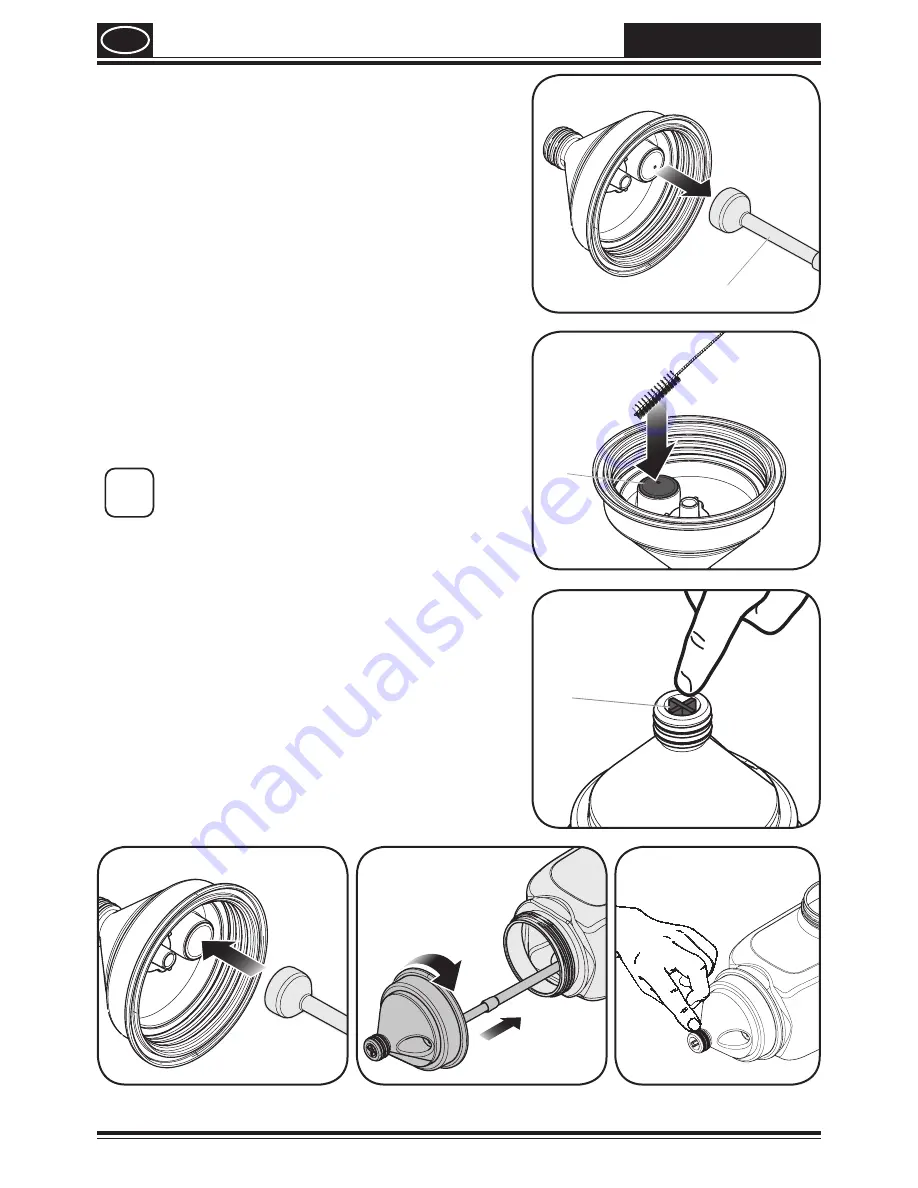
Pull out the tube (fig. 15, a) and rinse it well (you 

do not have to take the tube apart to do this).

• 

Using a soft brush and detergent, wipe away and 

remains of the material from the valve (fig. 16, b).

Important: Do not remove the valve for cleaning. 

If the valve is incorrectly re-attached, the material 

cannot flow out of the container.

• 

Allow the cleaning agent to flow through the 

valve, pressing the cross-shaped valve button (fig. 

17, c).

• 

Put the black tube back on the valve (fig. 18).

• 

Wipe the inside of the container cap with a cloth.

• 

Screw the container cap back on the container, 

tightening it by hand. (Fig. 19).

• 

Lubricate the O rings with a thin layer of 

lubricant. (Fig. 20)

i

Allow the container to dry completely 

before storing it away.

• 

Re-insert the container.

a

b

c

Содержание Renuvo

Страница 1: ...Renuvo D GB F NL 2 ans de garantie 2 jaar garantie 2 years Guarantee 2 Jahre Garantie...

Страница 2: ...er to convey the material Fill container max 1 9 l Move Renuvo evenly back and forward 1 4 5 3 6 2 Contents 1 Description Scope of delivery 11 2 Technical Data 11 3 Field of application 11 4 Pretreatm...

Страница 3: ...ner group com service 1 Description Scope of delivery Brush for grooves yellow Outdoor application pad Application pad holder Application pad quick release fastener Connection tube upper part Detachab...

Страница 4: ...mportant information about the material you are using e g brand and colour tone so that you can use the same material for future work 6 Assembly i Regardless of how your Renuvo was packaged some of th...

Страница 5: ...ut of the outdoor application pad turn it round and attach it Fig 3 Place the device on to a piece of masking material with the container opening upwards Fig 4 Unscrew the lid on the container Fill th...

Страница 6: ...lete a stroke before taking a break This will avoid any noticeable differences in structure If taking a longer break put the application pad in a plastic bag in order to prevent it from drying out i T...

Страница 7: ...er fig 9 a to detach the container Unscrew the lid and pour any leftover material into the original container Fill the container with a suitable cleaning agent Fig 10 Re insert the container Make sure...

Страница 8: ...attached thematerial cannot flow out of the container Allow the cleaning agent to flow through the valve pressing the cross shaped valve button fig 17 c Put the black tube back on the valve fig 18 Wi...

Страница 9: ...B Too much material is coming out Material limiter is set to the lower position Trigger is pressed too frequently Push the limiter up Press trigger less frequently for shorter periods C No material co...

Страница 10: ...48 333 2 Outdoor application pad incl pos 3 2348 334 3 Brush for grooves 2348 580 4 Indoor application pad incl pos 5 2348 335 5 Mini corner pad 2350 229 6 O ring set one O ring for the application pa...

Страница 11: ...lso excluded from the guarantee The guarantee excludes commercial use We expressly reserve the right to fulfil the guarantee The guarantee expires if the tool is opened up by persons other than WAGNER...

Отзывы: