Wacom PL Series Скачать руководство пользователя страница 11

11

11

Index

Contents

Index

Contents

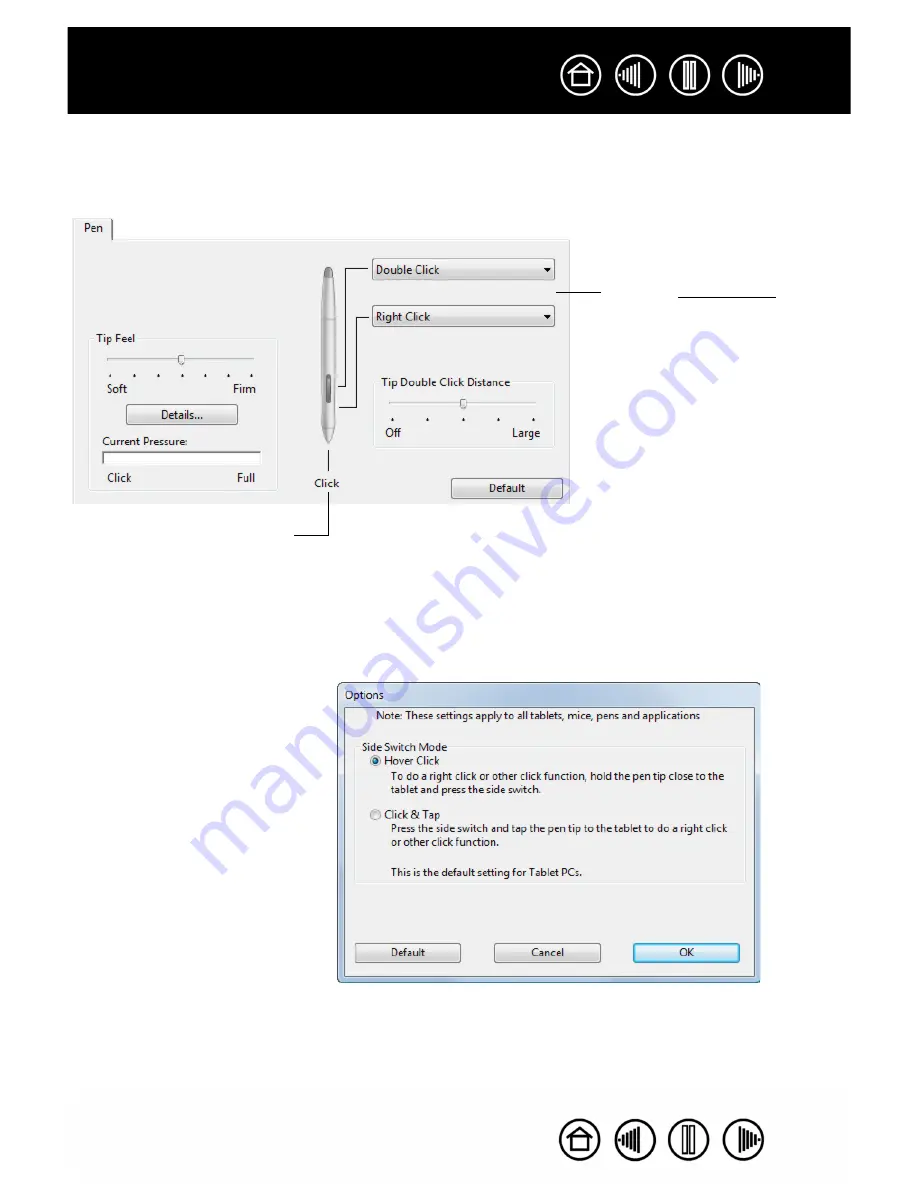
CUSTOMIZING PEN BUTTONS

Select the P

EN

 tab to change the functions assigned to the side switches and tip of your pen.

Note:

 Some product configurations may include a pen without side switches.

Select the button function to 
perform when pressing the upper 
or lower side switch.

When you bring the pen tip within 
5 mm (0.20 inch) of the tablet 
surface without touching the tablet 
and press the upper or lower side 
switch, the selected function 
occurs.

Hint:

 To make double-clicking 

easier, set the side switch to 
double-click automatically by 
selecting D

OUBLE

 C

LICK

.

Double-click here to change the 
function assigned to the pen tip.

At least one pen button should 
be set to the C

LICK

 function.

The tip must be set to C

LICK

 in 

order to draw in most graphics 
applications.

Note

: You can change the S

IDE


S

WITCH

 M

ODE

 to best fit the way you 

like to use the pen when making 
right-clicks or other click functions.  
To access the S

IDE

 S

WITCH

 M

ODE


settings, click on the O

PTIONS

... 

button at the bottom of the control 
panel.  In the O

PTIONS

 dialog box 

that appears:

Select  H

OVER

 C

LICK

 to perform 

click functions without touching 
the pen tip to the tablet surface.

When C

LICK

 & T

AP

 is selected, 

you must press the side switch 
while touching the pen tip to the 
tablet surface in order to 
perform a click function.  
C

LICK

 & T

AP

 enables the 

precise placement of your click 
functions, and is the default 
setting for Tablet PCs.

Содержание PL Series

Страница 1: ...tip feel and double click 8 Adjusting eraser feel 9 Advanced tip and eraser pressure settings 10 Customizing pen buttons 11 Button functions 12 Using the pen display with other monitors 17 Using and...

Страница 2: ...tool to increase the size of the page on your display screen The following kinds of information are not included with this product information about your specific computer hardware or operating system...

Страница 3: ...ugh the manual Go to front page Go to table of contents Go to index Go back to previous view Page back or page forward Go to topic Topic continued Adobe Reader provides you with additional tools for u...

Страница 4: ...OL PANEL To open the Wacom Tablet control panel use the pen on the pen display Windows Click on the Windows START button and choose ALL PROGRAMS Then select WACOM TABLET and choose the WACOM TABLET PR...

Страница 5: ...ew moments the Tool Tip will pop up Additionally your keyboard tab and arrow keys can be used to navigate the control panel Tabs display customizable settings for the selected TOOL See control panel s...

Страница 6: ...of the more complex topics Many of the sections also contain useful customizing tips Calibrating the pen display Customizing the pen Using and customizing the Radial Menu Working with Display Toggle...

Страница 7: ...y Use the pen tip to click on the center of the crosshairs in the upper left corner 5 Then click on the center of the crosshairs that are displayed in the lower right corner 6 Test the alignment by po...

Страница 8: ...t the current tip feel setting You can use the CURRENT PRESSURE bar to determine how hard you must press on the pen to reach maximum pressure Displays the tip FEEL DETAILS dialog box where you can fur...

Страница 9: ...g the eraser Customizes the amount of pressure needed to erase Displays the eraser FEEL DETAILS dialog box where you can further customize the eraser sensitivity With your screen cursor positioned ove...

Страница 10: ...overrides the detail pressure settings If you customize the detail settings then drag the slider your detail settings will be removed Drag the slider to adjust the click threshold level This setting d...

Страница 11: ...to change the function assigned to the pen tip At least one pen button should be set to the CLICK function The tip must be set to CLICK in order to draw in most graphics applications Note You can cha...

Страница 12: ...ragging objects or selecting blocks of text 4TH CLICK Simulates a 4th mouse button click BACK Simulates the BACK command in browser applications 5TH CLICK Simulates a 5th mouse button click FORWARD Si...

Страница 13: ...cursor between the pen display and your other displays When selected your product can be used either as a pen display the screen cursor is positioned at the pen tip location or as a standard Wacom tab...

Страница 14: ...keystroke combinations from the ADD SPECIAL drop down menu When you make a selection it is added to the KEYS entry box After defining a keystroke or keystroke sequence click OK Important Because the E...

Страница 15: ...image As you move the pen tip the document or image is repositioned to follow the direction of pen movement on the tablet Release the button or lift the pen tip from the tablet surface when you are do...

Страница 16: ...applications use modifier keys to constrain the size or placement of objects Sets the screen cursor acceleration when in mouse mode Sets the screen cursor tracking speed when in mouse mode Note Mouse...

Страница 17: ...you have several options for navigating on the other monitors Set a pen side switch to the DISPLAY TOGGLE function You can then press the button to toggle the screen cursor between the pen display and...

Страница 18: ...from Select an available option by clicking on it within the Radial Menu The menu closes after you make a selection To close the Radial Menu without making a selection click on the X located at the ce...

Страница 19: ...LAYS is selected and you press the pen button the screen cursor is toggled from your pen display to another active pen display or monitor If additional displays are attached to the system the screen c...

Страница 20: ...ettings in all applications When application specific settings are added to the APPLICATION list the ALL icon changes to ALL OTHER and an application icon is displayed for the newly added application...

Страница 21: ...n specific settings applications that have not been customized in this manner will use the TOOL settings for ALL OTHER Tip First customize settings for one application When you feel comfortable with t...

Страница 22: ...Then place the pen back on the pen display The PEN will be added back to the TOOL list using the default settings INSTALLING MULTIPLE TABLETS The TABLET list displays an icon for any supported tablet...

Страница 23: ...a double click Eraser aware application A software application that has built in support for the pen eraser These applications take advantage of the eraser in different ways depending on what makes se...

Страница 24: ...nu A hierarchical menu in radial format Each level of the menu consists of eight menu slices which may contain various features and options to choose from You can customize the buttons of your pen to...

Страница 25: ...ed 10 pen 8 pen buttons 11 Radial Menu 18 tip feel 8 advanced 10 Display Toggle working with 19 Double click customizing 8 Eraser feel customizing 9 advanced 10 Features control panel 5 Functions butt...

Страница 26: ...elease to the users of the Manual is simultaneous with the introduction into the market of the applicable Wacom product DuoSwitch is a trademark and Wacom is a registered trademark of Wacom Co Ltd Ado...

Отзывы: