background image

6

Index

Contents

6

Index

Contents

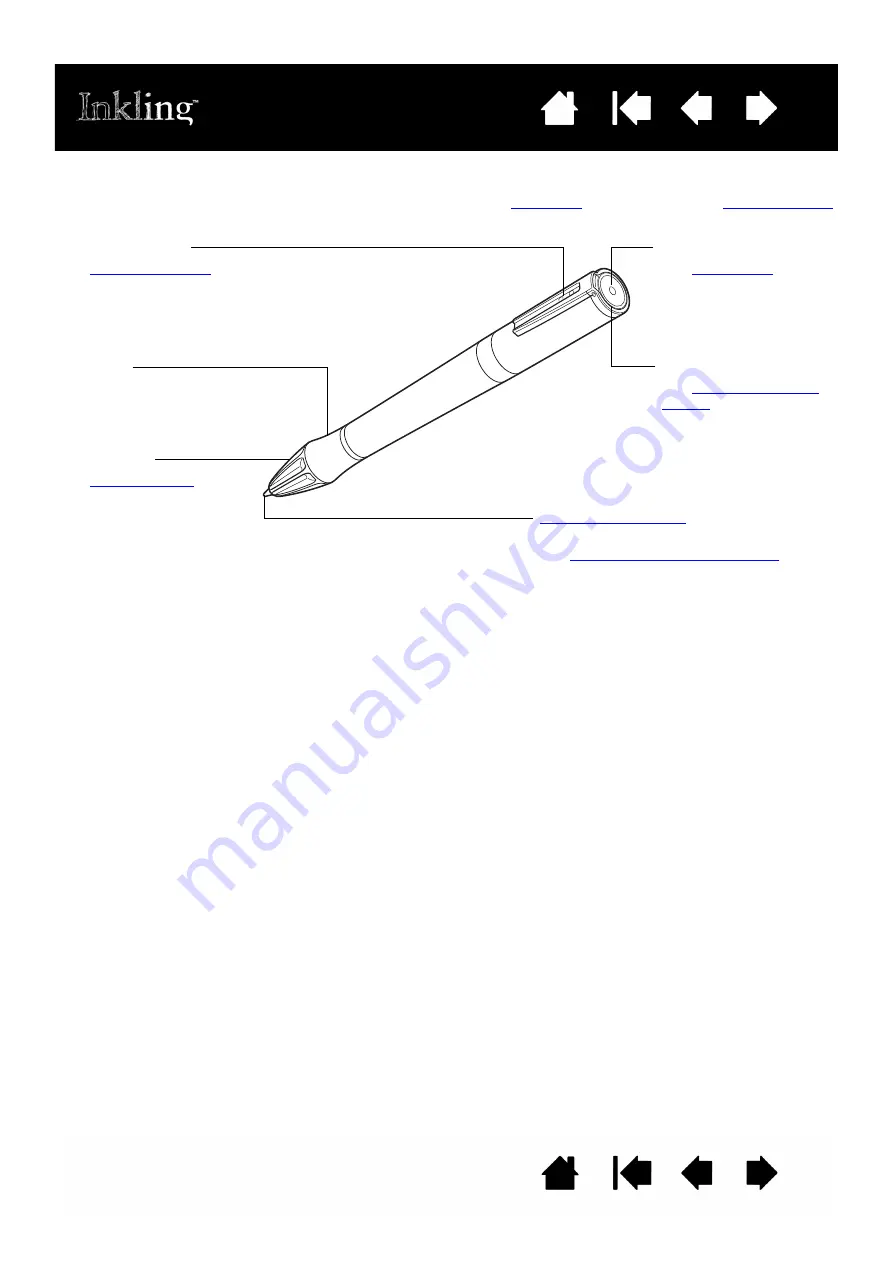
INKLING DIGITAL PEN

Use the digital pen to write and sketch on regular paper.   See 

sketching

.  As you work, the 

Inkling receiver


digitally captures your sketches and saves them for uploading to your computer at a later time.

Grip area

Replaceable cartridge

 (pen tip)

Uses standard Mini Ballpoint Ink refills.  
See 

available parts and accessories

.

Battery compartment

See 

battery installation 

for pen

.

Charging contacts

See 

charging batteries

.

Pen LED

See 

status lights

.

Pen tip cone

See 

holding the pen

.

Содержание Inkling MDP-123

Страница 1: ...User s manual for Windows Macintosh 1 Index Contents 1 Index Contents Inkling model MDP 123 Before you start Setting up Sketching Saving your work Sketch management Troubleshooting...

Страница 2: ...s simultaneous with the introduction into the market of the applicable Wacom product Inkling is a trademark and Wacom is a registered trademark of Wacom Co Ltd Adobe Photoshop and Illustrator are eith...

Страница 3: ...hanging pages 19 Viewing and uploading a sketch 20 INKLING SKETCH MANAGER 21 Installing the software 21 Working with the Sketch Manager 22 Toolbar options 23 Right click options 23 Control buttons 24...

Страница 4: ...specifications and your license and warranty Use the navigation controls to move through the manual You can use your pdf viewer zoom in tool to increase the size of the manual on your display screen...

Страница 5: ...o digitally capture your sketches Together the pen and receiver act like a portable digital sketchbook Inkling saves your information in one place for quick access Use the Inkling Sketch Manager to or...

Страница 6: ...itally captures your sketches and saves them for uploading to your computer at a later time Grip area Replaceable cartridge pen tip Uses standard Mini Ballpoint Ink refills See available parts and acc...

Страница 7: ...yers Receiver clip with new file button located beneath the clip A new sketch file is created when you open and close the clip See attaching the receiver to paper Power button Press to turn on or off...

Страница 8: ...t located directly on your computer or to a powered USB hub Pen cartridges Pen charging status LED See status lights USB port Power input and data connection See charging batteries and viewing and upl...

Страница 9: ...isted within the Important Product Information guide accessed from the Inkling Sketch Manager HELP menu Keep batteries out of the reach of children Battery installation for pen Receiver battery inform...

Страница 10: ...Under normal conditions the rechargeable receiver battery will have a long life span If the battery fails unexpectedly or has outlived its useful life and must be replaced please contact your local W...

Страница 11: ...t located directly on your computer or other powered USB source The pen charging status LED will glow red to indicate the case is connected to powered USB source and the pen battery is charging The po...

Страница 12: ...es Lithium Ion Polymer Li Ion Polymer and Nickel Metal Hydride Ni MH batteries Battery life and performance is not improved by cycling discharging and recharging Elevated temperatures can reduce the s...

Страница 13: ...ted to a powered USB source indicates battery is charging Status LED Off Pen not in use or no pen reception Green Pen in use and data reception is good New layer LED Green 1 second duration Lights whe...

Страница 14: ...ip lift the pen away from the charging case to remove the pen cartridge You can also clasp the cartridge tip with a pair of tweezers and pull it out of the pen 2 Select a replacement cartridge Remove...

Страница 15: ...to view organize and prepare your sketches before exporting and editing them in your favorite applications This chapter describes how to use Inkling It includes information to help you work more comf...

Страница 16: ...djust the click threshold Tips Inkling can be used on most relatively smooth flat surfaces Use a gentle grip when working with the pen As you draw maintain a direct line of sight between the pen tip c...

Страница 17: ...insert paper into the opening Release the clip Be sure to center the receiver on the page edge 2 Press the receiver power button Wait until the power LED stops blinking and glows green 3 Begin sketch...

Страница 18: ...per position shown with fingers on the grip area above the pen tip cone When sketching always maintain a direct line of sight between the pen tip cone and receiver Digital recording will not occur if...

Страница 19: ...page by creating a new layer after you complete each item When working on a larger sketch create layers to simplify the editing process later or to try different approaches or styles in the same sketc...

Страница 20: ...the receiver This is where your sketch files are located 2 Use the Inkling Sketch Manager to work with your sketch files 3 Move files from the Inkling receiver to your computer Drag file thumbnails t...

Страница 21: ...ly attach the Inkling receiver to your computer or to a powered USB hub Note that you can also install the Inkling software while the Inkling charging case is connected to your computer and the receiv...

Страница 22: ...tips are available for most Sketch Manager controls Position the screen cursor over an item and let it rest there in a few moments the tool tip will appear Your keyboard tab and arrow keys can be used...

Страница 23: ...may also be available for working with some Sketch Manager controls UPPER TOOLBAR OPTIONS FILE Access file commands such as OPEN FILE SAVE EXPORT TO and PRINT EDIT Access common editing commands VIEW...

Страница 24: ...anager view Move back through folder tree navigation history Move forward through folder tree navigation history Zoom in Zoom out Rotate selected file counter clockwise around virtual paper center Rot...

Страница 25: ...tch files you have created are saved to the MY SKETCHES folder located on the receiver They are sorted by date You can browse all directories listed in the tree to locate and work with sketch files in...

Страница 26: ...an be merged Delete selected layer Expanded view of selected file layer s Work with the selected file layer s using the LAYER MANAGER toolbar options control buttons or right click options Use the scr...

Страница 27: ...ected are displayed in the left L or right R strokes counter boxes For example when you click on the split layers button the current layer will be split at the position of the scrubber heads This enab...

Страница 28: ...TROLS Go to first stroke Go to previous stroke from current playback location Play selected file showing your pen strokes Note Strokes may be shown on a stroke by stroke basis or combined and shown in...

Страница 29: ...iate Sketch Manager Export button option From the upper toolbar you can also select FILE and choose an EXPORT TO option The Sketch Manager will open the selected export to application along with your...

Страница 30: ...iew SETTINGS TABS MAPPING Inkling automatically detects your pen strokes as you sketch Inkling is optimized for a page size of A4 letter portrait orientation Choose the PAPER SIZE you typically use an...

Страница 31: ...affect the presentation of your strokes in digital form DEFAULT BRUSH SIZE sets the size of the pen stroke width in digital form and is based on the BALLPOINT DIAMETER DEFAULT BRUSH COLOR sets the co...

Страница 32: ...screen cursor within the test area on this tab 4 Then sketch a couple of typical lines in that area and compare them with the digital lines in the test area on this tab 5 If needed use the slider to...

Страница 33: ...n to which the Inkling Sketch Manager automatically navigates when the application is open and the receiver is not connected to your computer SET RECEIVER REAL TIME DOCK is used to set the local date...

Страница 34: ...ars choose INKLING SKETCH MANAGER Click UNINSTALL and follow the prompts to remove the software If prompted enter your administrator login name and password Windows XP or XP x64 Click START In the sta...

Страница 35: ...ion updates 4 Test your Inkling 5 If you are having a compatibility conflict between Inkling and a new hardware or software product see obtaining software downloads for information on downloading upda...

Страница 36: ...arge is okay 4 Verify that you can upload files from the receiver to your computer See viewing and uploading a sketch 5 Check the product in online mode Properly connect the receiver to your computer...

Страница 37: ...that the USB cable is properly plugged into the receiver and that it is plugged directly into a powered USB port on your computer or a powered USB hub Try charging the receiver within the charging ca...

Страница 38: ...g from the sketch closest to where the receiver was located on the paper There is a limited performance zone where the receiver cannot reliably record your pen strokes See attaching the receiver to pa...

Страница 39: ...is not working properly contact the Wacom support staff for the area where your product was purchased See the Inkling Read Me file located on the Inkling receiver for contact information When you cal...

Страница 40: ...t and Africa Japan Asia Pacific English China Hong Kong Korea Taiwan Worldwide Web http www wacom com productsupport Software updates Worldwide Web http www wacom eu downloads Software updates Worldwi...

Страница 41: ...the cloth using a very mild soap diluted with water Do not use volatile liquids such as paint thinner or benzene because they may damage the plastic casings Keep your Inkling in a clean dry place and...

Страница 42: ...the paper This synchronizes the pen to the receiver Tap once to click Tap twice to double click 4 When finished disconnect the receiver from your computer Before disconnecting use the SAFELY REMOVE H...

Страница 43: ...tablet wacom co jp Asia Pacific English http www wacom asia com China Simplified Chinese http www wacom com cn Hong Kong Traditional Chinese http www wacom com hk Korea http www wacomkorea com Taiwan...

Страница 44: ...ct com USA only In Europe call 49 0 180 500 03 75 or send an Email to spareparts wacom eu Or visit http shop wacom eu You can also contact your local dealer distributor or technical support using the...

Страница 45: ...erface A messaging architecture used by many Email applications Online mode An operational mode that enables you to use Inkling for navigation input Pressure sensitive A quality of the Inkling digital...

Страница 46: ...g 41 testing 36 Layers adding 19 creating 26 editing 26 exporting 29 working with 26 LEDs status 13 Manager sketch 21 Managing settings 30 Online mode 42 Opening a sketch file 25 Ordering parts and ac...

Страница 47: ...to 16 with pressure 19 with tilt 19 Software downloads obtaining 40 installing 21 uninstalling 34 Status LEDs 13 Technical Support contacting 39 Testing 36 Tilt sketching with 19 Troubleshooting 35 ge...

Страница 48: ...M KOREA CO LTD Unit 2807 28th Floor SK Tower 1211 12F KGIT Sangam Center No 6 Jia Jianguomenwai Avenue 1601 Sangam dong Mapo gu Seoul 121 913 Korea Beijing 100022 China Telephone 82 2 557 3894 Interne...

Отзывы: