background image

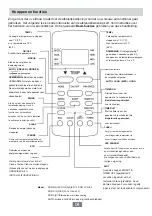
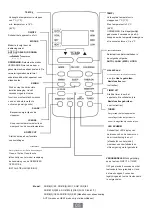
Information are displayed when the remote controller is power up.

Note:

All indicators shown in the figure are for the purpose of clear presentation. But during the actual
operation, only the relative function signs are shown on the display window.

06

Remote Screen Indicators

Displayed when data transmitted.

Displayed when remote controller is ON.

Low speed 

NO display

Medium speed 

High speed 

Auto fan speed 

Displayed when TIMER ON time is set 

Displayed when TIMER OFF time is set 

Indicated all the current settings are 
locked 

Shows set temperature or room
temperature, or time under TIMER setting  

HIGH
MED
LOW

AUTO

COOL

DRY

HEAT

AUTO

HEAT

COOL

FAN

DRY

Mode display

Fan speed indication

FAN

HIGH

MED

LOW

Displayed when Follow Me feature is 
activated(some units)

Displayed when SLEEP feature is activated

Displayed when ECO feature is activated
(some unit)

Displayed when FRESH feature is 
activated(some units)

Displayed when TRUBO feature is activated

Horizontal louver auto swing display

Vertical louver auto swing display(some units)

Содержание RG51A(2)/EF

Страница 1: ...E REMOTE CONTROLLER OWNER S MANUAL Thank you for purchasing our air conditioner Please read this manual carefully before operating your new air conditioning unit Make sure to save this manual for futu...

Страница 2: ...le of Contents Remote Controller Specifications 02 Handling the Remote Controller 03 Buttons and Functions 04 Remote Screen Indicators 06 How to Use Basic Functions 07 How to Use Advanced Functions 10...

Страница 3: ...no effect When there are wide differences between Remote controller Manual and USER S MANUAL on function description the description of USER S MANUAL shall prevail 02 Remote Controller Specifications...

Страница 4: ...FCC Rules Operation is subject to the following two conditions 1 This device may not cause harmful interference and 2 this device must accept any interference received including interference that may...

Страница 5: ...ee How to Use Basic Functions for instructions TIMER OFF Sets timer to turn unit off seeHow to Use Basic Functions for instructions I SENSE Temperature sensing and room temperature display button ECO...

Страница 6: ...s SHORT CUT CLEAN LED DISPLAY 05 Model RG51B 2 EF RG51B 2 EFU1 RG51Y8 2 EF RG51B10 2 EF RG51B10 2 CEF 20 28 C 68 82 F RG51B 2 CEF RG51B10 2 CEF Cooling only models AUTO mode and HEAT mode are not avai...

Страница 7: ...when TIMER ON time is set Displayed when TIMER OFF time is set Indicated all the current settings are locked Shows set temperature or room temperature or time under TIMER setting HIGH MED LOW AUTO CO...

Страница 8: ...ng the TEMP or TEMP button Set your desired temperature using the TEMP or TEMP button 3 Press the ON OFF button to start the unit Press the ON OFF button to start the unit NOTE FAN SPEED can t be set...

Страница 9: ...s the ON OFF button to start the unit 1 Press the MODE button to select HEAT mode 2 3 Press FAN button to select the fan speed AUTO LOW MED or HIGH 4 1 3 2 4 DRY Mode dehumidifying NOTE FAN SPEED cann...

Страница 10: ...Cancel either function by setting its timer to 0 0h Point remote to unit and wait 1sec the TIMER ON will be activated Press TIMER OFF button to initiate the OFF time sequence Point remote to unit and...

Страница 11: ...n to turn on and turn off the display on the indoor unit 5s Press LED button Press this button more than 5 seconds some units I SENSE function some units When the I SENSE function is activated the rem...

Страница 12: ...r modifying the mode or adjusting the set temperature to less than 24 C 75 F will stop ECO operation Under ECO operation the set tmeperature should be 24 C 75 F or above it may result in insufficient...

Страница 13: ...emperature of 16 C 60 F or 20 C 68 F for model RG51A10 2 EF RG51B10 2 EF RG51B10 2 CEF to activate FP function Press On Off Sleep Mode Fan and Temp button while operating will cancel this function Not...

Страница 14: ...CR296 RG51A B 2 F The design and specifications are subject to change without prior notice for product improvement Consult with the sales agency or manufacturer for details...

Страница 15: ...E NOTITIE AFSTANDSBEDIENING Dank u voor de aankoop van onze airconditioner Lees deze handleiding aandachtig door voordat u uw nieuwe airconditioning in gebruik neemt Zorg ervoor dat u deze handleiding...

Страница 16: ...icaties afstandsbediening 02 Omgaan met de afstandsbediening 03 Indicatoren op afstandsscherm 06 Basisfuncties gebruiken 07 Knoppen en functies 04 Hoe geavanceerde functies te gebruiken 10 Inhoudsopga...

Страница 17: ...vangstbereik 3 0V droge batterijen R03 LR03 2 5 C 60 C 23 F 140 F Zw ni g T mier 1 6 4 2 Snelstartgids Knopontwerpen op uw apparaat kunnen iets afwijken van het getoonde voorbeeld NIET ZEKER WAT EEN F...

Страница 18: ...gebruiker aangemoedigd om te proberen de interferentie te corrigeren door een of meer van de volgende Veranderingen of modificaties die niet uitdrukkelijk zijn goedgekeurd door de partij die verantwo...

Страница 19: ...oppen SWING Start en stopt de horizontale lamellenbeweging Houd 2 seconden ingedrukt om de functie voor automatisch zwenken van de verticale lamellen te activeren sommige units OPMERKING Druk tegelijk...

Страница 20: ...oetsen DIRECT TIMER OFF gedurende 5 seconden om het toetsenbord te vergrendelen Houd de twee knoppen 2 seconden tegelijk ingedrukt om het toetsenbord te ontgrendelen Basisfuncties voor Stelt en active...

Страница 21: ...uidelijke presentatie Maar tijdens de daadwerkelijke werking worden alleen de relatieve functietekens weergegeven op het weergavevenster Informatie wordt weergegeven wanneer de afstandsbediening wordt...

Страница 22: ...of HIGH Stel de gewenste temperatuur in met de TEMP of TEMP knop Druk op de AAN UIT knop om het apparaat te starten OPMERKING FAN SPEED kan niet worden ingesteld in de AUTO modus 1 Druk op de MODE kn...

Страница 23: ...HIGH Stel de gewenste temperatuur in met de TEMP of TEMP knop OPMERKING FAN SPEED kan niet worden gewijzigd in DRY modus Druk op de FAN knop om de ventilatorsnelheid te selecteren AUTO LOW MED of HIG...

Страница 24: ...UIT knop om de UIT tijdreeks te starten Richt de afstandsbediening op het apparaat en wacht 1 sec De TIMER ON wordt geactiveerd Druk op de TIMER ON knop om de ON tijdsequentie te starten Druk op Temp...

Страница 25: ...e actuele kamertemperatuur weer Als u nogmaals langer dan 5 seconden drukt keert u terug naar de ingestelde temperatuur De horizontale lamel zal automatisch omhoog en omlaag gaan wanneer u op de Swing...

Страница 26: ...en Deze functie kan alleen worden geactiveerd via de afstandsbediening De slaapfunctie is niet beschikbaar in de Fan of Dry modus Raadpleeg de GEBRUIKERSHANDLEIDING voor Opmerking Deze functie is alle...

Страница 27: ...stiltefunctie te annuleren Druk op Aan Uit Slaapstand Modus Ventilator en Temp knop tijdens het gebruik zal deze functie annuleren Opmerking Deze functie is alleen voor airconditioners met een warmtep...

Страница 28: ...Het ontwerp en de specificaties kunnen zonder voorafgaande kennisgeving worden gewijzigd ter verbetering van het product Raadpleeg het verkoopbureau of de fabrikant voor details CR296 RG51A B 2 F...

Отзывы: