background image

18

Menu Operation

Location

: Use 

▲/▼

 to select 

Home

Shop

 or 

Shop 

with demo

Input method

: This TV supports virtual keyboard input. 

Common interface

: press 

OK

 and then you will find 

CAM Info and Application Info. 

Note

:


This option is only available under DTV source, 

and please insert the common interface card to the 

socket on the back of TV before using this function. 

Common Interface is not available for certain model.

Bluetooth

: Press 

OK

/

 to enter, use ◄/► to turn 

Bluetooth on or off. when it was turned on, highlight 

Refresh

 and press 

OK

 to find the Bluetooth devices 

nearby, choose the device you want and press 

OK

 to 

connect it.

Note

:


This option is not available for some models. For 

optimal connection, please place your Bluetooth device 

within a range of 3 meters from the TV.

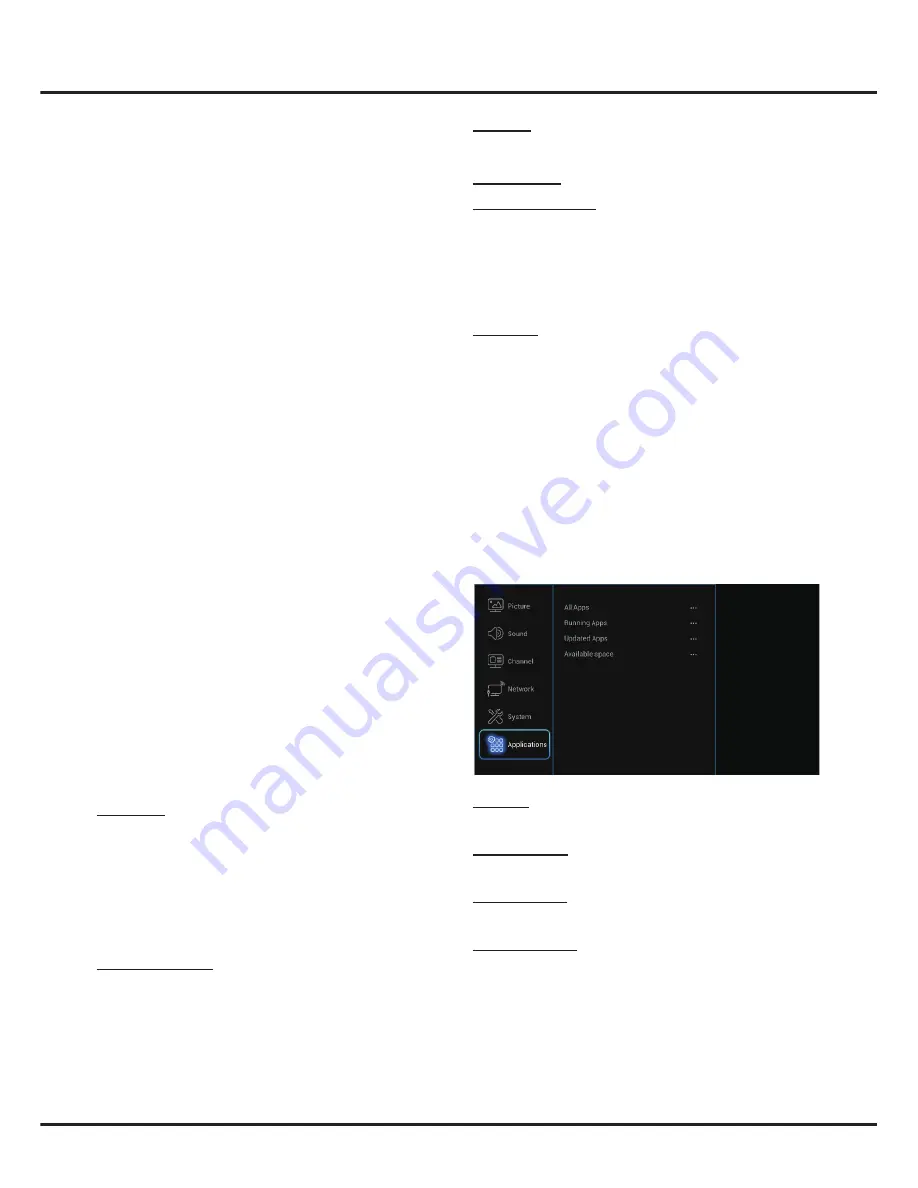
Applications

Select 

Settings > Applications

, then the 

Applications


menu appears with the following options. Press 

 to 

enter and use 

▲/▼ 

to choose an option.

All Apps

: Press 

OK

 to display the information of all the 

apps.

Running Apps

: Press 

OK

 to display the information of 

the running apps.

Updated Apps

: Press 

OK

 to display the apps ready to 

be updated, and click 

Update All

 to update the apps .

Available space

: Press 

OK

 to display the available 

space.

black and upgrade the software. 

Note

: Do not switch off or unplug the TV until the   

upgrade is completed. Keep successful network   

connection during upgrade.

• 

By USB

: Enables you to install the latest version of 

the software from your USB ports if available. Select 

By USB

 and press 

OK

/► to enter. Follow the on-

screen instructions to continue your installation.

• 

By Channel

: Enables you to install the latest version 

of the software if available. Select 

By channel 

and 

press 

OK/

► to enter.


-

Use ◄/► to select 

Yes

 under Auto download 

to automatically download the latest software if 

available. After the software has been downloaded 

successfully, you will be prompted to decide if you 

want to install it right now. If yes, follow the on-

screen instructions to complete your installation. You 

can also select to ignore the installation here.


-

Select 

No

 under Auto download to decline the 

automatic download.


-

Select 

Manual download

 and press 

OK/

► to start 

manual scanning the latest software. Follow the on-

screen instructions to complete. During the scan, 

press 

OK/EXIT

 to cancel or exit the process.

• 

Restore factory settings

: Allows you to reset the TV 

to factory default settings.


-

Select 

Restore factory settings

 and press 

OK

/

 to 

enter.


-

Use the digit buttons to enter the password.

Note

: The factory default code is 

1234

. And the 

super password is 

0423

. If you forget your code, 

enter it to override any existing codes. 


-

Press 

◄/► 

to select 

OK

 and press 

OK

 to confirm.


-

The Initial setup menu appears. Follow the related     

Instructions to continue.

There is also information about the TV such as


Current 

version

, etc.

HDMI type

: Select 

2.0 

or 

1.4

 according to the signal 

input from the selected HDMI source. 
• 

2.0

: 4K@60Hz signal is input. Select this setting if the 

external HDMI device outputs 4K@60Hz signal.

• 

1.4

: Select this setting if the external HDMI device 

does not output 4K@60Hz signal.

Note

:


This option is only available under HDMI source.

HDMI auto switch

:

When user plug in an HDMI signal source:
• 

Auto

: Auto switch your TV to the HDMI Source. 

• 

Manual

: A tip will display on screen to remind user to 

select if switch to the HDMI source.

• 

Off

: Close this function.

Содержание TL65C1CUS

Страница 1: ......

Страница 2: ...e 9 Step 2 Agree the disclaimer 9 Step 3 Set up the network 9 Step 4 Select your country 9 Step 5 Set up the time 9 Step 6 All Done 9 Chapter 3 Homepage Operation Using Homepage TV 10 TV Window 10 Inp...

Страница 3: ...the television on cloth or other materials placed between the television and supporting furniture Educating children about the dangers of climbing on furniture to reach the television or its controls...

Страница 4: ...Standby And the shortcuts may vary depending on models To exit the NAV menu highlight and then press to confirm 2 Scans up down through the channel list In menu mode they act like the UP DOWN directi...

Страница 5: ...A IN socket input This socket can be used to connect a computer Note VGA IN shares the same audio sockets with AV IN YPBPR component sockets input These YPBPR sockets can be used to connect a device t...

Страница 6: ......

Страница 7: ...ould only be connected to an AC supply It must not be connected to a DC supply If the plug is detached from the ca ble do not under any circumstances connect it to a mains socket as there is a risk of...

Страница 8: ...different depending on your actual network configuration If you have any questions about your home network please refer to your ISP Connecting to a wired network To connect to a wired network 1 Ensure...

Страница 9: ...droid based TV requires Internet service to access the web and Smart TV applications Connect Internet using your existing wireless home network or Ethernet cable and follow the guides on the screen Se...

Страница 10: ...etwork conditions If you experience a problem using an application please contact the content provider According to circumstances of the contents provider an application s updates or the application i...

Страница 11: ...taining apps are available for downloading After entering App Store you will see the recommendations Press to select press OK to enter The buttons on the top right such as Required Search can provide...

Страница 12: ...e this function Auto standby Enables all CEC devices to automatically go to the standby mode when you turn off the TV with the TV remote Select On to enable this function Note The CEC functions depend...

Страница 13: ...ct a USB drive to the TV first Note The feature is available only in selected products and due to specific TV network limitations and country technical requirements might not be available in product o...

Страница 14: ...ettings Sound then the Sound menu appears on the right with the following options Press to enter and use to choose an option Using System Settings The Settings menu allows you to configure the TV with...

Страница 15: ...in signal sources Some options may appear in the next page of the Sound menu you can press to switch Sound preset Press OK to display the option list Use to select a sound type from the list Standard...

Страница 16: ...s to select a channel and press OK to check the box Channel edit Press OK to display the channel list Press to select a channel you want to edit then press OK to enter Press to select Channel name the...

Страница 17: ...channel By network Enables you to download and install the latest software version from the Internet Make sure to set up a wired or wireless network connection first then select By network and press O...

Страница 18: ...y Channel Enables you to install the latest version of the software if available Select By channel and press OK to enter Use to select Yes under Auto download to automatically download the latest soft...

Страница 19: ...your internet service provider to confirm if access of your router is supported Refer to the operation manual of your router and activate its DHCP function after linking the network to your TV Make s...

Страница 20: ...72 MS68AA EAPBX...

Страница 21: ......

Отзывы: