background image


IT-85 Integrated amplifier  
Owner’s Manual 
VTL 

9

From the IT-85’s back panel, you can access the inputs, outputs, power connector, the 
main fuse and B+ fuse holders, the serial number and voltage setting of the unit.   

AC POWER

LEFT

RIGHT

MAIN FUSE

B+ FUSE

Pre Out

Tape Out

Proc/Amp in

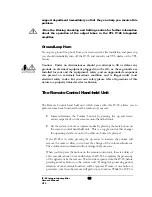
Aux 2

Aux 1

Tuner

Tape

CD

IT-85 INTEGRATED AMPLIFIER

6A SB (120V)

3A SB (240V)

1 A FAST ACT

TO PREVENT ELECTRIC SHOCK DO NOT REMOVE COVER.
NO USER SERVICABLE PARTS INSIDE. REFER SERVICING
TO QUALIFIED PERSONNEL. FOR CONTINUED PROTECTION
AGAINST FIRE HAZARD, REPLACE ONLY WITH FUSES OF
SAME TYPE AND RATING. TO PREVENT FIRE OR SHOCK DO 
NOT EXPOSE THIS APPLIANCE TO RAIN OR MOISTURE.

RIGHT

RISK OF ELECTRIC SHOCK

Manufactured by

Vacuum Tube Logic

Chino, CA USA

(909)627-5944

+

+

-

-

SPEAKERS

LEFT

Main Fuse 

AC Power Receptacle

B+ Fuse 

Left Channel RCA Jacks (white)

Right Channel RCA Jacks (red)

Right channel Speaker Binding posts

Left channel Speaker Binding posts

Serial number and Voltage Information


The 

Main Fuse Holder

 contains the main power fuse. 


CAUTION: Replace fuses only with fuses of same type and rating. 


The 

Power Receptacle. i

s used for connecting the IT-85 to the AC power from a wall 

outlet using the power cord. 


The 

B+ Fuse Holder 

holds the B+ fuse 


CAUTION: Replace fuses only with fuses of same type and rating. 


The 

RCA Jacks.

 5pairs of single-ended line inputs to connect your source 

components to the preamplifier section of the IT-85, including CD, Tape, Tuner, 
Aux 1 and Aux 2, and 1 pair processor loop/IT-85 inputs. 2 pairs of outputs 
include 1 pair buffered pre-outs, and 1 pair fixed record outputs.  


The 

Right channel binding posts.

 Connect right channel speakers to these binding 

posts (make sure to observe the “+” and “-“ markings). 


The 

Left channel binding posts.

  Connect left channel speakers to these binding posts 

(make sure to observe the “+” and “-“ markings). 


The Information label contains Serial number and voltage information. 

Содержание IT-85

Страница 1: ...VTL IT 85 Integrated amplifier Owner sManual ...

Страница 2: ...roduced or transmitted in any form or by any means electronic or mechanical for any purpose without the express written permission of VTL Version History Version 3 2 April 23 2008 Part Number 0020 001 Copyright 2008 by VTL Amplifiers Inc All rights reserved 4774 Murrieta Street Suite 10 Chino CA 91710 USA Phone 909 627 5944 Fax 909 627 6988 Email mail vtl com http www vtl com ...

Страница 3: ......
Страница 4: ... View 8 Connecting the VTL IT 85 Integrated amplifier to your system 10 Voltage Setting 11 Power Source for the VTL IT 85 Integrated amplifier 11 Fitting the Batteries to the Remote Control 11 Chapter 3 13 Operating the VTL IT 85 Integrated Amplifier 13 Power on Stages 13 Powering your system on 13 Ground Loop Hum 15 The Remote Control Hand held Unit 15 Powering the system off 16 Selecting Source ...

Страница 5: ...s 20 Tube Life 20 Bias checking and Setting 21 Top view and Bias Measurement points and Tube complement of the IT 85 amplifier 24 Changing Tubes 24 Changing the Main and B Fuses 26 Cleaning 27 Troubleshooting 27 chapter 5 30 Specifications 30 Chapter 6 31 Warranty 31 Appendix 33 Warranty Registration 33 Service Notes 33 ...

Страница 6: ...on in one compact package We have chosen this route over the high gain amplifier with passive volume control approach for several reasons Integrated amplifiers ie amplifiers that are both preamplifier and power amplifier offer the user many benefits that separates cannot primarily simplicity and space efficiency coupled with some cost savings that is realized from eliminating a chassis power suppl...

Страница 7: ...to an integrated amplifier would not be of much benefit Symbol Conventions used in this guide Certain symbols are used in this owner s manual to draw your attention to important points being discussed For your own safety and that of your equipment you should note and heed the warnings that follow these symbols The Warning Pay particular Attention symbol used is And the Warning Observe These Precau...

Страница 8: ...estions please contact your authorized VTL dealer or the factory Operational Warnings Do not touch the tubes after the IT 85 is turned on Tubes can get very hot while the IT 85 is operating Turn off the IT 85 and allow the tubes to cool down before attempting to work with the tubes Do not attempt to disassemble the IT 85 chassis or remove any covers from the IT 85 Always consult with your VTL auth...

Страница 9: ...hile the unit is powered on as this can damage the switch and is not covered under warranty Do not exceed fuse ratings or attempt to bypass any fuses as this can cause an extremely hazardous condition and will void any warrantees Use only the same type and rating of fuses as specified in the owners manual and marked on the unit ...

Страница 10: ...p 2 Roll the box once more onto the open top and making sure that none of the flaps is trapped under the carton lift the carton off the unit 3 Rotate the IT 85 onto one of the foam ends 4 Lift the top foam away from the unit and carefully cut away the plastic from around the IT 85 5 Rotate the IT 85 onto the other end and lift off the other piece of foam and the plastic 6 Rotate the unit onto its ...

Страница 11: ...r the first time If there are any tubes not fully seated then you should refer to your VTL dealer and take this procedure with the unit Notes for the servicing installing technician 1 Remove the protective wire cage on the top deck of the IT 85 The cage is mounted with two screws on each side of the IT 85 Loosen the screws and lift the wire cage slowly and carefully Do not let the cage touch or hi...

Страница 12: ...of the manual for instructions on how to do this 6 Once the unit is functioning correctly put the protective cage back onto the IT 85 unit Tighten the screws to make sure that the cage is securely fastened to the unit IT 85 Front Panel The full functionality of the VTL IT 85 Integrated amplifier can be accessed from the front panel controls and switches The following is a description of each contr...

Страница 13: ...ater systems thereby bypassing the IT 85 s preamplifier section and allowing the external surround processor to control the volume of the front left and right channels Engaging the Processor position automatically mutes the pre out The Mute switch is a momentary switch to allow you to toggle the preamplifier section of the IT 85 between the mute and ready states If the IT 85 is currently in the op...

Страница 14: ...cks red Right channel Speaker Binding posts Left channel Speaker Binding posts Serial number and Voltage Information The Main Fuse Holder contains the main power fuse CAUTION Replace fuses only with fuses of same type and rating The Power Receptacle is used for connecting the IT 85 to the AC power from a wall outlet using the power cord The B Fuse Holder holds the B fuse CAUTION Replace fuses only...

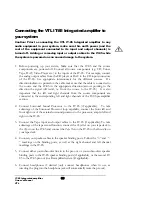
Страница 15: ...IT 85 It is also important that the left and right channels from the source components are connected to the corresponding left and right channels of the IT 85 preamplifier section 2 Connect Surround Sound Processor to the IT 85 if applicable To take advantage of the Surround Processor loop capability connect the front left and front right out of the external surround processor to the processor amp...

Страница 16: ...ur IT 85 Power Source for the VTL IT 85 Integrated amplifier Your IT 85 Integrated amplifier is a high performance high power amplifier capable of outputting up to 80 watts per channel To assure best conditions for optimal results you should plug the unit directly into a wall AC outlet if bi amplifying you should use one separate outlet for each amplifier Do not plug your IT 85 into a light extens...

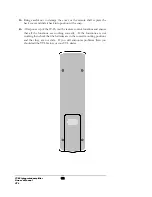
Страница 17: ...position with a snap 4 After power up of the IT 85 test the remote control functions and ensure that all the functions are working correctly If the functions are not working then check that the batteries are in the correct mounting positions and that they are not stale If you still encounter problems then you should call the VTL factory or your VTL dealer ...

Страница 18: ...er your system on 1 If you haven t already done so ensure that all the tubes inside the VTL IT 85 are properly seated all the way into their sockets before connecting to an AC source Refer to the factory or your local VTL dealer if you find that any tubes are loose or broken Also double check that your IT 85 is correctly set for your AC voltage 2 Power on the source component s you intend to use f...

Страница 19: ...l not power up after these checks have been performed 5 Adjust the Input Selector to the input source you would like to use Make sure the Processor switch is in default mode down position if you re not utilizing this function Check that the volume control is in the correct position Caution Make sure that the volume control is not set too high before switching into or out of the Processor mode as e...

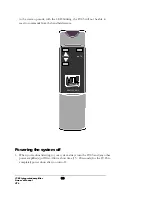
Страница 20: ...emote Control hand held unit which comes with this IT 85 allows you to perform some basic functions from the comfort of your seat Increase decrease the Volume Control by pressing the up and down arrows respectively on the remote control hand held unit Set the system in mute or operate modes by pressing the mute button on the remote control hand held unit This is a toggle control that changes the o...

Страница 21: ...be able to react to commands from the hand held remote pure tube VOLUME MUTE REMOTE NP 2 Powering the system off 1 When you re done listening to your system always turn the IT 85 and any other power amplifier s off first Allow a short time 15 20 seconds for the IT 85 to completely power down after you turn off ...

Страница 22: ... to the corresponding input connector of the IT 85 and in the correct channels For Phono connections a separate phono stage is needed which can then be connected to any of the line inputs on the IT 85 Selecting Headphone out The VTL IT 85 Integrated amplifier offers a high quality headphone connection for a 1 4 phone jack that is driven from the amplifier stage of the IT 85 A switch is provided on...

Страница 23: ...ou are listening to your two channel audio system from sources connected to the line inputs of the IT 85 set the Processor switch on the IT 85 front panel to the default operating position down The system and the IT 85 are now driving the front speakers giving you the full volume control and source selection When you wish to use your system for home theater set the processor switch to the Processo...

Страница 24: ...the upper and lower frequency sections To properly bi amplify without using an external crossover special consideration must be given to matching the gains and input impedances of both power amplifiers so as not to over accentuate one part of the frequency spectrum and cause an imbalance in the sound character of the speaker The best example of this type of bi amped system would be the use of the ...

Страница 25: ...for the input and driver stages in the amplifier section and 2 12AU7 tubes 1 per channel in the preamplifier stage Caution We recommend that your VTL component be fitted only with the tubes that are supplied by the factory see the warranty section for further details Any damage caused by the fitting of any other tubes will not be covered by the warranty Tube Life Your VTL IT 85 Integrated Amplifie...

Страница 26: ...resent in the unit should only perform this setting Do not attempt to undertake this procedure yourself as you could be severely injured The idle current of the tubes will fluctuate slightly over time at a rate that is dependent on the usage of the unit We recommend that the bias setting should be checked on all the tubes after every 1000 hours of listening or once per year Using your IT 85 with i...

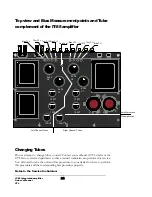
Страница 27: ...meter to the ground point on the IT 85or the negative speaker binding post of the amplifier 3 Consult the following figure for the locations of the bias measurement points on the IT 85 s top deck Insert the positive red probe of the multimeter into each bias measurement point The resistance reading on each point should be 10 ohms within a 10 range If the resistance reading is outside the acceptabl...

Страница 28: ...ent point where you found the out of range bias reading Locate the bias adjustment point whose number corresponds to the bias measurement point See Figure 2 for the locations of the measurement points 2 Insert a 1 8 flat tipped screwdriver with a plastic shaft or a properly insulated handle into the bias adjustment trimpot that corresponds to the out of range measurement point Rotate the screwdriv...

Страница 29: ... Bias Pt 2 EL34 V2 Left Channel Tubes Right Channel Tubes Gnd Point Preamp section Amplifier section Changing Tubes Do not attempt to change tubes yourself Contact your authorized VTL dealer or the VTL factory service department so that a trained technician can perform this service You will need to take the unit and this procedure to your dealer for them to perform this procedure and the correspon...

Страница 30: ...y indicate that a replacement of these two tubes is necessary A full power test of the IT 85 may also need to be undertaken to ensure that all power tubes are conducting equally 2 Power off the IT 85 To change tubes in this IT 85 you should first power the unit down unplug the unit from the wall outlet and disconnect the IT 85 from the rest of the system Let the IT 85 stay powered off for at least...

Страница 31: ...rom the cover and put them back in the correct holes Tighten all screws to make sure that the cover is securely fastened to the unit Changing the Main and B Fuses The B fuse for your IT 85 is rated at 1A ceramic Fast Acting There is also one primary mains fuse rated at 6A Slo Blo 100 120Volt AC or 3A Slo Blo 220 240 Volt AC ceramic The B fuse is housed in a fuse holder located on the back panel of...

Страница 32: ...under no circumstances should you allow excess fluid to enter the IT 85 as this fluid is conductive and could cause you to get a shock or damage the IT 85 Under no circumstances should any type of abrasives be used on any of the electrical contacts Damage to the IT 85 through improper or excessive use of contact cleaners is not covered under the warranty Troubleshooting 1 When I power on the IT 85...

Страница 33: ...e reduction and safest operation If however there are too many paths to ground then a ground loop hum can result You should either contact your dealer or the VTL factory to try to resolve this problem 4 I am getting a noise and hum coming from my video source What can I do to eliminate the noise The noise may be coming in from your video Cable system First disconnect the VCR from the system to see...

Страница 34: ...IT 85 Integrated amplifier Owner s Manual VTL 29 If the remote control unit is still not functioning properly contact your VTL authorized dealer or the VTL factory service department ...

Страница 35: ...imum Output Power 55 watts per channel into 5 ohms Gain 20 dB Input Impedance 20K ohms line in 135K ohms amp in Channel Separation 75 dB 1 kHz Power Consumption Idle 150 Watts Full Power 500 Watts Primary Mains Fuse Rating 6A Slo Blo Ceramic 120Volt AC 3 A Slo Blo Ceramic 240 Volt AC B Fuse Rating Dimensions 0 75A A Fast acting 250V ceramic fuse W 16 40 cm D 12 30 cm H 7 18 cm Packed Weight 60 lbs...

Страница 36: ...filled out warranty registration card mailed with your purchase receipt to VTL If a VTL product fails to perform properly under the above warranty then the purchaser s sole remedy shall be to return the product to the authorized VTL dealer or to VTL Amplifiers Inc where the defect will be repaired without charge for parts and labor The product will then be returned via prepaid insured freight meth...

Страница 37: ...h all applicable terms on the local warranty and superceding these terms Some states do not allow limitations on how long an implied warranty lasts so the above limitations may not apply to you Some states do not allow the exclusion or limitation of incidental or consequential damages so the above exclusion may not apply to you This warranty gives you specific legal rights and you may also have ot...

Страница 38: ...TL Warranty Registration 4774 Murrieta Street Suite 10 Chino CA 91710 To help you keep a record of the serial number and purchase information please enter the following information into this manual Product Model Number IT 85 Integrated amplifier_ Serial Number ___________________________ Purchase Date ___________________________ Authorized Dealer ___________________________ Service Notes Date Serv...

Отзывы: