background image


communication 

 simple 

 flexible 

 unlimited 

© Vonamic GmbH 2020  


Subject to technical modifications 

14 


3.


Configuration Description


3.1


IP address and device ID 

3.1.1


Preparation 

In order to establish communication in the VIPCOS system, it is necessary to assign an individual IP 
address in the same IP address range and a device ID between 

1000

 and 

9999

 to each device. First, 

you should adjust the V615's IP address. By default, the IP address is 

192.168.100.10 / 255.255.255.0.


Next, the call station needs an individual ID in order to be able to make an assignment for direct and 
SIP calls. 

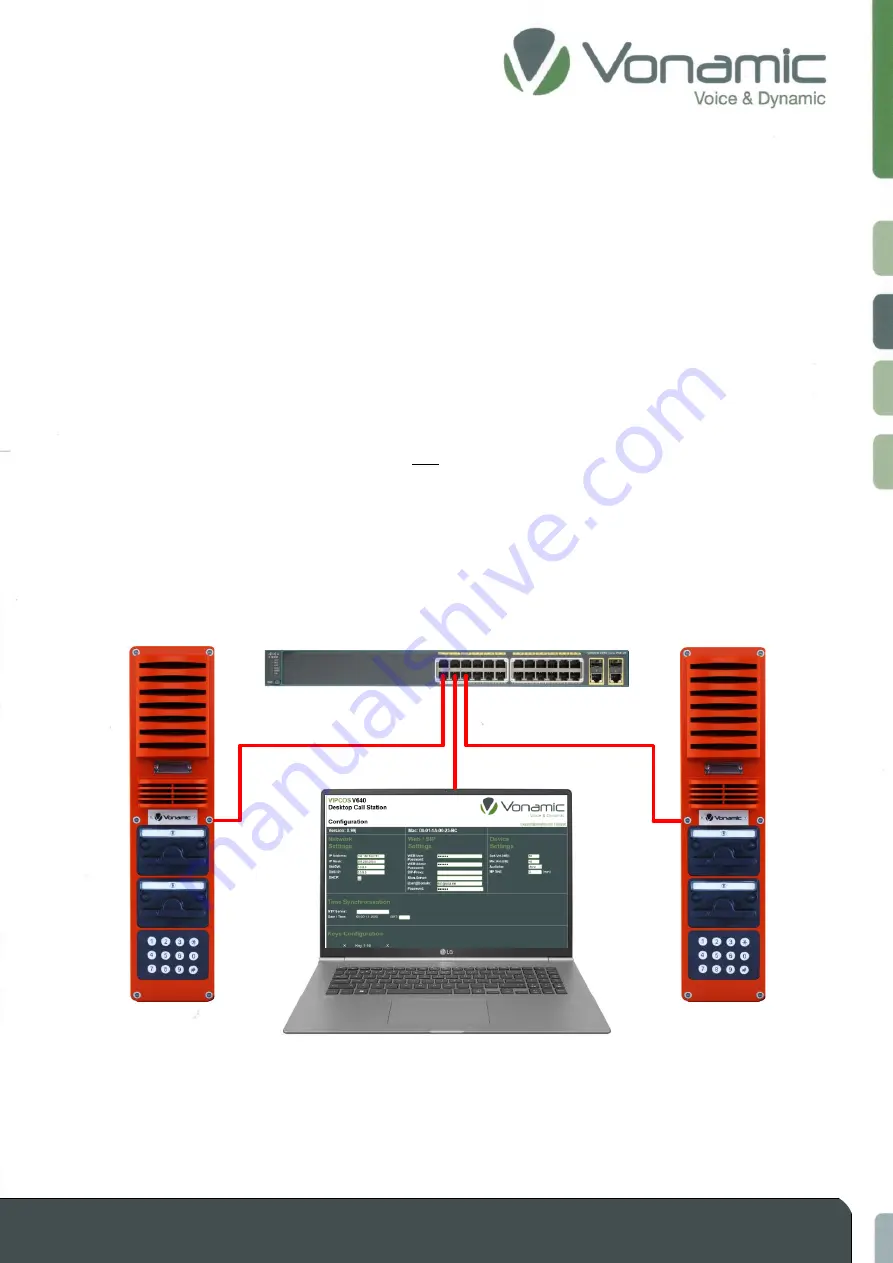
In our example, we will adjust the IP and ID of 

two

 V615 Industrial call stations and thus create the first 

requirement for communication in VIPCOS System. 

First create an environment as described in 

chapter 1.2

 and get access to the web interface of first 

V615: 


192.168.100.61 / 

255.255.255.0

ID: 1615

192.168.100.62 / 

255.255.255.0

ID: 1616

192.168.100.200 / 

255.255.255.0

Cat.5e 

Cat.5e 


Содержание 703100

Страница 1: ...ial Call Station Vonamic GmbH Im Lipperfeld 27 46047 Oberhausen Germany Phone 49 0 208 30 99 06 0 Fax 49 0 208 30 99 06 99 Web http www vonamic com Mail info vonamic com Translation of the German original Industrial Call Station V615 6 Lines L No 703101 Аdditional housing V615 6 Lines L No 703200 Intercom Call Station V615 With dial pad L No 703100 ...

Страница 2: ...device ID 14 3 1 1 Preparation 14 3 1 2 Set and adjust IP 15 3 1 3 Setup and adjust ID 16 3 1 4 Determine device IP Address Troubleshooting 17 3 2 Volume adjustment 17 3 3 Direct call connection 18 3 4 Group call connection 19 3 4 1 Define group membership 19 3 4 2 Set up a group call 20 3 5 SIP connection 20 3 5 1 SIP server Registration 21 3 5 2 Set up an outgoing SIP connection 22 3 5 3 Set up ...

Страница 3: ...web interface is divided into six segments Network Settings Web SIP settings Device Settings Time Synchronization Key Configuration and Group selection Chapter 2 explains the functions of the individual areas in detail Chapter 3 gives specific configuration examples of the individual functions After reading this document carefully you will be able to fully configure the V615 Industrial Call Statio...

Страница 4: ...can access the Web interface of the device using the V615 default IP address The factory default configurations of the V615 are as follows IP address 192 168 100 10 Subnet mask 255 255 255 0 Login User limited write admin superadmin Password Vonamic Vonamic Vonamic Note If you are using a system that has already been configured please use the IP address range of your system The examples in this ma...

Страница 5: ...lt gateway that corresponds with your network setup Then enter your preferred and Alternate DNS server addresses Step 7 Click OK to change the PC s IP address 3 Turn on the switch that will be used for configuration and as the voltage source of the V615 Wait until the start up process is completed 4 Make sure that PoE is activated on the switch Connect the V615 to an PoE Port using a standard netw...

Страница 6: ...Password Use the set password for each user level Default Vonamic The VIPCOS system has a three level password protection User Read limited Write Admin Read Write Superadmin Read Write Password Control To get the full access login as administrator by entering Username Admin and Password Vonamic Note If you are using a pre configured system please use the current passwords If you are not sure ask y...

Страница 7: ...e must be called again using the new address IP mask Changes the subnet mask of the end device Enter a valid subnet mask and click on Submit to initiate a restart The new subnet mask was adopted after the restart StdGW Setting a standard gateway for routing connections e g to other subnets Changes are applied after saving DNS IP Setting a DNS server Note After saving please wait with further setti...

Страница 8: ...in or Superadmin Password Use the set password for each user level Default Vonamic SIP Proxy IP address of the SIP server Stun Server IP address of the stun server User Domain own phone number of the terminal Input from 1000 9999 In local networks we recommend the extension local net after the phone number When registering with a SIP server the ending is different e g for Call number 1001 1001 loc...

Страница 9: ...Off Session Amp PW Setting the gain factor from 10W to 40W Please note 40W operation Mode assumes external 24VDC power supply Wideband If activated the codec is changed from G 711 to 8 kHz Keypad If activated the keypad query is started Please note Buttons 5 and 6 are replaced by the keypad and buttons 3 dial and 4 hang up are assigned fixed functions NF Test Setting the time for the recurring sel...

Страница 10: ...ple flexible unlimited Vonamic GmbH 2020 Subject to technical modifications 10 2 4 Time Synchronization NTP Server IP address of the NTP server Date Time current date and time display no automatic refresh GMT Time Zone ...

Страница 11: ...ll group call telephone call Partyline Hangup Destination Enter the call destination 1000 9999 neuronal Prio Enter the call priority 1 255 Line selection Setting the playback lines of a V1000 IP 400W amplifier Callback As soon as this function has been set to an unassigned key the device accepts unknown SIP calls The last incoming unknown number is stored in the assigned key and can therefore be a...

Страница 12: ...mber you have assigned to the destination under User Domain Group call Connection to all participants in the corresponding group Enter the group number you want to announce here 1 255 Telephone call telephone connection Establishes a SIP connection to the number under Destination Hang up Terminate a telephone connection Press to end a phone call Partyline Answer button slave in a party Party line ...

Страница 13: ... at the same time To determine the group membership it is sufficient to activate the corresponding checkbox of the group with a click of the mouse As soon as you have finished selecting the affiliation confirm your entry with the Submit button 2 7 Store Restore of Config Files After you have completed the configuration and saved it with Submit you can load the configuration as an encrypted file fr...

Страница 14: ...d adjust the V615 s IP address By default the IP address is 192 168 100 10 255 255 255 0 Next the call station needs an individual ID in order to be able to make an assignment for direct and SIP calls In our example we will adjust the IP and ID of two V615 Industrial call stations and thus create the first requirement for communication in VIPCOS System First create an environment as described in c...

Страница 15: ...1 You can adjust the subnet mask by double clicking in the IP Mask field and entering a valid subnet mask In our example 255 255 255 0 After you have made the entries confirm and accept them by clicking the Submit button at the bottom of the website The device will now restart and apply the changes The restart takes 10s and the device can then be reached via its new IP address A second device is r...

Страница 16: ...device by double clicking in the User Domain field This marks the entire content Now enter a valid device ID between 1000 and 9999 In our example we set the first V615 the ID 1615 local net After you have made the entries confirm and accept them by clicking the Submit button at the bottom of the website The device will restart and apply the changes The restart takes 10s A second device is required...

Страница 17: ...f the device as the source You can use a network protocol analyzer such as Wireshark to determine the IP address 3 Debug The VIPCOS devices have a debug interface which also outputs the device s IP address A TTL USB cable is required to use this interface Training is required to complete this step Please contact us under support vonamic com to get your individual offer 3 2 Volume adjustment By set...

Страница 18: ... configuration options for the key 1 Select the Direct Call function from the Call Function drop down list for button 1 2 Enter the device ID of the extension you want to reach in the Destination field In our example we use the ID 1615 192 168 100 61 and ID 1616 192 168 100 62 So we enter 1616 in the field destination of the device with the ID 1615 In the device with ID 1616 we enter 1615 inside t...

Страница 19: ...es are accessible Clicking on another segment will switch To close press the X In our example we will configure both V615 Industrial call stations for participants in group 10 1 Select the Groups 1 64 segment with a mouse click The selection of the two subsegments Groups 1 32 and Groups 33 64 became accessible 2 Select the subsegment Groups 1 32 with a mouse click A total of 32 check boxes are now...

Страница 20: ... by pressing the Submit button 4 Perform steps 1 3 for both ID 1615 and ID 1616 If you now hold down button 2 of the respective V615 the device will establish a multicast connection to group 10 and hold the connection for the duration of the button press All devices that are participants in group 10 are now addressed 3 5 SIP connection The V615 Industrial call station can be integrated as a subscr...

Страница 21: ...stration number 1640 192 168 100 250 3 Enter the SIP registration password in the Password field 4 Save your entry with Submit The device will reboot and try to register on the SIP server The current status of the registration is displayed under the Password field The status Login is displayed first This means that the registration attempt was started Note After entering and saving SIP configurati...

Страница 22: ...wn menu for key 3 2 Enter the number 12344321 in the Destination field of key 3 25 Characters maximum 3 Select the Call Function Hangup in the dropdown menu for key 4 4 Save your entry with Submit By pressing key 3 on device ID 1615 a SIP call to the extension 12344321 is requested via the server 192 168 100 250 If a corresponding SIP device is registered on the server a connection to this extensi...

Страница 23: ...itelist All unassigned phone numbers receive a busy signal if the Callback function is not activated Answer an incoming call by pressing and holding the corresponding key signaling by flashing If the call is not accepted the Missed call is indicated by the corresponding key flashing quickly This Status is reset after 60 seconds 2 Callback Function If it is desired that phone numbers are accepted t...

Страница 24: ...ned key Set up the Call Function DG PL on another unconfigured key This serves as a speech button in the currently formed party PL Mode starts the party building function by pressing the button once The start of the function is indicated by flashing of PL Mode button You can now add preconfigured direct call participants to your party by pressing the corresponding buttons once The party recording ...

Страница 25: ...able at the amplifier output The announcement is made at the preset volume under Amp Vol and in the Amp PW selected power level Off Deactivation of the additional amplifier Session Deactivation on answer This function activates the additional amplifier so that audio signals are made available at the amplifier output As soon as a response is received and it is signaled that the user is in close pro...

Страница 26: ...ector to the keypad is correctly inserted and that the keypad is screwed in securely Furthermore it is necessary to update the V615 website to the version V615 Keypad http tsk and the keypad is activated on the website The keypad is exchanged for the lower double toggle of the device This will replace the direct selection buttons 5 6 with the keypad By activating the keypad the keys 3 4 are assign...

Страница 27: ...r to establish a group call connection a specific sequence of digits assigned to the desired group must be entered e g 10 Use the prefix to select the Group Call call function You can speak to the selected group by pressing and holding the Dial button The last dialed number is saved until you press the Cancel button and is available for further connections SIP Call In order to establish a SIP voic...

Страница 28: ...als are available on the terminal block of the call station The relay can be set in 4 modes via the device website Off Puts the relay in the rest position NC On Puts the relay in the working position NO Answer Puts the relay in the working position for the duration of an outgoing or incoming connection Online Puts the relay in the working position for the duration of the successful registration at...

Страница 29: ...e additional amplifier output if the correspondingly configured key is pressed and held This function serves e g at assembly points to generate announcements to the employees present To be able to use the function enter the key number of an unassigned key of the V615 in the Megaphone key field After successful saving this button is used for the live announcement from the internal microphone to the...

Страница 30: ...try with Submit Now the current date and time is displayed next to Date Time 3 12 Amplifier lines Another device in the VIPCOS series is the V1000 400W IP Amplifier This device has 6 separately controllable speaker circuits or 3 loops You can specify a selection of the speaker circuits for both direct and group call connection to a V1000 All possible constellations can be made from one to all line...

Страница 31: ...ternal operating system assumes to keep the file name Config bin We recommend archiving in subfolders Restore The Restore button starts the upload of a previously defined configuration file to your device The file selection field is located above the buttons for store and restore First you have to choose a correct configuration file To do this click the search button next to the Please select a co...

Отзывы: