98
IMG-381020
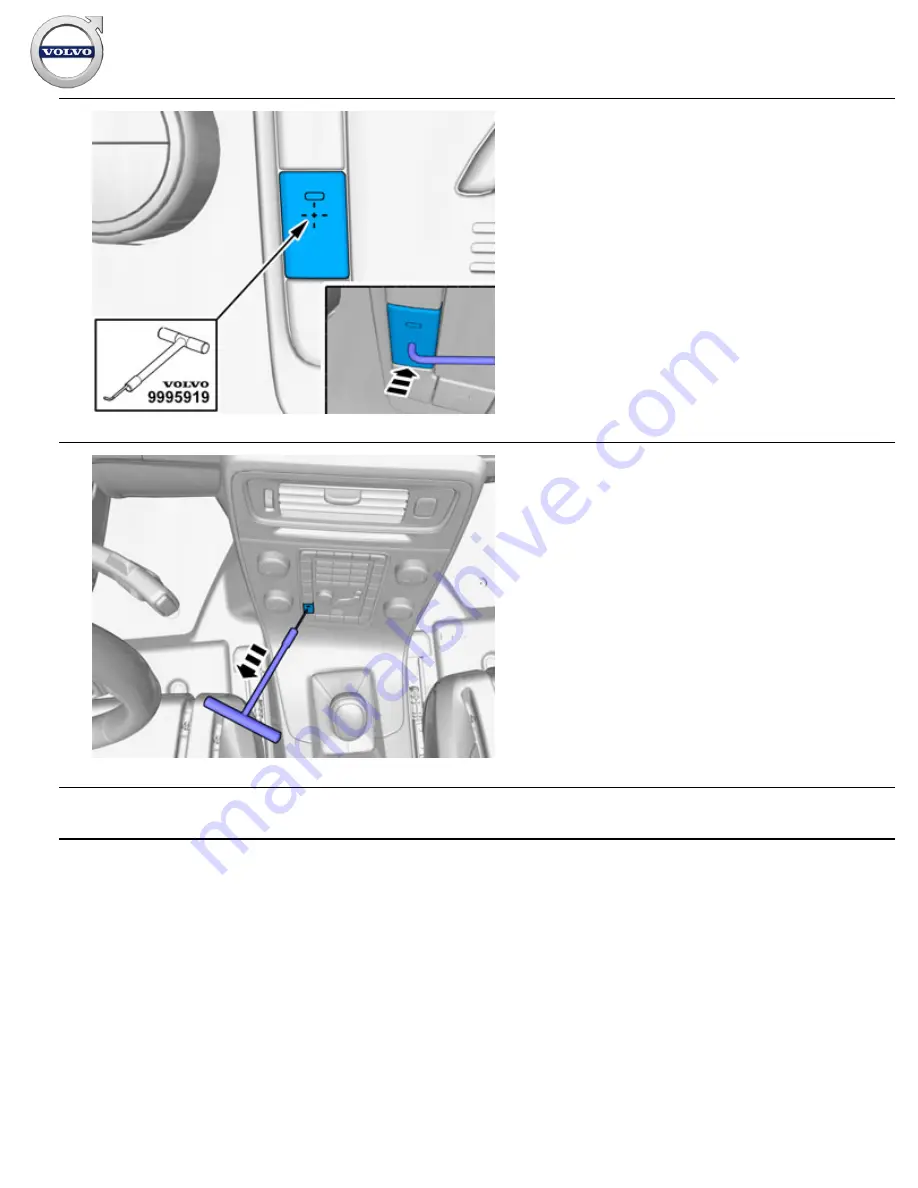
99
IMG-380996
Accessory installation
Installation instructions, accessories
Volvo Car Corporation Gothenburg, Sweden
© Volvo Car Corporation
Parking assistance, camera, rear- 31428063 - V1.0
Page 54 / 57
Страница 1: ...camera rear IMG 258000 Instruction No Version Part No 31428063 1 0 31428061 31428882 Parking assistance camera rear IMG 258000 Installation instructions accessories Volvo Car Corporation Gothenburg Sw...
Страница 2: ...239664 A0000192 IMG 239660 IMG 239446 IMG 332313 IMG 333293 IMG 333288 IMG 353696 Installation instructions accessories Volvo Car Corporation Gothenburg Sweden Volvo Car Corporation Parking assistance...
Страница 3: ...IMG 346651 Installation instructions accessories Volvo Car Corporation Gothenburg Sweden Volvo Car Corporation Parking assistance camera rear 31428063 V1 0 Page 3 57...
Страница 4: ...d steps In the event of any problems with the instructions or the accessory contact your local Volvo dealer Note Some steps in these installation instructions are presented with illustration only Prep...
Страница 5: ...edge using a weatherstrip tool Note The inner handle will no longer be used there is a new handle in the kit 3 IMG 254044 Pull out the central pin from the clips for the warning triangle s holder and...
Страница 6: ...nel and remove the panel 5 IMG 249177 Fold together the cargo compartment carpet 1 2 and remove it Installation instructions accessories Volvo Car Corporation Gothenburg Sweden Volvo Car Corporation P...
Страница 7: ...226722 Remove the trunk lid s sill trim panel It is secured by two clips at the front edge 1 and two at the upper edge 2 Installation instructions accessories Volvo Car Corporation Gothenburg Sweden...
Страница 8: ...belt from the guide 1 on the side bolster Insert a hand from the side of the upper section of the side bolster Press in the catches properly and jerk the upper edge of the bolster so that the two catc...
Страница 9: ...asure 30 mm 1 3 16 from the rear edge of the gas cylinder s bracket to the previously drawn line Mark out the middle of the hole that is to be drilled where the lines cross each other Pre drill the ho...
Страница 10: ...right hand corner according to the diagram and mark out the middle Pre drill the hole using a 3 mm 1 8 bit Note Use a 5 mm 3 16 drill stop Drill out the hole to 8 mm 5 16 and then to 12 mm 15 32 to b...
Страница 11: ...les Remove any swarf Apply primer part no 9437350 around the hole edges and allow to dry 15 IMG 254110 Disconnect the connector for number plate lighting Installation instructions accessories Volvo Ca...
Страница 12: ...it Remove any tape residue from the trunk lid by heating the steel with a hot air gun Do not heat above 80 C 17 IMG 254112 Remove the four screws from the number plate lighting panel and remove it Rem...
Страница 13: ...9 Remove the rubber strip 19 IMG 338119 Remove the panel Installation instructions accessories Volvo Car Corporation Gothenburg Sweden Volvo Car Corporation Parking assistance camera rear 31428063 V1...
Страница 14: ...20 IMG 346676 21 IMG 346681 Installation instructions accessories Volvo Car Corporation Gothenburg Sweden Volvo Car Corporation Parking assistance camera rear 31428063 V1 0 Page 14 57...
Страница 15: ...22 IMG 346677 23 IMG 346682 Installation instructions accessories Volvo Car Corporation Gothenburg Sweden Volvo Car Corporation Parking assistance camera rear 31428063 V1 0 Page 15 57...
Страница 16: ...t hand rear door by carefully pulling it upwards until the four clips release 25 IMG 344717 Release the catch Installation instructions accessories Volvo Car Corporation Gothenburg Sweden Volvo Car Co...
Страница 17: ...26 IMG 344721 27 IMG 344722 Remove the panel Installation instructions accessories Volvo Car Corporation Gothenburg Sweden Volvo Car Corporation Parking assistance camera rear 31428063 V1 0 Page 17 57...
Страница 18: ...79 Remove the screws 29 IMG 341941 Unplug the connector Installation instructions accessories Volvo Car Corporation Gothenburg Sweden Volvo Car Corporation Parking assistance camera rear 31428063 V1 0...
Страница 19: ...ve the panel 31 IMG 349877 Remove the screws Remove the panel Installation instructions accessories Volvo Car Corporation Gothenburg Sweden Volvo Car Corporation Parking assistance camera rear 3142806...
Страница 20: ...IMG 352166 Vehicles with 7 inch display Disconnect the connector if applicable Use electrical tape to secure the connector in the existing cable Installation instructions accessories Volvo Car Corpora...
Страница 21: ...the number plate lighting panel Then remove the existing markings on the inside of the panel see image Even off the edges carefully using a fine toothed file Note Take care not to knock the surface t...
Страница 22: ...w the screws into the holes on the camera completely so that they rotate freely Insert the camera into the hole and screw it into place by tightening the screws crosswise so that the camera is tighten...
Страница 23: ...locates in the cut out on the hinge Press the cable holder so that the upper section engages in the upper edge of the hinge 39 IMG 255738 Insert the longer of the cables in the hole on the rear fender...
Страница 24: ...n the hole on the trunk lid 41 IMG 255739 Bind the connector to the shorter cable at the routed wire using tape Pull up the cable through the trunk lid and pull it out through the hole Installation in...
Страница 25: ...e clip from the oval hole in the trunk lid and press the clip onto the hole edge Note Check that the cable is not over stretched between the trunk lid and the fender when the trunk lid is full open Ad...
Страница 26: ...el for the number plate lighting Connect the connector to the routed cable harness for the reversing camera Guide the cable for the number plate lighting through the hole in the trunk lid Reinstall th...
Страница 27: ...me strip tape will sit Wipe dry 47 IMG 255745 Take the new trim strip from the kit Remove the protective film from the adhesive tape Installation instructions accessories Volvo Car Corporation Gothenb...
Страница 28: ...s locating pins align with the holes on the trunk lid Press the strip firmly along the entire length of the trunk lid and the panel so that the tape adheres 49 IMG 255747 Connect the number plate lig...
Страница 29: ...nk lid 51 IMG 255749 Reinstall the warning triangle s holder and press the middle pins of the clips in Installation instructions accessories Volvo Car Corporation Gothenburg Sweden Volvo Car Corporati...
Страница 30: ...g the parking assistance camera PAC 53 IMG 255751 Installing the parking assistance camera PAC Take the control module from the kit Clean the two polished surfaces on the control module using isopropa...
Страница 31: ...ut them in the middle to create four equal parts 55 IMG 222283 Press the Velcro strips two and two Installation instructions accessories Volvo Car Corporation Gothenburg Sweden Volvo Car Corporation P...
Страница 32: ...attached Velcro strips 57 IMG 255752 Press the Velcro strips onto the cleaned surfaces of the control module Installation instructions accessories Volvo Car Corporation Gothenburg Sweden Volvo Car Co...
Страница 33: ...n the surfaces under the tail lights with isopropanol Wipe dry Installation instructions accessories Volvo Car Corporation Gothenburg Sweden Volvo Car Corporation Parking assistance camera rear 314280...
Страница 34: ...to the socket on the control module as illustrated Connect the connector 2 on the pre routed taped cable harness for the power supply under the left hand tail lamp to the corresponding connector on t...
Страница 35: ...the control module upwards firmly as high as possible on the flat surface under the tail lamp according to the measurements illustrated Installation instructions accessories Volvo Car Corporation Got...
Страница 36: ...the TRM module from the Velcro strips on the plate under the rear lamp and place to one side 63 IMG 255758 Allow the old Velcro strips to remain in the body Installation instructions accessories Volvo...
Страница 37: ...ps 65 IMG 255759 Press the Velcro strips on to the cleaned surfaces on the parking assistance camera PAC Installation instructions accessories Volvo Car Corporation Gothenburg Sweden Volvo Car Corpora...
Страница 38: ...e A B from the kit and connect the large green connector to the socket on the control module as illustrated Connect the connector 2 on the pre routed cable harness for the power supply to the correspo...
Страница 39: ...module with isopropanol Wipe dry 69 IMG 255763 Remove the marked Velcro strip from the TRM module Installation instructions accessories Volvo Car Corporation Gothenburg Sweden Volvo Car Corporation P...
Страница 40: ...ddle to create four equal parts 71 IMG 255764 Clean the marked surfaces on the TRM module with isopropanol Wipe dry Installation instructions accessories Volvo Car Corporation Gothenburg Sweden Volvo...
Страница 41: ...ro strips 73 IMG 255765 Press the Velcro strip on to the TRM module beside the other strip as illustrated Installation instructions accessories Volvo Car Corporation Gothenburg Sweden Volvo Car Corpor...
Страница 42: ...module s two existing Velcro strips 75 IMG 255767 Remove the protective film from the Velcro strips Installation instructions accessories Volvo Car Corporation Gothenburg Sweden Volvo Car Corporation...
Страница 43: ...ector 1 on the adapter cable for the power supply to the corresponding socket in the TRM module Connect the remaining gray connector 2 which was removed from the TRM module Installation instructions a...
Страница 44: ...0 Nm 7 5 lbf ft 79 IMG 273870 Wash the rear crossmember using isopropanol where the ground lead is to be taped Wipe dry Secure the cable using a wide piece of silver fabric tape or similar Note The gr...
Страница 45: ...he hole in the body Take a tie strap from the kit and secure the cable at the fuse holder s cable harness 81 IMG 354975 Remove the foam tape from the kit and split it in the centre Installation instru...
Страница 46: ...m tape 83 IMG 353731 Apply the foam tape around the wiring to protect the cable from sharp edges Installation instructions accessories Volvo Car Corporation Gothenburg Sweden Volvo Car Corporation Par...
Страница 47: ...nd drive vehicles Route the cable harness inside the floor and insulation panels up on the A pillar slightly and then at an angle upwards between the A pillar and the end panel towards the dashboard R...
Страница 48: ...board Tape the connector on the cable to the screen by the wire Pull the cable up to the location for the screen and out through the hole in the dashboard 87 IMG 353636 Applies to all vehicles Take a...
Страница 49: ...g cable harnesses inside the dashboard as illustrated 89 IMG 348526 Applies to all vehicles with 5 inch ICM display Note If there is no connection replace the display Installation instructions accesso...
Страница 50: ...of connectors cables and cable ties can vary depending on the vehicle s equipment level Plug in the connectors Installation instructions accessories Volvo Car Corporation Gothenburg Sweden Volvo Car...
Страница 51: ...Plug in the connector 93 IMG 352267 Applies to vehicles with 7 inch ICM display Plug in the connector Installation instructions accessories Volvo Car Corporation Gothenburg Sweden Volvo Car Corporatio...
Страница 52: ...e screws Reinstall the detached components in reverse order Removal 95 IMG 382371 Removal Note Orientation view Installation instructions accessories Volvo Car Corporation Gothenburg Sweden Volvo Car...
Страница 53: ...96 IMG 381005 97 IMG 381006 Installation instructions accessories Volvo Car Corporation Gothenburg Sweden Volvo Car Corporation Parking assistance camera rear 31428063 V1 0 Page 53 57...
Страница 54: ...IMG 381020 99 IMG 380996 Accessory installation Installation instructions accessories Volvo Car Corporation Gothenburg Sweden Volvo Car Corporation Parking assistance camera rear 31428063 V1 0 Page 54...
Страница 55: ...t from the accessory kit Installation 101 IMG 336901 Installation Reconnect the battery negative lead Installation instructions accessories Volvo Car Corporation Gothenburg Sweden Volvo Car Corporatio...
Страница 56: ...ng the working area for the airbags Set the ignition switch to position II 103 IMG 242268 Download software application for the accessory s function according to service information in VIDA See VIDA o...
Страница 57: ...n screen instructions Switch off the ignition for at least 10 seconds Turn the ignition on The display is activated Check that the support lines appear on the screen and that these react to steering w...