background image

14

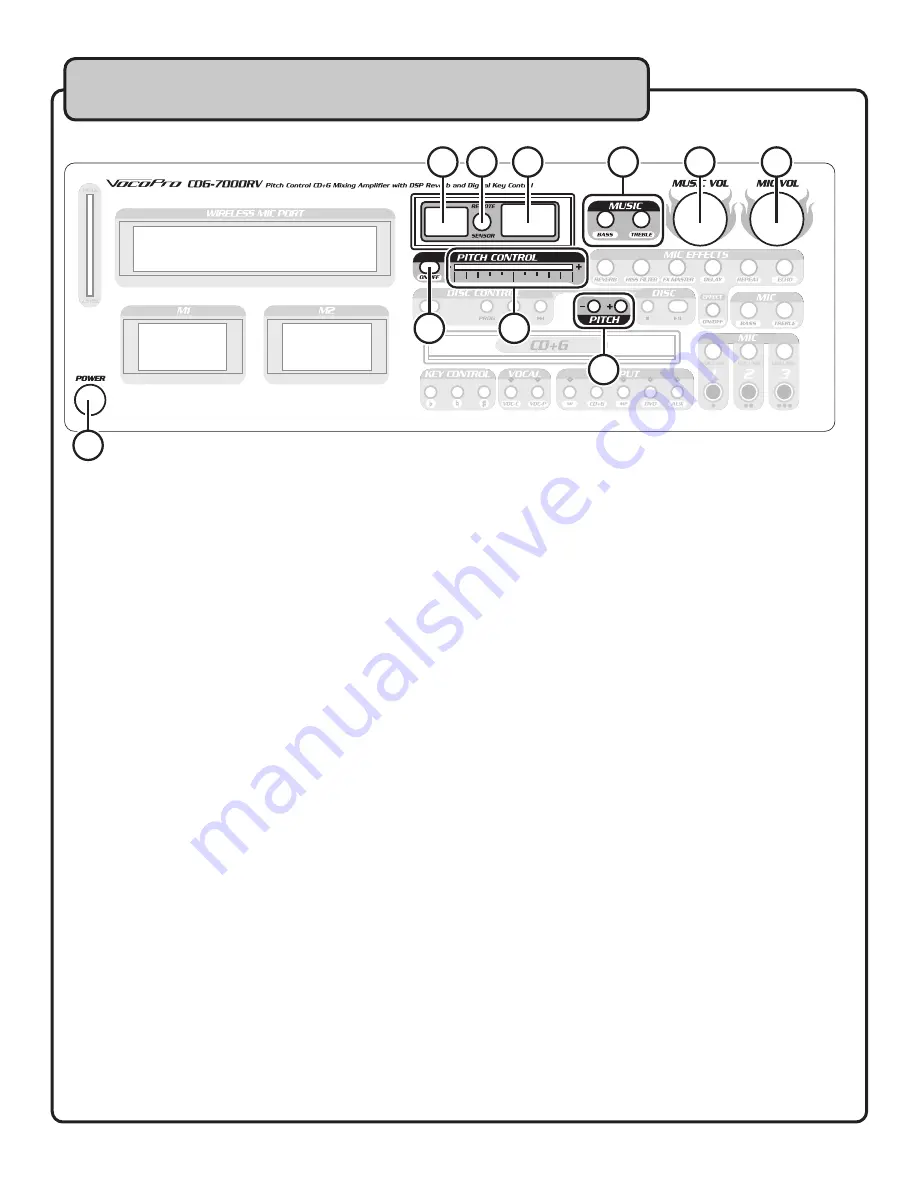
Descriptions and Functions

1. POWER -

 Use this button to turn the CDG-7000RV ON or OFF .

2. KEY CONTROL DISPLAY -

 Displays key control setting information .

3. REMOTE SENSOR -

 When operating the CDG-7000RV with the REMOTE CONTROL, direct the REMOTE towards 

this SENSOR within 23 feet .  Maintain a line of sight between REMOTE and REMOTE SENSOR clear of obstacles to 

prevent signal deflection . 

4. DISPLAY -

 Displays track information .

5. MUSIC BASS/TREBLE CONTROL -

 These controls adjust the bass and treble of the music output .  Turn clockwise 

to increase output and counter-clockwise to decrease .

6. MUSIC VOLUME -

 This controls the output level for whichever input is currently selected . Turn clockwise to 

increase output and counter-clockwise to  to decrease .

7. MIC VOLUME -

 This controls the output level for all the microphones currently connected . Turn clockwise if all 6 

microphones are inserted, adjusting the volume up/down will cause the front and back microphones to change 

also .

8. PITCH ADJUST ON/OFF -

 Turn the pitch adjust on or off by pushing this button .

9. PITCH SLIDER -

 Adjust the speed of your music, slide right to increase, left to decrease .

10. PITCH CONTROL -

 This control temporarily changes the pitch of the music .

2  3 

10 

Содержание CDG-7000RV

Страница 1: ...CDG 7000RV Pitch Control CD G Mixing Amplifier with DSP Reverb and Digital Key Control o w n e r s m a n u a l ...

Страница 2: ......

Страница 3: ...ed 8 Features 9 Getting Connected 10 13 Connecting Input Source Players 10 Connecting TVs Monitors 11 Connecting Speakers 12 Connecting External Effects or EQ Devices 13 Descriptions and Functions 14 20 Front Panel 14 18 Rear Panel 19 Remote 20 Specifications 21 Troubleshooting 22 Table of Contents ...

Страница 4: ...ncluding amplifiers that produce heat 10 Power Sources The appliance should be connected to a power supply only of the type described in the operating instructions or as marked on the appliance 11 Grounding or Polarization Precautions should be taken so that the grounding or polarization means of an appliance is not defeated 12 Power Cord Protection Power supply cords should be routed so that they...

Страница 5: ...Keep it in a safe place for future reference 2 Install your unit in a cool dry clean place away from windows heat sources and too much vibration dust moisture or cold Avoid sources of hum transformers v motors To prevent fire or electrical shock do not expose to rain and water 3 Do not operate the unit upside down 4 Never open the cabinet If a foreign object drops into the set contact your dealer ...

Страница 6: ...28 Curtiss Court La Verne CA 91750 Toll Free 800 678 5348 TEL 909 593 8893 FAX 909 593 8890 VocoPro Company Email Directory Customer Service General Information info vocopro com Tech Support techsupport vocopro com Remember Our Website Be sure to visit the VocoPro website www vocopro com for the latest information on new products packages and promos And while you re there don t forget to check out...

Страница 7: ...Pay attention to the different levels in various recordings Taking a minute to do this now will help to prevent hearing damage or loss in the future After all we want you listening for a lifetime Used wisely your new sound equipment will provide a lifetime of fun and enjoyment Since hearing damage from loud noise is often undetectable until it is too late this manufacturer and the Electronic Indus...

Страница 8: ...rb and Digital Key Control The CDG 7000RV will provide years of reliability and high quality entertainment for you if used properly Please read this manual carefully before using your CDG 7000RV to ensure best performance WHAT S IN THE BOX CDG 7000RV A V RCA Patch Cable Remote Control AA Batteries 2 AC Power Cable ...

Страница 9: ...hone Receiver Slot Available Stereo Expansion Slots for Increased Capability Audio Recording Bluetooth Video Playback Bass and Treble Controls for Microphone and Music Digital Echo and Reverb for Professional Sounding Vocals Vocal Cancel Partner Modes for Removing Vocals on Multiplexed Media Remote Control for Easy Use Effect Loop for Use with Additional Sound Equipment 120V 230V Toggle Switch ...

Страница 10: ...he corresponding CDG 7000RV DVD and AUX AUDIO INPUTS Any audio device with an RCA stereo connection can be connected to these inputs 2 Connect the video connection from your respective players to the CDG 7000RV s DVD VIDEO INPUT Use an RCA video cable usually coded in yellow to carry the signal that will display Karaoke graphics and video to TVs or other monitor devices when output from the CDG 70...

Страница 11: ...ideo monitor devices 1 Connect an RCA style video cable from a VIDEO OUTPUT on the CDG 7000RV to the VIDEO INPUT jack on your TV or other monitor You may need to manually switch your TV to the correct video mode while some models automatically switch when a video signal is detected On most TVs the INPUT jack is labeled A V AUX or VIDEO IN TV 1 TV 2 ...

Страница 12: ... or ridges 1 Connect one end of the striped grooved ridged etc cable to the red terminal on the rear panel of the CDG 7000RV 2 Connect the other end of the striped grooved ridged etc cable to the red terminal on the speaker 3 Connect one end of the plain NO stripes grooves ridges etc cable to the black terminal on the rear panel of the CDG 7000RV 4 Connect the other end of the plain NO stripes gro...

Страница 13: ...ove the EFFECT LOOP BARS and store them in a safe place 2 Connect an L R RCA cable from the EFFECT LOOP OUTPUT on the CDG 7000RV rear panel to the INPUT jack on the External Effects or EQ device 3 Connect an L R RCA cable from the OUTPUT of the EXTERNAL EFFECTS or EQ DEVICE to the EFFECT LOOP INPUT on the CDG 7000RV rear panel WARNING If effects loops jacks are empty there will be no audio output ...

Страница 14: ...Turn clockwise to increase output and counter clockwise to decrease 6 MUSIC VOLUME This controls the output level for whichever input is currently selected Turn clockwise to increase output and counter clockwise to to decrease 7 MIC VOLUME This controls the output level for all the microphones currently connected Turn clockwise if all 6 microphones are inserted adjusting the volume up down will ca...

Страница 15: ...R KNOB Control the level of all effects DELAY KNOB This control adjusts the length of time for each ECHO interval or REPEAT Rotating the DELAY control clockwise will increase the DELAY creating the effect of more space REPEAT KNOB This control adjusts the number of ECHO repeats applied to the signal until the effect decays or fades out ECHO KNOB This controls the overall level for the ECHO effect ...

Страница 16: ...r CD CDG disc onto the tray and press the OPEN CLOSE button again to close tray Never push or force tray closed manually 15 DIGITAL KEY CONTROL You can adjust the key of your source music in half step increments to match the natural range of your voice using the KEY CONTROL buttons To flat b or lower the key press the flat b button on the left side of the KEY CONTROL controls To sharp or raise the...

Страница 17: ...l again become audible so it s like having a vocal partner For example if you want to sing every other verse in a song you may do so when using this feature The guide lead vocal will automatically begin a second after you stop singing and become inaudible when you resume singing until the VOC P key is pressed again 17 INPUT SELECTOR Change the input source by pressing the corresponding button to t...

Страница 18: ...s capable of audio recording and playback are installed The recording module available is the SDR 4 3 Media Slot This slot is where the optional modules capable of audio and video playback are installed Please check vocopro com for details on compatible multimedia modules Note It is possible to install the other MEDIA modules into M2 but playback will be limited to AUDIO ONLY If there is no module...

Страница 19: ...115V 230V AC OUTLET This outlet can be used to connect another component providing it does not exceed 250 watts maximum power consumption 7 SPEAKER JACKS Use these speaker jacks to connect speakers Refer to Getting Connected 8 AUX AUDIO INPUT Connect RCA stereo cables from your audio output device 9 DVD INPUT Connect RCA audio and video cables from your DVD player output 10 AUDIO PRE AMP OUTPUT Ou...

Страница 20: ...fter you stop singing and become inaudible when you resume singing until the VOC P key is pressed again 4 DIGITAL KEY CONTROL You can adjust the key of your source music in half step increments to match the natural range of your voice using the KEY CONTROL buttons on the remote control Press any of the four flat b buttons on the left side of the KEY CONTROL controls to select a flat b or lower key...

Страница 21: ...0 ECHO VOLUME 0 100 ECHO DELAY TIME 140Msec 240Msec REVERB VOLUME 0 99 1 5 Step REVERB TIME 0 99 1 0 Step KEY CONTROL RANGE 6 6 KEY MUSIC INTERVALS 13 POSITIONS SIGNAL TO NOISE RATIO 75db CD G PITCH CONTROL 10 SPEAKER IMPEDANCE ONE CHANNEL 1 OR 2 4 16Ω TWO CHANNELS 1 AND 2 8 32Ω POWER SUPPLY OTHER POWER REQUIREMENTS AC 110V 220V 50Hz 60Hz POWER CONSUMPTION 600 WATT DIMENSIONS W x D x H 17in 16 5in...

Страница 22: ... Double check the mic cable connection Ensure the Mic Channel Volume and Mic Master Volume are turned up to audible levels Be sure to use high impedance microphones 300 The remote control is not working Make sure the batteries are inserted correctly Make sure there is nothing blocking the IR sensor Ensure the remote is within the 23ft range of the IR sensor I m missing some parts from my box What ...

Страница 23: ...23 Notes ...

Страница 24: ...CDG 7000RVRV Owner s Manual VocoPro 2015 v1 0 1124 www vocopro com ...

Отзывы: