background image


18 


This feature gives you a great way to control the system around your studio or campus.  With the 

User 

Interface

 running full screen in 

Studio Monitor

 on a receiving system, it’s really hard to remember that you’re 

actually controlling a remote system.   

Even touch is supported, meaning you can run the 

User Interface

 output on a Microsoft Surface™ system for 

portable touch control over your entire live production system. 

(Actually, many of the interface screengrabs shown in this manual – including those in this section – were 

grabbed from 

NDI


Studio Monitor

 while controlling the remote system in the manner described above.) 

S

YSTEM 

C

ONFIGURATION


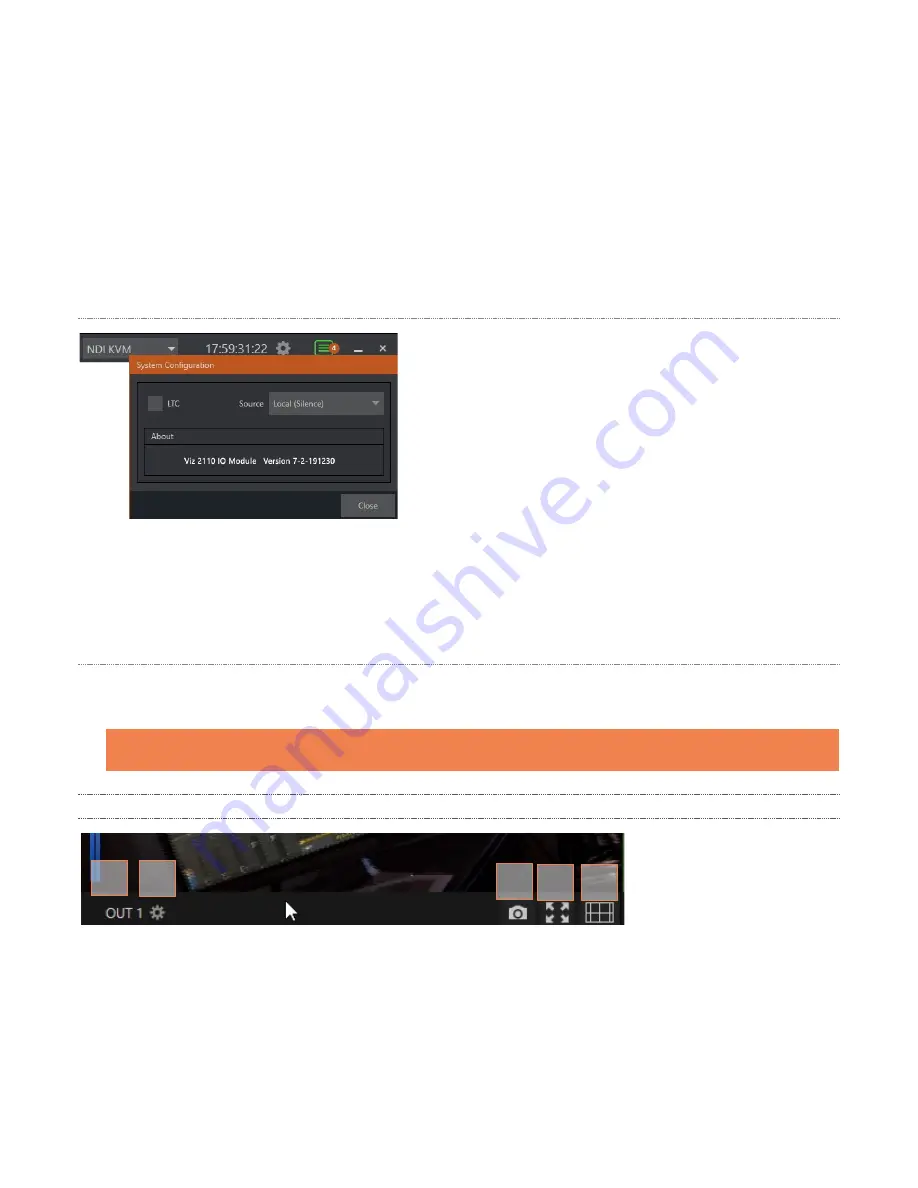
 The 

System Configuration

  dialog is opened by clicking the 

‘gear’ gadget next to the 

Titlebar

 time display and appears as 

shown in Figure 23. 

LTC


T

IMECODE


LTC timecode support can be activated by choosing an input 

using the 

LTC  >  Source

  menu to choose almost any audio 

input to provide  the  timecode  signal and  enabling the 

checkbox at left. 


A

BOUT


The 

About

 box displays the current software version and hardware revision of the unit. 

N

OTIFICATIONS


The Notifications panel opens when you click the ‘text balloon’ gadget at right in the 

Titlebar

.  This panel lists 

information messages the system provides, including any cautionary alerts. 

Hint: You can clear individual entries using by right-clicking to show the item’s context menu, or the Clear All 

button in the panel’s footer. 

2.2.2


VIEWPORT TOOLS 


FIGURE 24 

Viz  2110  IO’s  channels each have a toolbar beneath their respective viewports.  The various elements 

comprising the toolbar are listed below from left to right: 

1.


Channel name 

– Can be changed by clicking on the label, and also in the 

Configure Channel

 panel. 

2.


Configuration

 gadget (gear) pops up next to the channel name when the mouse is over a viewport. 


1  2 

3  4  5 

FIGURE 23


Содержание Viz 2110

Страница 1: ...i...

Страница 2: ...s been taken in the preparation of this document to ensure that it contains accurate and up to date information the publisher and author assume no responsibility for errors or omissions Nor is any lia...

Страница 3: ...FP A and B SMPTE 2110 5 Section 1 6 Configuration Administration 5 1 6 1 SFP Configuration 5 1 6 2 Genlock Configuration 6 1 6 3 I O Channels 7 1 6 4 Administration Panel Footer Tools 9 CHAPTER 2 USER...

Страница 4: ......

Страница 5: ...dcast and production industries SECTION 1 2 OVERVIEW Commitments and requirements can change from production to production A powerful versatile platform for multi source production and multi screen de...

Страница 6: ...C power conditioning especially in situations where local power is unreliable or noisy Power conditioners can reduce wear on Viz 2110 IO s power supplies and other electronics and provide a further m...

Страница 7: ...g in your preferred SFP Small Form factor Pluggable transceivers to connect and serve SMPTE 2110 traffic between external systems and your Viz 2110 I O IP Each of the two SFP connection allows two SMT...

Страница 8: ...ngs 1 6 2 GENLOCK CONFIGURATION Genlocking provides a mechanism to ensure that your video sources are in sync with one another and other external systems The Genlock tab in the Administration panel pr...

Страница 9: ...allows two SMTPE 2110 input connections for a total of four and two outputs to SMTPE 2110 Inputs 1 and 2 and outputs 1 and 2 are served by SFP A while SFP B handles inputs 3 and 4 and outputs 3 and 4...

Страница 10: ...10 output FIGURE 7 RTP Sync Source the RTP Real time Transfer Protocol Synchronization Source Identifier SSRC Type of Service DSCP indicates that the Type of Service ToS is Differentiated Service Code...

Страница 11: ...use the value entered at right to limit the IP stream track count transmitted 1 6 4 ADMINISTRATION PANEL FOOTER TOOLS FIGURE 8 At the bottom of the Administration pane you will see About Manual Exit...

Страница 12: ......

Страница 13: ...provides very useful remote monitoring options in addition to configuration and control features FIGURE 9 The Desktop interface includes a titlebar running across the top of the screen and a Dashboar...

Страница 14: ...INPUT TAB Let s consider configuring an input channel first An input supplied by a SMTPE 2110 source is automatically converted to an NDI stream The editable Channel Name under the viewport identifie...

Страница 15: ...se A V synchronization where a v source timing differs CAPTURE This tab is also where you assign the path and filename for captured still images FIGURE 12 The initial Grab Directory is the default Pic...

Страница 16: ...RE 14 The first choice you will usually make is which audio video source you wish to output as SMTPE 2110 Often you will simply use the Audio Video Source menu to select an NDI a v stream from your ne...

Страница 17: ...he Add IP Camera entry opens the IP Source Manager Adding entries to the list of sources shown in this panel causes corresponding listings to appear in the Local group shown in the Video Source menu o...

Страница 18: ...sting the color characteristics of each video channel Choosing Auto Color automatically adapts color balance as lighting conditions change over time Note Proc Amp adjustments follow Auto Color process...

Страница 19: ...the manual are provided above 2 2 1 TITLEBAR TOOLS NDI KVM Thanks to NDI it is no longer necessary to configure complicated hardware KVM installations to enjoy remote control over your Viz 2110 IO sys...

Страница 20: ...support can be activated by choosing an input using the LTC Source menu to choose almost any audio input to provide the timecode signal and enabling the checkbox at left ABOUT The About box displays...

Страница 21: ...N FIGURE 26 Clicking this button expands the video display for the selected channel to fill your monitor Press ESC on your keyboard or click the mouse to return to the standard display OVERLAY FIGURE...

Страница 22: ...d source can be adjusted moving the slider provided at right double click this control to reset it to the default 0dB value DISPLAY In the bottom right corner of the Dashboard at the bottom of the pri...

Страница 23: ...te video and audio over IP in real time NDI enabled devices and software have the potential to greatly enhance your video production pipeline by making video input and output available anywhere your n...

Страница 24: ......

Страница 25: ...of third party software libraries under license Related license requirements are defined in documentation installed on the product To view these licenses please click the Additional Licenses link prov...

Отзывы: