background image

VIZIO VBR210 User Manual 

22 

www.VIZIO.com


  You only have to perform this procedure once. The next time you turn on your player, it will 

connect to the network automatically. 

  If you need additional help setting up your network, please refer to the user manual for your 

router or contact the manufacturer of either your router or your Internet service provider if they 
provided the router for you. 

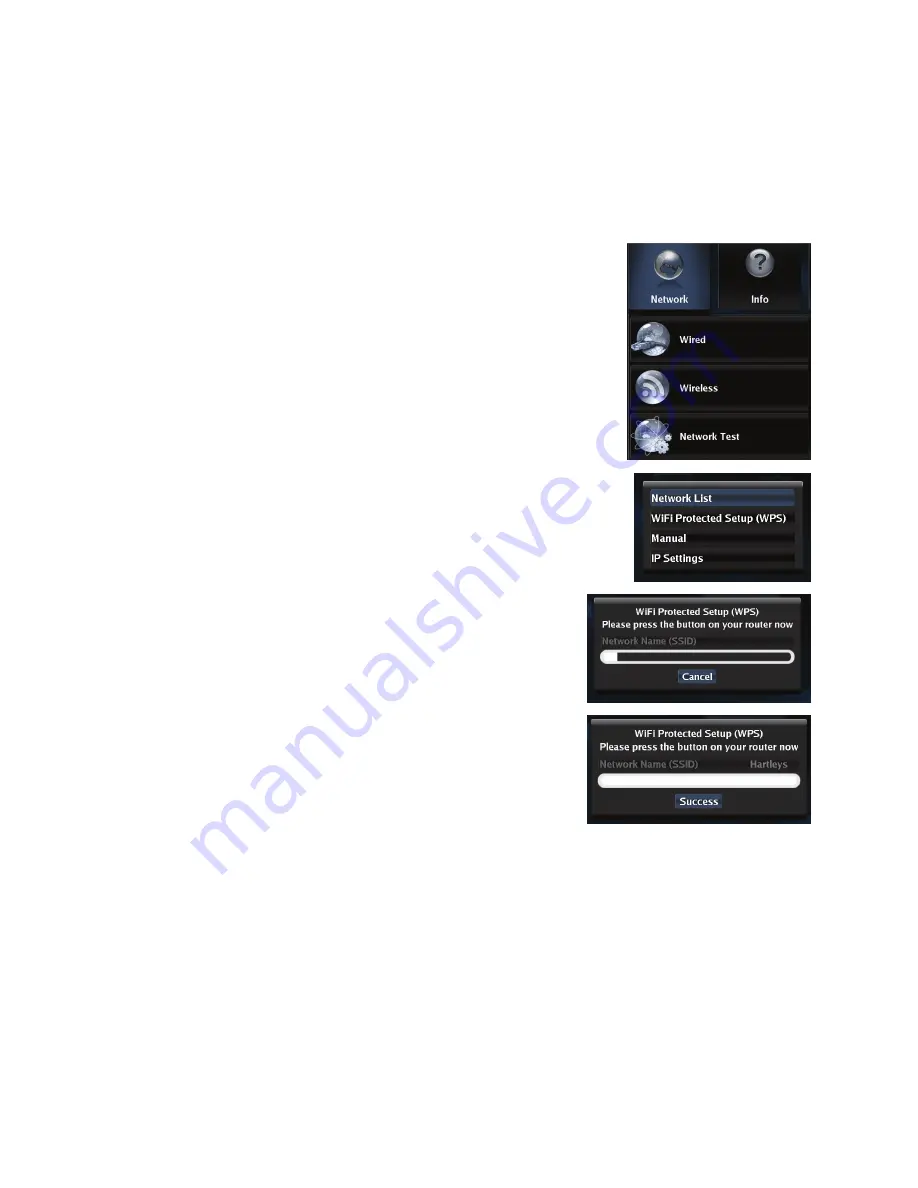
Using a wireless network with WPS (Wi-Fi Protected Setup – Button Method)  


1.  Turn on your player and your TV. If a DVD is not in the disc tray, 

the 

Home m

enu will be displayed. If a DVD is in the disc tray, press 

SETUP

 to display the 

Home m

enu. 

2. Press 

the 

B

 (green) button, if prompted. Otherwise: 

a. Press 

 or 

 to select 

Settings

, and then press 

SELECT

.  

b. Press 

 or 

 to select 

Network

, and then press 

SELECT

3. Press 

 or 

 to select 

Wireless

 and then press 

SELECT

4. Press 

 or 

 to select 

WiFi Protected Setup (WPS) 

and then 

press 

SELECT

.  

5.  Press the button on your router. When you see 

Success

 on the 

screen, your player is connected to your wireless network. 

6. Press 

SELECT

 to close the message. 


Notes:  

  You only have to perform this procedure once. The next time you 

turn on your player, it will connect to the network automatically. 

  If you need additional help setting up your network, please 

refer to the user manual for your router or contact the 
manufacturer of either your router or your Internet service 
provider if they provided the router for you. 


Содержание VBR210

Страница 1: ...We recommend you register your headphones at our website www VIZIO com or fill in your registration card and mail it in For peace of mind and to protect your investment beyond the standard warranty VIZIO offers extended warranty service plans These plans give additional coverage during the standard warranty period Visit our website or call us to purchase a plan Serial _____________________ Purchas...

Страница 2: ...ZIO 12 Use only with the cart stand tripod bracket or table specified by the manufacturer or sold with your player When a cart is used use caution when moving the cart and player combination to avoid injury from tip over 13 Unplug your player during lightning storms or when unused for long periods of time 14 Refer all servicing to qualified service personnel Servicing is required when your player ...

Страница 3: ...14 Connecting to the Internet 14 Exploring the Home Menu 14 CHAPTER 4 CONNECTING EQUIPMENT 15 Which Video Connection Should I Use 15 Connecting to a TV 16 Using HDMI Best 16 Using Component Video Better 17 Connecting a USB drive 19 Connecting to your home network 19 Using a wired Ethernet connection 20 Using a wireless connection with DHCP 21 Using a wireless network with WPS Wi Fi Protected Setup...

Страница 4: ...ge Control 33 Language Menu 34 OSD 34 Menu 34 Audio 34 Subtitle 34 Home Menu 34 BD Live 35 BD Live Internet Access 35 BD Live Storage 35 Erase Blu ray Storage 35 Parental Menu 35 Parental Country 35 Parental Control 36 Parental Level 36 Parental Password 36 System Menu 36 Optical Disc AutoPlay 36 Auto Power Down 36 Screen Saver Duration 37 Update Via Network 37 Restore Factory Defaults 37 Network ...

Страница 5: ...49 LEGAL NOTICES 50 ONE YEAR LIMITED WARRANTY 52 ONE YEAR LIMITED WARRANTY 53 INDEX 54 Opening the Package Your Blu ray Player and its accompanying accessories are carefully packed in a cardboard carton that has been designed to protect it from transportation damage Once you have opened the carton check that your player is in good condition and that all of the contents are included IMPORTANT Save ...

Страница 6: ...d an Internet connection Your player has 802 11n wireless built in which is also compatible with 802 11b and 802 11g wireless networks so you can connect your player to the Internet through your wireless home network Or you can connect to the Internet by plugging in an Ethernet cable not included from your Internet connection to the Ethernet port on your player A wired connection may provide a mor...

Страница 7: ...ded Multiple outputs for connecting your home theater system or amplifier PIP functionality that lets you display primary and secondary video at the same time if available on the Blu ray Disc Pop up menu display without interrupting playback if available on the Blu ray Disc HDMI 1080p output Blu ray Disc only that provides smooth playback of video with a frame rate of 60 frames per second TV must ...

Страница 8: ...ate mp3 files may not play back correctly jpeg jpg Region codes Blu ray Discs and DVDs have region codes to help prevent illegal distribution of discs If the disc s region code does not match your player s region code the disc will not play The disc s region code is displayed on the disc or disc packaging You can only play Blu ray Discs that have a region code of A and you can only play DVDs that ...

Страница 9: ...the power cord 2 Remote Control Sensor Point the remote control directly at this sensor for the best response to the remote signal 3 Disc Tray Insert a disc with the label side up into this tray 4 Open Close Press to open or close the disc tray Note Due to the nature of Blu ray discs it may take a moment for the disc tray to respond 5 Play Pause Press to start or pause playback 6 Stop Press to sto...

Страница 10: ... connect your player to the Internet through your wireless home network instead of using this connector See Connecting to your home network on page 18 for detailed information on setting up your Internet connection 7 HDMI Connect a digital video and audio device such as TV to this all digital connector No additional audio connection is needed Only HDMI is capable of delivering 1080p video and the ...

Страница 11: ...d pets Remote Control Range The effective range of the remote control is approximately 23 feet 7 meters from the front of the remote control sensor 30 to the left and right 30 up and down Point the remote control at the remote control sensor to transmit the commands Do not place any obstacles between the remote control and the remote control sensor VIZIO Remote Control Precautions The remote contr...

Страница 12: ... disc menu when playing a Blu ray Disc or DVD These buttons also navigate the pop up menu when playing MP3 or JPEG files SELECT Press to select an option after it has been highlighted in the menu RETURN Press to return to the previous page When using your Apps such as Netflix Vudu and Pandora When going through the Settings or Media menus POPUP MENU TITLE MENU Press to open a menu that lets you co...

Страница 13: ... subtitles off AUDIO Press to select the audio language if multiple languages are available on the disc When pressed XX XX XXX appears on the screen The first XX shows the current audio language number The next XX shows the total number of audio languages available And XXX describes the current audio language RES Press to select the video resolution Choose from 480i 480p 720p 1080i 1080p or HDMI A...

Страница 14: ...n your player or press SETUP on your remote while a disc is playing the Home menu appears in the middle of your screen with a selection of different Apps that let you watch movies TV shows or listen to music all on demand A high speed Internet connection is required to receive automatic product updates and to access your favorite online content You have the option to connect your TV to the Interne...

Страница 15: ...y and amazing sound so if your TV has HDMI this is the connection type you should be using Better analog Component consists of three cables for transmitting video and two cables for transmitting audio one red and one white Component video provides a sharper image than Composite video and should be used instead of composite when possible However because it is still an analog connection it won t pro...

Страница 16: ...to your player 3 Select the corresponding HDMI input on your TV to view the disc HDMI with an HDMI capable home theater sound system 1 Connect an HDMI cable not included from the HDMI jack on your player to the HDMI IN jack on the home theater system 2 Use another HDMI cable not included to connect the HDMI OUT on the home theater system to the HDMI IN on the TV 3 Turn on the power to your player ...

Страница 17: ...UDIO OUT jacks on the back of your player 3 Turn on the power to your player 4 Select the corresponding Component input on your TV to view the disc Component Video with a home theater sound system using analog audio 1 Connect the green blue and red component cables from your TV to the COMPONENT jacks on the back of your player 2 Connect the white and red audio cables not included from your TV to t...

Страница 18: ...cluded from the COAXIAL DIGITAL AUDIO OUT jack on the back of your player to the COAXIAL IN jack on the home theater system OR Connect an optical digital audio cable not included from the OPTICAL DIGITAL AUDIO OUT jack on the back of your player to the OPTICAL IN jack on the home theater system You may first need to remove the plug from the OPTICAL jack 3 Turn on the power to your player 4 Select ...

Страница 19: ...n connect your player to the Internet through your wireless home network Or you can connect to the Internet by plugging in an Ethernet cable not included from your Internet connection to the Ethernet port on your player A wired connection may provide a more consistent connection depending on the conditions in your home environment The network configuration and connection method may vary depending ...

Страница 20: ... router Your home network must have broadband Internet access such as cable or DSL Your player should automatically get an IP address on the network and display the Connected icon in the upper right hand corner of your TV 4 A small number of users may need to manually adjust the network settings See the Network Menu on page 37 detailed information on configuring your Internet connection If you nee...

Страница 21: ...s password protected enter the secure access code you created when setting up your wireless router otherwise skip to Step 6 a Press SELECT to open the on screen keyboard to enter the password b Highlight DONE on the keyboard and press SELECT when you have finished entering the password 7 Select Connect and then press SELECT When you see Success on the screen your player is connected to your wirele...

Страница 22: ... display the Home menu 2 Press the B green button if prompted Otherwise a Press or to select Settings and then press SELECT b Press or to select Network and then press SELECT 3 Press or to select Wireless and then press SELECT 4 Press or to select WiFi Protected Setup WPS and then press SELECT 5 Press the button on your router When you see Success on the screen your player is connected to your wir...

Страница 23: ... 1 Be sure you have activated your account 2 Add movies to your Instant Queue from either your player or from the Netflix website 3 Press or to select Netflix and then press SELECT 4 Select and play movies or TV episodes 5 When watching a movie control the playback using your players remote control Press to pause playback Press it again to resume playback Press to stop playback and return to the I...

Страница 24: ...mplete account setup Watching a movie with Vudu 1 Be sure you have activated your account 2 Turn on your player 3 Press or to select Vudu and then press SELECT 4 Add movies and TV shows to your Wish List from either your player or from the Vudu website 5 When watching a movie control the playback using your players remote control Press to pause playback Press it again to resume playback Press or t...

Страница 25: ...e on screen keyboard select Search and then press SELECT 7 The radio station will begin playing Listening to music with Pandora 1 Be sure you have activated your account 2 Turn on your player 3 Press or to select Pandora and then press SELECT 4 Create a new station by entering a favorite song or artist using the on screen keyboard The music begins playing and information about the song is displaye...

Страница 26: ...ocation on those discs it is recommended that you press Repeatedly press or to fast forward or fast reverse the speed from Fast x 2 Fast x 4 Fast x 8 Fast x 16 Fast x 32 Fast x 64 to Fast x 128 Press to resume playback Press once to go to the beginning of the current chapter or track Press twice to go to the previous chapter or track Press to go to the next title chapter or track Repeatedly press ...

Страница 27: ...ayer to your home network see Connecting to your home network on page 18 6 Connect a USB storage device to the USB port on the back of your player Note The USB device should be larger than 1GB with at least 1GB of free space and formatted FAT32 NTFS and other file systems are not supported 7 Turn on your player and TV 8 Press to open the disc tray 9 Press to open the disc tray place a BD LiveTM ca...

Страница 28: ...revious folder and then eventually back to the Music menu Media Menu This option is displayed when you have files on both a USB device and a disc Select it to return to the menu to select either the USB device or the disc Play Files Play all of the songs on the selected device Press II to pause playback Press it again to resume playback Press to stop playback and return to the Music menu Press or ...

Страница 29: ... a folder 8 Press to select a menu option Home Return to the DVD player s main menu Previous folder This option is displayed when you have opened a folder containing files Select it to return to the previous folder and then eventually back to the Pictures menu Media Menu This option is displayed when you have files on both a USB device and a disc Select it to return to the menu to select either th...

Страница 30: ...udio and other settings Your player will save changes made to the settings even when your player is turned off 1 Turn on your player and your TV If a DVD is not in the disc tray the Home menu will be displayed If a DVD is in the disc tray press SETUP to display the Home menu 2 Press or to select Settings and then press SELECT 3 Press or to select one of the menus Display Audio Language Home BD Liv...

Страница 31: ...rchased in other parts of the world such as Europe or Japan Resolution Select the video output resolution option that best fits the type of TV you have connected to your player HDMI Auto Automatically sets the resolution if the TV is connected to the HDMI jack 1080p HDMI Select if the TV is a HDTV that can display 1080p any frame rate and is connected to the HDMI jack 1080i Select if the TV is a H...

Страница 32: ...t Movie will fill entire screen No effect Movie will fill entire screen Center of movie will be shown on TV Left and right portions of movie contents will not be shown Movie will be shown in rectangular wide aspect ratio Horizontal bars will be shown above below movie HD television episodes in widescreen format Episode will fill entire screen No effect Episode will fill entire screen Center of epi...

Страница 33: ...ing the highest quality possible HDMI has higher quality capabilities with advanced audio codecs like Dolby TruHD and DTS HD Blu ray disc audio is limited to the soundtrack for the main movie and the player does not send PIP audio or audio effects Bitstream Legacy sends the audio from the disc over HDMI or Digital Audio Out coax or optical using legacy DVD audio formats Blu ray disc audio is limit...

Страница 34: ... change the setting 6 Press RETURN once to return to the sub menu OSD Select the Settings menu language Choose from English French or Spanish Menu Select the disc menu language The number of languages depends on the disc Most discs have only one language available Audio Select the disc audio language The number of languages depends on the disc Some discs do not allow you to select the audio langua...

Страница 35: ... your player from downloading content from any BD LiveTM website BD Live Storage Show the available capacity for BD LiveTM storage You can also select BD LiveTM files to delete Erase Blu ray Storage Select to delete saved BD LiveTM files Parental Menu Many discs are encoded with a rating similar to the MPAA movie rating system Configure your player to prevent playback of discs with a certain ratin...

Страница 36: ...he password enter a new 4 digit password using the number buttons on the remote The default password is 0 0 0 0 Press to select OK and then press SELECT Note The System Reset feature will reset the password but it will also reset all settings you may have changed System Menu 1 Turn on your player and your TV If a DVD is not in the disc tray the Home menu will be displayed If a DVD is in the disc t...

Страница 37: ...tivate the Pandora account you set up on your player Deactivate Vudu Select to deactivate the Vudu account you set up on your player Network Menu Your player has 802 11n wireless built in which is also compatible with 802 11b and 802 11g wireless networks so you can connect your player to the Internet through your wireless home network Or you can connect to the Internet by plugging in an Ethernet ...

Страница 38: ...s your player will automatically detect and use your network settings after you connect your Ethernet cable but you can manually change those settings if you are an advanced user and are comfortable with wired and wireless networks 1 Turn on your player and your TV If a DVD is not in the disc tray the Home menu will be displayed If a DVD is in the disc tray press SETUP to display the Home menu 2 C...

Страница 39: ...assword 5 Highlight DONE on the keyboard and press SELECT when you have finished entering the password 6 Select Connect and then press SELECT When you see Success on the screen your player is connected to your wireless network 7 Press SELECT to close the message Notes If you have forgotten your secure access code please refer to the user manual for your wireless router or contract the manufacturer...

Страница 40: ...iFi Protected Setup WPS and then press SELECT 5 Press the button on your router When you see Success on the screen your player is connected to your wireless network 6 Press SELECT to close the message Notes You only have to perform this procedure once The next time you turn on your player it will connect to the network automatically If you need additional help setting up your network please refer ...

Страница 41: ...rectly Turn on your player remove the disc leave the tray open and then leave your player on for two to three hours To minimize condensation problems keep the power cord connected to a power outlet Storing discs Do not store discs in a place that is exposed to direct sunlight or heat Do not store discs in a place that is exposed to moisture and dust such as a bathroom or near a humidifier Store di...

Страница 42: ...ther file systems are not supported The USB storage device must not have other iso or dat files in the root directory 2 Connect the USB storage device to the USB port on the back of your player 3 Follow the on screen instructions to update your player Updating your player via the Internet When a new software update is available a message will be displayed on the Home menu To update the software 1 ...

Страница 43: ... composite video A high definition picture is not possible using the composite video output 4 Can I play Blu ray Discs or DVDs that I bought in another country You can play the discs if the video was recorded in standard NTSC format You cannot play Blu ray Discs that do not have a region code of A DVDs that do not have a region code of 1 or ALL 5 Can I play Blu ray Discs or DVDs that do not have r...

Страница 44: ...e disc is not dirty or defective The Parental Controls rating may be blocking the disc Enter the 4 digit password and change the parental settings Receive the error message No Signal on my TV Press the input or source button on the TV remote control to select the input source for your player Playback will not start or playback starts then stops Make sure that the disc is inserted with the label fa...

Страница 45: ...audio Some discs do not let you change the audio When connecting a home theater system using a coaxial digital cable optical digital audio cable or an HDMI cable set Digital Audio Output to PCM or connect the home theater system using a standard audio cable Incorrect audio type Depending on the connected equipment not all audio tracks may be available if your player is connected with an HDMI cable...

Страница 46: ... sure that the disc is not dirty or defective Press wait five seconds and then press again to reset your player PIP does not work with a Blu ray Disc Make sure that the Blu ray disc allows PIP See the documentation that came with the disc Cannot change the viewing angle Not all discs or scenes are recorded with multiple viewing angles Power is ON but there is no image on the screen Make sure the c...

Страница 47: ...ss Connection Issues Refer to the user manual for your wireless router or contact the manufacturer of either your router or your Internet Service Provider if they provided the router for you Make sure the Internet connection is set up correctly See Connecting to your home network on page 18 for detailed information Test the Internet connection to make sure it is working See the Network Menu on pag...

Страница 48: ...unnecessary shipping charges billed to you Our trained support personnel can often resolve the problem over the phone For more information on warranty service or repair after the warranty period please contact our Support Department at the number below Customer support and quality service are integral parts of VIZIO s commitment to service excellence For technical assistance contact our VIZIO Tech...

Страница 49: ... module 2 4Ghz 11N VBR210 Features Blu ray Disc Resolutions of 1080p HDMI Out 1080i 720p 480p 480i Component Out DVD DVD R DVD RW Selectable Resolutions of 1080p HDMI 1080i 720p 480p 480i HDMI Component Out CD CD R CD RW MP3 CD Support Dolby Digital Dolby Digital Plus Dolby Digital TrueHD DTS Digital Surround BD Live JPG MP3 WMA Netflix Vudu Pandora Media Playback through USB for Video Photo MP3 P...

Страница 50: ...or any radio or TV interference caused by unauthorized modification to this equipment It is the responsibilities of the user to correct such interference FCC Part 15 This device complies with Part 15 of the FCC Rules Operation of this product is subject to the following two conditions 1 this device may not cause harmful interference and 2 this device must accept any interference received including...

Страница 51: ...wise authorized by Macrovision Reverse engineering or disassembly is prohibited Under the U S Copyright laws and Copyright laws of other countries unauthorized recording use display distribution or revision of television programs videotapes BD ROM discs DVDs CDs and other materials may subject you to civil and or criminal liability Licenses Java and all Java based trademarks and logos are trademar...

Страница 52: ...et ratified IEEE 802 11n standard used in Wi Fi Alliance as of June 2007 The specifications of the 802 11n WLAN wireless local area network are draft specifications and not final If the final specifications differ from the draft specification it may affect the ability of this device to communicate with other 802 11n WLAN devices ...

Страница 53: ...carton box and shipping material or packaging that affords an equal degree of protection VIZIO Technical Support will provide instructions for packing and shipping the covered Product to the VIZIO service center Limitations and Exclusions VIZIO s one year limited warranty only covers defects in materials and workmanship This warranty does not cover for example cosmetic damage normal wear and tear ...

Страница 54: ...es 6 Internet Connecting 14 19 37 Language Menu Audio 34 Menu 34 OSD 34 35 Subtitles 34 Legal notices 50 Maintenance 41 Media Playing Music 28 Viewing Pictures 29 Menu 30 Audio Menu 33 Display Menu 31 Home Menu 34 Info Menu 40 Language Menu 34 Network Menu 37 Parental Menu 35 System Menu 36 Music Playing 28 Netflix Activating 23 Deactivating 24 37 Support 24 Using 23 Network Setting up 19 37 Wired...

Страница 55: ...37 Screen Saver 37 Update Software 37 42 Technical Support 48 Netflix 24 Pandora 26 Vudu 24 Troubleshooting 43 Audio Issues 45 BD Live and USB Issues 46 Internet Issues 47 Netflix Pandora and Vudu Issues 47 Operation Issues 44 Video Issues 46 TV Connecting to 16 Update Software 37 42 USB drive Connecting 19 Using 14 Vudu Activating 24 Deactivating 24 37 Support 24 Using 24 Warranty 53 Warranty ser...

Отзывы: