background image


VIVOTEK


User's Manual - 19  

in: English, Deutsch, Español, Français, Italiano, 

日本語

, Português, 

簡体中文

, and 

繁體中文

Hide Button

You can click the hide button to hide the control panel or display the control panel�

Resize Buttons

 : 

Click the Auto button, the video cell will resize automatically to fit the monitor. 

Click 100% is to display the original homepage size�

Click 50% is to resize the homepage to 50% of its original size�

Click 25% is to resize the homepage to 25% of its original size�
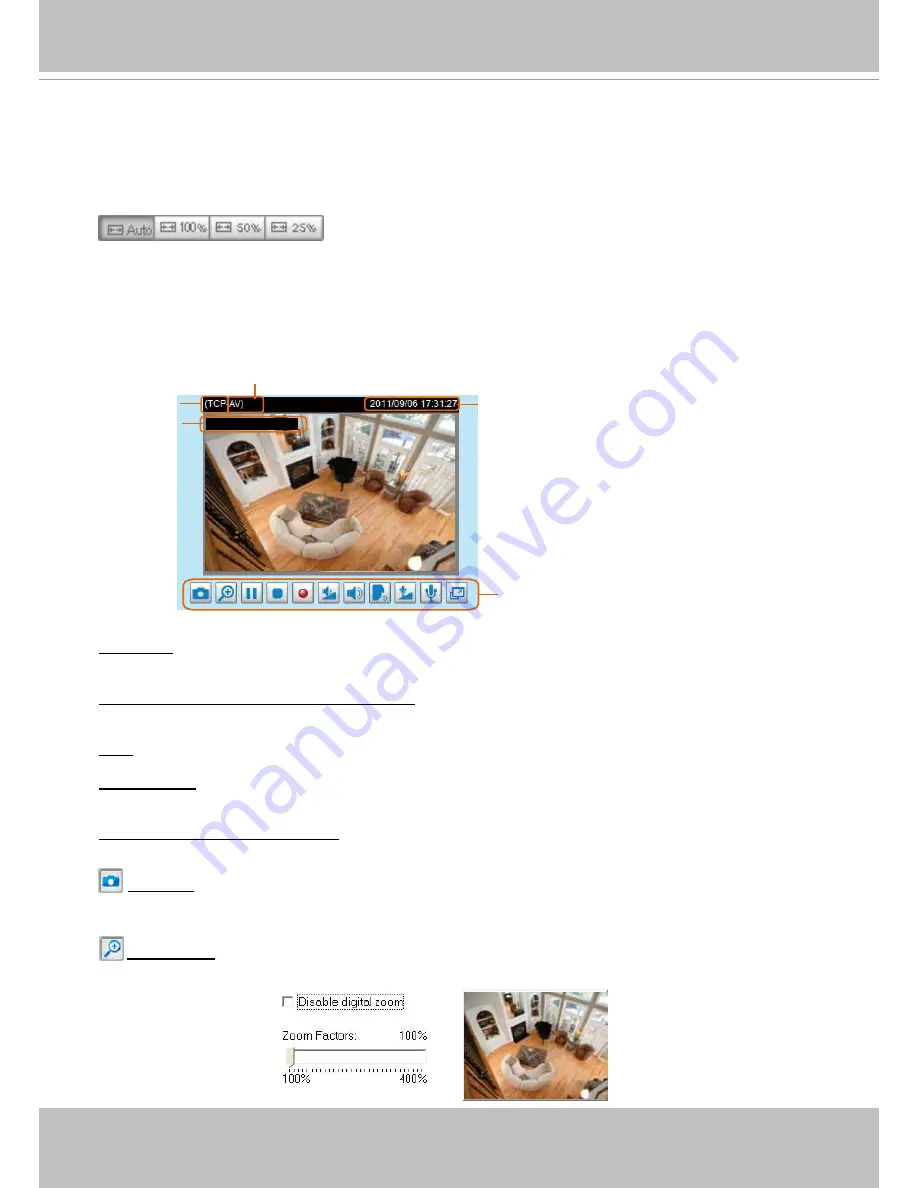
Live Video Window

■ The following window is displayed when the video mode is set to H.264 / MPEG-4:

Video Title

: The video title can be configured. For more information, please refer to Video Settings on 

page 64�

H�264 / MPEG-4 Protocol and Media Options

: The transmission protocol and media options for H.264 / 

MPEG-4 video streaming. For further configuration, please refer to Client Settings on page 22.

Time

: Display the current time. For further configuration, please refer to Video Settings on page 64.

Title and Time

: The video title and time can be stamped on the streaming video. For further configuration, 

please refer to Video Settings on page 64�

Video and Audio Control Buttons

: Depending on the Network Camera model and Network Camera 

configuration, some buttons may not be available.

 Snapshot

: Click this button to capture and save still images. The captured images will be displayed 

in a pop-up window� Right-click the image and choose 

Save Picture As

 to save it in JPEG (*.jpg) or BMP 

(*�bmp) format�

 Digital Zoom

: Click and uncheck “Disable digital zoom” to enable the zoom operation. The navigation 

screen indicates the part of the image being magnified. To control the zoom level, drag the slider bar. To 

move to a different area you want to magnify, drag the navigation screen�

Time

MPEG-4 Protocol and Media Options         

Video Title

Video and Audio Control Buttons 

Title and Time

Video 13:44:17  2011/01/17

Содержание IP8132

Страница 1: ...IP Surveillance IP8132 8133 8133W H 264 Privacy Button Compact Design Rev 1 2 IP8132 Wired IP8133W Wireless IP8133 Wired PoE Wired PoE Wired PoE ...

Страница 2: ...17 Main Page 18 Client Settings 22 Configuration 24 System 25 Security 28 HTTPS Hypertext Transfer Protocol over SSL 29 SNMP Simple Network Management Protocol 34 Network 35 Wireless IP8133W 49 Express Link 58 DDNS 59 Access List 61 Audio and Video 64 Motion Detection 74 Camera Tampering Detection 77 Homepage Layout 78 Application 81 Recording 97 System Log 101 View Parameters 102 Maintenance 103 ...

Страница 3: ...res the product is used properly as intended The Network Camera is a network device and its use should be straightforward for those who have basic networking knowledge It is designed for various applications including video sharing general security surveillance etc The Configuration chapter suggests ways to best utilize the Network Camera and ensure proper operations For creative and professional ...

Страница 4: ...f IP8133W except the wireless antenna Item LED status Description LED Definitions 1 Steady Red Power on and system boot Red LED off Power off 2 Blink Green every 1 sec Network connected Steady Red Network failed 3 Blink Green every 2 sec Audio muted 4 Blink Orange every 2 sec Privacy button pressed 5 Blink Green RED and Orange intermittently Upgrading firmware 6 Blink Orange every 0 15 sec Restori...

Страница 5: ...cket Privacy Button 2 MAC 0002D132C353 IP8133W This device complies with part 15 of the FCC rules Operation is subject to the following two conditions 1 This device may not cause harmful interference and 2 this device must accept any interference received including interference that may cause undesired operation Pat 6 930 709 IP8133 8133W IP8132 Privacy Button Antenna Connector IP8133W Power Cord ...

Страница 6: ...apidly blinks orange Note that all settings will be restored to factory default Upon successful restore the status LED will blink green once per second during normal operation Pin Name 4 Power 3 Digital Output 2 Digital Input 1 Ground General I O Terminal Block This Network Camera provides a general I O terminal block which is used to connect external input output devices The pin definitions are d...

Страница 7: ...lished and the security encryption such as WEP or WPA PSK will be synchronized with the AP Use the IW2 utility to find the camera As for IP setting the camera s use of DHCP or static IP is determined by your configuration on the network camera via the web based configuration of firmware The camera s default is DHCP NOTE WPS Button WPS Button Wireless AP 1 WPS may not work if your AP is configured ...

Страница 8: ...re setting up the Network Camera over the Internet make sure you have a router and follow the steps below 1 Connect your Network Camera behind a router the Internet environment is illustrated below Regarding how to obtain your IP address please refer to Software Installation on page 10 for details MAC 0002D132C353 IP8132 This device complies with part 15 of the FCC rules Operation is subject to th...

Страница 9: ...eo RTCP port for video RTP port for audio RTCP port for audio If you have changed the port numbers on the Network page please open the ports accordingly on your router For information on how to forward ports on the router please refer to your router s user s manual 3 Find out the public IP address of your router provided by your ISP Internet Service Provider Use the public IP and the secondary HTT...

Страница 10: ... continue the program 3 The program will search for all VIVOTEK network devices on the same LAN 4 After searching the main installer window will pop up Click on the MAC and model name which matches the product label on your device to connect to the Network Camera via Internet Explorer 0002D132C353 00 02 D1 32 C3 53 192 168 5 119 IP8132 MAC 0002D132C353 IP8132 This device complies with part 15 of t...

Страница 11: ...mera should prompt as shown below 2 You should be able to see live video from your camera You may also install the 32 channel recording software from the software CD in a deployment consisting of multiple cameras For its installation details please refer to its related documents ...

Страница 12: ...ch your web browser ex Microsoft Internet Explorer Mozilla Firefox or Netscape 2 Enter the IP address of the Network Camera in the address field Press Enter 3 The live video will be displayed in your web browser 4 If it is the first time installing the VIVOTEK network camera an information bar will pop up as shown below Follow the instructions to install the required plug in on your computer For M...

Страница 13: ...tection please refer to Security on page 28 If you see a dialog box indicating that your security settings prohibit running ActiveX Controls please enable the ActiveX Controls for your browser 1 Choose Tools Internet Options Security Custom Level 2 Look for Download signed ActiveX controls select Enable or Prompt Click OK 3 Refresh your web browser then install the Active X control Follow the inst...

Страница 14: ...gement view session with the camera using a 64 bit IE browser If you encounter this problem try execute the Iexplore exe program from C Windows SysWOW64 A 32 bit version of IE browser will be installed On Windows 7 the 32 bit explorer browser can be accessed from here C Program Files x86 Internet Explorer iexplore exe ...

Страница 15: ...t the RTSP port to 554 For more information please refer to RTSP Streaming on page 47 For example 4 The live video will be displayed in your player For more information on how to configure the RTSP access name please refer to RTSP Streaming on page 47 for details mpegable Player pvPlayer rtsp 192 168 5 151 554 live3 sdp Video 16 38 01 2011 01 17 1 Launch the RTSP player 2 Choose File Open URL A UR...

Страница 16: ...P Streaming on page 47 2 As the bandwidth on 3G networks is limited you will not be able to use a large video size Please set the video streaming parameters as listed below For more information please refer to Viewing Window on page 69 Video Mode MPEG 4 Frame size 176 x 144 Maximum frame rate 5 fps Intra frame period 1S Video quality Constant bit rate 40kbps 3 As most ISPs and players only allow R...

Страница 17: ...taneous monitoring and video recording for multiple Network Cameras Please install the recording software then launch the program to add the Network Camera to the Channel list For detailed information about how to use the recording software please refer to the user s manual of the software or download it from http www vivotek com ...

Страница 18: ...adjustment setting is found on page 27 Manual Trigger Click to enable disable an event trigger manually Please configure an event setting on Application page before enable this function A total of 3 event settings can be configured For more information about event settings please refer to page 82 If you want to hide this item on the homepage please go to the Homepage Layout page to uncheck show ma...

Страница 19: ...e refer to Client Settings on page 22 Time Display the current time For further configuration please refer to Video Settings on page 64 Title and Time The video title and time can be stamped on the streaming video For further configuration please refer to Video Settings on page 64 Video and Audio Control Buttons Depending on the Network Camera model and Network Camera configuration some buttons ma...

Страница 20: ...external speaker connected to the Network Camera Click this button Click this button to talk to people around the Network Camera Audio will project from the again to end conversation Mic Volume When the Mute function is not activated move the slider bar to adjust the microphone volume Mute Turn off the Mic volume on the local computer The button becomes the Mic On button after clicking the Mute bu...

Страница 21: ...the image being magnified To control the zoom level drag the slide bar To move to a different area you want to magnify drag the navigation screen Start MP4 Recording Click this button to record video clips in MP4 file format to your computer Press the Start MP4 Recording Stop MP4 Recording button to end recording When you exit the web browser video recording stops accordingly To specify the storag...

Страница 22: ...connecting to the server takes up additional bandwidth and the Network Camera allows up to ten simultaneous accesses UDP multicast This protocol allows multicast enabled routers to forward network packets to all clients requesting streaming media This helps to reduce the network transmission load of the Network Camera while serving multiple clients at the same time Note that to utilize this featur...

Страница 23: ...nd time suffix to the file name Select this option to append the date and time to the end of the file name Local Streaming Buffer Time Due to the unsteady bandwidth flow the live streaming may lag and not be very smoothly If you enable this option the live streaming will be stored on the camera s buffer area for a few seconds before playing on the live viewing window This will help you see the str...

Страница 24: ...tem log View parameters are not displayed in Basic Mode If you want to set up advanced functions please click Advanced Mode on the bottom of the configuration list to quickly switch to Advanced Mode In order to simplify the user interface the detailed information will be hidden unless you click on the function item When you click on the first sub item the detailed information for the first sub ite...

Страница 25: ...settings for the Network Camera such as the host name and system time It is composed of the following three columns System System Time and DI and DO When finished with the settings on this page click Save at the bottom of the page to enable the settings System Host name Enter a desired name for the Network Camera The text will be displayed at the top of the main page Turn off the LED indicators If...

Страница 26: ...nter the date and time manually Note that the date and time format are yyyy mm dd and hh mm ss Automatic The Network Time Protocol is a protocol which synchronizes computer clocks by periodically querying an NTP Server NTP server Assign the IP address or domain name of the time server Leaving the text box blank connects the Network Camera to the default time servers Update interval Select to updat...

Страница 27: ...ct to turn on the LED directly to a configurable brightness level or gradually light up to that level You can manually enter a percentage number in the text fields The white light LED can be manually lit using a button on the home page or passively triggered by a camera event OFF Select to turn off the LED directly or let the light gradually fade out ...

Страница 28: ...e main page Please refer to Main Page on page 24 White light Illuminators Determines if an operator or viewer can control the white LED Allow anonymous viewing If you check this item any client can access the live stream without entering a User ID and Password Manage User Administrators can add up to 20 user accounts 1 Input the new user s name and password 2 Select the privilege level for the new...

Страница 29: ...on option HTTP HTTPS or HTTPS only Note that you have to create and install a certificate first in the second column before clicking the Save button Create and Install Certificate Method Before using HTTPS for communication with the Network Camera a Certificate must be created first There are three ways to create and install a certificate Create self signed certificate automatically 1 Select this ...

Страница 30: ...below You can click Property to view detailed information about the certificate 5 Click Home to return to the main page Change the address from http to https in the address bar and press Enter on your keyboard Some Security Alert dialogs will pop up Click OK or Yes to enable HTTPS https 192 168 5 151 index html https ...

Страница 31: ...tificate Information will automatically be displayed in the third column as shown below You can click Property to see detailed information about the certificate Create certificate and install Select this option if you want to create a certificate from a certificate authority 1 Select this option 2 Click Create to open the Create Certificate page then click Save to generate the certificate ...

Страница 32: ...bar at the top of the page to allow pop ups 4 The pop up window shows an example of a certificate request 5 Look for a trusted certificate authority that issues digital certificates Enroll the Network Camera Wait for the certificate authority to issue a SSL certificate click Browse to search for the issued ...

Страница 33: ... and click Save a warning dialog will pop up 2 Click OK to disable HTTPS 3 The webpage will redirect to a non HTTPS page automatically If you want to create and install other certificates please remove the existing one To remove the signed certificate uncheck Enable HTTPS secure connection in the first column and click Save Then click Remove to erase the certificate NOTE ...

Страница 34: ...3 Managed device A network node on a managed network For example routers switches bridges hubs computer hosts printers IP telephones network cameras web server and database Before configuring SNMP settings on the this page please enable your NMS first SNMP Configuration Enable SNMPv1 SNMPv2c Select this option and enter the names of Read Write community and Read Only community according to your NM...

Страница 35: ...ach time the camera is connected to the LAN Use fixed IP address Select this option to manually assign a static IP address to the Network Camera 1 You can make use of VIVOTEK Installation Wizard 2 on the software CD to easily set up the Network Camera on LAN Please refer to Software Installation on page 11 for details 2 Enter the Static IP Subnet mask Default router and Primary DNS provided by you...

Страница 36: ...atically so that video streams can be sent out from a LAN To utilize of this feature make sure that your router supports UPnPTM and it is activated PPPoE Point to point over Ethernet Select this option to configure your Network Camera to make it accessible from anywhere as long as there is an Internet connection Note that to utilize this feature it requires an account provided by your ISP Follow t...

Страница 37: ...Error Router does not support UPnP port forwarding Steps to enable the UPnPTM user interface on your computer Note that you must log on to the computer as a system administrator to install the UPnPTM components 1 Go to Start click Control Panel then click Add or Remove Programs 2 In the Add or Remove Programs dialog box click Add Remove Windows Components 3 In the Windows Components Wizard dialog ...

Страница 38: ...ces Enabling UPnP port forwarding allows the Network Camera to open a secondary HTTP port on the router not HTTP port meaning that you have to add the secondary HTTP port number to the Network Camera s public address in order to access the Network Camera from the Internet For example when the HTTP port is set to 80 and the secondary HTTP port is set to 8080 refer to the list below for the Network ...

Страница 39: ... above When IPv6 is enabled by default the network camera will listen to router advertisements and be assigned with a link local IPv6 address accordingly IPv6 Information Click this button to obtain the IPv6 information as shown below If your IPv6 settings are successful the IPv6 address list will be listed in the pop up window The IPv6 address will be displayed as follows Link global IPv6 address...

Страница 40: ...address format Please refer to HTTP on page 45 for detailed information If you choose PPPoE as the Network Type the PPP0 address will be displayed in the IPv6 information column as shown below Manually setup the IP address Select this option to manually set up IPv6 settings if your network environment does not have DHCPv6 server and advertisements enabled routers If you check this item the followi...

Страница 41: ...sts authentication 2 Authenticator an access point or a switch A go between which restricts unauthorized end users from communicating with the authentication server 3 Authentication server usually a RADIUS server Checks the client certificate and decides whether to accept the end user s access request VIVOTEK Network Cameras support two types of EAP methods to perform authentication EAP PEAP and E...

Страница 42: ...sing 802 1X via a switch the authenticator The client offers its identity and client certificate which is then forwarded by the switch to the RADIUS Server which uses an algorithm to authenticate the Network Camera and returns an acceptance or rejection back to the switch 3 The switch also forwards the RADIUS Server s certificate to the Network Camera 4 Assuming all certificates are validated the ...

Страница 43: ...t include support for QoS The network video devices used in the network must be QoS enabled QoS models CoS the VLAN 802 1p model IEEE802 1p defines a QoS model at OSI Layer 2 Data Link Layer which is called CoS Class of Service It adds a 3 bit value to the VLAN MAC header which indicates the frame priority level from 0 lowest to 7 highest The priority is set up on the network switches which then u...

Страница 44: ...rovides 64 different class IDs It gives an indication of how a given packet is to be forwarded known as the Per Hop Behavior PHB The PHB describes a particular service level in terms of bandwidth queueing theory and dropping discarding the packet decisions Routers at each network node classify packets according to their DSCP value and give them a particular forwarding treatment for example how muc...

Страница 45: ...s are incorrectly assigned the following warning messages will be displayed To access the Network Camera on the LAN both the HTTP port and secondary HTTP port can be used to access the Network Camera For example when the HTTP port is set to 80 and the secondary HTTP port is set to 8080 refer to the list below for the Network Camera s IP address Access name for stream 1 3 This Network camera suppor...

Страница 46: ... not support server push technology therefore access to the camera will fail using http ip address http port access name for stream 1 3 HTTPS By default the HTTPS port is set to 443 It can also be assigned to another port number between 1025 and 65535 FTP The FTP server allows the user to save recorded video clips You can utilize VIVOTEK s Installation Wizard 2 to upgrade the firmware via FTP serv...

Страница 47: ...ailability of the RTSP streaming for the three authentication modes is listed in the following table Access name for stream 1 3 This Network Camera supports multiple streams simultaneously The access name is used to differentiate the streaming source If you want to use an RTSP player to access the Network Camera you have to set the video mode to H 264 MPEG 4 and use the following RTSP URL command ...

Страница 48: ...yed Multicast settings for stream 1 3 Click the items to display the detailed configuration information Select the Always multicast option to enable multicast for stream 1 3 Unicast video transmission delivers a stream through point to point transmission multicast on the other hand sends a stream to the multicast group address and allows multiple clients to acquire the stream at the same time by r...

Страница 49: ...cable and disconnect the DC power jack and then reconnect the power When you are performing the initial setup via LAN the wireless antenna can be left in place To set up a wireless connection with the camera 1 You must already have a wireless AP and wireless connection available Find out the name of your wireless network by a click on your Windows System Tray Jot down the name of the network 2 You...

Страница 50: ...e the following pages for more details You may enter the Configuration Network page to setup a DHCP or a static IP 5 You may then use the ping command to detect if your camera is switching from wired connection to wireless connection Open a command prompt window or click on Windows Start menu type cmd in the Run command field Ping the camera s LAN port IP address use the ping xxx xxx xx xx t argum...

Страница 51: ...llowing options Infrastructure Connect the Network Camera to the WLAN via an Access Point default setting Ad Hoc Connect the Network Camera directly to a host equipped with a wireless adapter in a peer to peer environment Channel While in infrastructure mode the channel is selected automatically to match the channel setting of the selected Access Point In Ad Hoc mode the channel must be manually s...

Страница 52: ...its The default setting is 64 bits Key format Hexadecimal or ASCII The fault setting is HEX HEX digits consist of the numbers 0 9 and the letters A F ASCII is a code for representing English letters as numbers from 0 127 except and the space character which are reserved Network Key Enter a key in either hexadecimal or ASCII format You can select different key lengths the acceptable input lengths a...

Страница 53: ... Wireless setting page and change the Wireless mode into Ad hoc Select the encryption mode and a Wireless mode channel 4 Configure the PC or laptop that is equipped with a wireless adaptor in the following way 4 1 Enter your Windows Control Panel Network and Internet Connections Network Connections 4 2 Select a Wireless Network Connection and right click on it to select the Properties command 4 3 ...

Страница 54: ...a new wireless connection 4 6 On the Properties window enter a name for the network and configure the Data encryption option 4 7 Click to select the ad hoc checkbox at the bottom of this window You may also configure a WEP network key for secure connection 4 8 Click OK when the setting is done You will return to the Properties window ...

Страница 55: ...t the Computer to computer ad hoc networks only checkbox 5 Return to the Wireless page and click on the Next button to proceed Depending on the connection quality of your wireless network the apply process may take several minutes and the connection should be available ...

Страница 56: ...lss Network Connection icon and select the View Available Wireless Networks command 7 Your wireless camera s SSID should appear on the list of Wireless Networks Left click to select and click on the Connect button at the lower right to proceed 8 Windows will start connecting to your network camera ...

Страница 57: ... for the connection to be established The process can take several minutes When done the connection status should be stated as Connected 10 Open a command prompt window Ping the camera s IP to ensure the connection is up and running ...

Страница 58: ...Express Link is more convenient and easy to set up Host Name Assignment Please follow the steps below to enable Express Link 1 Make sure that your router supports UPnP port forwarding and it is activated or you may see the following warning message Express Link is not supported under this network environment 2 Enter a host name for the network device and click Register If the host name has been us...

Страница 59: ...DDNS providers such as Dyndns org Dynamic Dyndns org Custom TZO com DHS org CustomSafe100 dyn interfree it Note that before utilizing this function please apply for a dynamic domain account first Safe100 net 1 In the DDNS column select Safe100 net from the drop down list Click I accept after reviewing the terms of the Service Agreement 2 In the Register column fill in the Host name xxxx safe100 ne...

Страница 60: ...a success message in the DDNS Registration Result column 3 Click Copy and all for the registered information will be uploaded to the corresponding fields in the DDNS column 4 Select Enable DDNS and click Save to enable the setting Forget key Click this button if you have forgotten the key to Safe100 net or CustomSafe100 Your account information will be sent to your email address Refer to the follo...

Страница 61: ...e and password to access the live video The user name will be displayed in the User ID column If the administrator allows clients to link to the webpage without a user name and password the User ID column will be empty There are some situations which allow clients access to the live video without a user name and password 1 The administrator does not set up a root password For more information abou...

Страница 62: ...plore or Quick Time Player Enable access list filtering Check this item and click Save if you want to enable the access list filtering function Filter Type Select Allow or Deny as the filter type If you choose Allow Type only those clients whose IP addresses are on the Access List below can access the Network Camera and the others cannot access On the contrary if you choose Deny Type those clients...

Страница 63: ...le Range This rule allows the user to assign a range of IP addresses to the Allow Deny List Note This rule is only applied to IPv4 For example Administrator IP address Always allow the IP address to access this device You can check this item and add the Administrator s IP address in this field to make sure the Administrator can always connect to the device IP address 192 168 2 x will be blocked ...

Страница 64: ...image flickering associated with fluorescent lights Note that after the power line frequency is changed you must disconnect and reconnect the power cord of the Network Camera in order for the new setting to take effect Video orientation Flip vertically reflect the display of the live video Mirror horizontally reflect the display of the live video Select both options if the Network Camera is instal...

Страница 65: ...ings Advanced Mode Click Image Settings to open the Image Settings page On this page you can tune the White balance Brightness Saturation Contrast Sharpness and Noice Reduction settings for the video White balance Adjust the value for the best color temperature Auto The Network Camera automatically adjusts the color temperature of the light in response to different light sources The white balance ...

Страница 66: ... video amplifier thermal noises often occur in the the dark area of an image or Impulse audio clicks and pops due to electromagnetic interference Select the type of noise to remove or select Both Faussian and Impulse and enter a value from 1 to 63 to set the degree of enhancement required You can click Preview to view the expected results or click Restore to recall the original settings without in...

Страница 67: ...Exposure Maximum Exposure Time Select a proper maximum exposure time according to the light source of the surroundings Shorter exposure times result in less light The exposure times are selectable for the following durations 1 30 second and 1 15 second Exposure level You can manually set the Exposure level which ranges from 1 to 8 dark to bright The default value is 4 Max gain Auto Gain Control Yo...

Страница 68: ...click Close to exit the page If you want to configure another sensor setting for a scheduled mode please click Profile to open the Sensor Settings Profile Settings page as shown below Please follow the steps below to setup a profile 1 Check Enable this profile 2 Enter a range of time for the Schedule mode 3 Configure Exposure settings in the second column Please refer to the previous page for deta...

Страница 69: ...eps below to set up those settings for a stream 1 Select a stream which you want to set up the viewing region 2 Select a Region of Interest from the drop down list the floating frame will resize accordingly If you want to set up a customized viewing region you can also resize and drag the floating frame to a desired position with your mouse 3 Choose a proper Output Frame Size from the drop down li...

Страница 70: ...in the Viewing Window click Save to enable the settings and click Close to exit the window The selected Output Frame Size will immediately be applied to the Frame size of video stream Then you can go back to the home page to test the settings Output Frame Size ...

Страница 71: ...ame size and lower bit rate for remote viewing on mobile phones and a larger video size and a higher bit rate for live viewing on web browsers Note that a larger frame size takes up more bandwidth Maximum frame rate This limits the maximum refresh frame rate per second Set the frame rate higher for smoothlier video quality If the power line frequency is set to 50Hz the frame rates are selectable a...

Страница 72: ... bandwidth usage Because the media contents are a combination of JPEG images no audio data is transmitted to the client There are three parameters provided in MJPEG mode to control the video performance Frame size You can set up different video resolution for different viewing devices For example set a smaller frame size and lower bit rate for remote viewing on mobile phones and a larger video siz...

Страница 73: ...t conditions Audio type Select audio codec and the bit rate Advanced Mode GSM ARM is designed to optimize speech quality and requires less bandwidth The bit rates are selectable from 4 75Kbps 5 15Kbps 5 90Kbps 6 7Kbps 7 4Kbps 7 95Kbps 10 2Kbps and 12 2Kbps G 711 also provides good sound quality and requires about 64Kbps Select pcmu μ Law or pcma A Law mode When completed with the settings on this ...

Страница 74: ...rted pixels by moving the Sensitivity and Percentage slide bar 4 Click Save to enable the settings 5 Select Enable motion detection to enable this function For example The Percentage Indicator will rise or fall depending on the variation between sequential images When motions are detected by the Network Camera and are judged to exceed the defined threshold the red bar rises Meanwhile the motion de...

Страница 75: ...of three motion detection windows can be configured on this page as well Please follow the steps below to set up a profile 1 Create a new motion detection window 2 Check Enable this profile 3 Manually enter a time range for Schedule mode 4 Click Save to enable the settings and click Close to exit the page This motion detection window will also be displayed on the Event Settings page You can go to ...

Страница 76: ...ight movements while smaller sensitivity settings will neglect them When the sensitivity is set to 70 the Network Camera defines the pixels in the purple areas as alerted pixels frame D Percentage is a value that expresses the proportion of alerted pixels to all pixels in the motion detection window In this case 50 of pixels are identified as alerted pixels When the percentage is set to 30 the mot...

Страница 77: ... Select Enable camera tampering detection 2 Enter the tamper trigger duration 10 sec 10 min The tampering alarm will be triggered only when the tampering factor the difference between current frame and pre saved background exceeds the trigger threshold 3 Set up the event source as Camera Tampering Detection on Application page Event Settings Server Settings how to send alarm message Media Settings...

Страница 78: ... be displayed automatically in this Preview field The following shows the homepage using the default settings Hide Powered by VIVOTEK If you check this item it will be removed from the homepage Logo Here you can change the logo at the top of your homepage Follow the steps below to upload a new logo 1 Click Custom and the Browse field will appear 2 Select a logo from your files 3 Click Upload to re...

Страница 79: ...r you to choose from The new layout will simultaneously appear in the Preview filed Click Save to enable the settings Font Color of the Video Title Font Color Background Color of the Control Area Font Color of the Configuration Area Background Color of the Configuration Area Background Color of the Video Area Frame Color Preset Patterns ...

Страница 80: ...ou want to change the color on the right hand side column 3 The palette window will pop up as shown below 4 Drag the slider bar and click on the left square to select a desired color 5 The selected color will be displayed in the corresponding fields and in the Preview column 6 Click Save to enable the settings 1 2 3 4 Color Selector Custom Pattern ...

Страница 81: ...t can be triggered by many sources such as motion detection PIR Passive Infra Red motion detector IP8133 IP8133W or external digital input devices When an event is triggered you can specify what type of action that will be performed You can configure the Network Camera to send snapshots or videos to your email address or FTP site ex Motion Detection Digital Input System Reboot Event Trigger ex Sna...

Страница 82: ...is option to enable the event setting Priority Select the relative importance of this event High Normal or Low Events with a higher priority setting will be executed first Detect next event after seconds Enter the duration in seconds to temporarily pause motion detection after a motion is detected This prevents event broadcast to be too frequently delivered An event is an action initiated by a use...

Страница 83: ...f the built in motion detection mechanism as a trigger source To enable this function you need to configure a Motion Detection Window first For more information please refer to Motion Detection on page 74 for details Periodically This option allows the Network Camera to trigger periodically for every other defined minute Up to 999 minutes are allowed Digital input This option allows the Network Ca...

Страница 84: ...ore effecive than video motion detection Shown below is the effective range of the PIR detector IP8133 and IP8133W only System boot This option triggers the Network Camera when the power to the Network Camera is disconnected Recording notify This option allows the Network Camera to trigger when the recording disk is full or when recording starts to rewrite older data Vertical 82 degree Horizontal ...

Страница 85: ...rs manually by clicking the on off button on the homepage Please configure 1 to 3 events before using this function Event Schedule Specify the period fo time in which the event will take effect Select the days of the week Select the recording schedule in 24 hr time format Action Define the actions to be performed by the Network Camera when a trigger is activated To set an event with recorded video...

Страница 86: ...hat it is not recommended to turn on the LED for an extended period of time Play Audio Clip You use the onboard microphone to record a short vocal message or upload audio files from your PC See Add Media in the later discussions The camera can then playback a recorded vocal message when an event is triggered Add Server Add Media Click Add Server to configure Server Settings For more information pl...

Страница 87: ...ork Camera will automatically send snapshots via e mail If you want to stop the event trigger you can click ON to turn it to OFF status or click Delete to remove the event setting To remove a server setting from the list select a server name from the drop down list and click Delete Note that only when the server setting is not being applied to an event setting can it be deleted To remove a media s...

Страница 88: ...ail when a trigger is activated Sender email address Enter the email address of the sender Recipient email address Enter the email address of the recipient Server address Enter the domain name or IP address of the email server User name Enter the user name of the email account if necessary Password Enter the password of the email account if necessary Server port The default mail server port is set...

Страница 89: ...older where the media file will be placed If the folder name does not exist the Network Camera will create one on the FTP server Passive mode Most firewalls do not accept new connections initiated from external requests If the FTP server supports passive mode select this option to enable passive mode FTP and allow data transmission to pass through the firewall To verify if the FTP settings are cor...

Страница 90: ... shown in a pop up window as below If successful you will receive a test txt file on the HTTP server Click Save to enable the settings then click Close to exit the page Network storage Select to send the media files to a network storage location when a trigger is activated Please refer to Network Storage Setting on page 97 for details Click Save to enable the settings then click Close to exit the ...

Страница 91: ... buffer area it temporarily holds data up to a certain limit Enter a number to decide how many images to capture before a trigger is activated Up to 7 images can be generated Send post event images Enter a number to decide how many images to capture after a trigger is activated Up to 7 images can be generated For example if both the Send pre event images and Send post event images are set to 7 a t...

Страница 92: ... set to 10 seconds the Network Camera continues to record for another 4 seconds after a trigger is activated Maximum file size Specify the maximum file size allowed File name prefix Enter the text that will be appended to the front of the file name For example Click Save to enable the settings then click Close to exit the page System log Select to send a system log when a trigger is activated Clic...

Страница 93: ...y date View Click this button to open a file list window This function is only for Network Storage NAS If you click View button of Network storage a file directory window will prompt for you to view recorded data on Network storage For detailed illustration please refer to the next page NOTE The Create folders by date time hour checkbox and the View button may not be available until you test the c...

Страница 94: ...ectory 2011 01 18 2011 01 18 Video Clip_58 mp4 Video Clip_59 mp4 Click to delete selected items Click to delete all recorded data Click to go back to the previous level of the directory The format is HH 24r Click to open the file list for that hour 2011 01 18 2011 01 18 Video Clip_58 mp4 Video Clip_59 mp4 The format is File name prefix Minute mm You can set up the file name prefix on Media Setting...

Страница 95: ...he camera close to you and record a vocal message using the onboard microphone To record a vocal message 1 Enter a name for the recording 2 Configure an elapse of time before the recording takes place after you click the Record button 3 Click on the Record button A recording progress window will prompt Click Stop to end the recording 4 Click Replay to ensure you have a satisfactory recording 5 Cli...

Страница 96: ...ur time on configuring the settings Please note that there is a limited number of customized scripts you can upload if the current amount of customized scripts has reached the limit an alert message will pop up If you need more information please ask for VIVOTEK technical support Click to upload a file Click to modify the script online ...

Страница 97: ... Server Settings page and follow the steps below to set up 1 Fill in the information for your server For example 2 Click Test to check the setting The result will be shown in the pop up window 1 2 3 4 Network storage path server name or IP address folder name User name and password for your server NOTE Before setting up this page please configure the Network Storage on the Server Settings page fir...

Страница 98: ...me control means that when there is alarm trigger the frame rate will raise up to the value you ve set on Video page Please refer to page 64 for more information If you enable adaptive recording on Camera A only when an event is triggered on Camera A will the server record the full frame rate streaming data otherwise it will only request the I frame data during normal monitoring thus effectively s...

Страница 99: ... to decide the duration of recording before and after a trigger is activated Priority Select the relative importance of this recording setting High Normal and Low Source Select the recording source stream 1 3 Trigger Schedule The server will start to record files on the local storage or network storage NAS according to the following recording schedule Recording Schedule Specify the recording durat...

Страница 100: ... 15 MBytes If you want to enable recording notification please click Application to set up Please refer to Trigger Recording notify on page 85 for detailed information When completed select Enable this recording Click Save to enable the setting and click Close to exit this page When the system begins recording it will send the recorded files to the Network Storage The new recording name will appea...

Страница 101: ...m log messages from the Network Camera An example is Kiwi Syslog Daemon Visit http www kiwisyslog com kiwi syslog daemon overview Follow the steps below to set up the remote log 1 In the IP address text box enter the IP address of the remote server 2 In the port text box enter the port number of the remote server 3 When completed select Enable remote log and click Save to enable the setting Curren...

Страница 102: ... User s Manual View Parameters Advanced Mode The View Parameters page lists the entire system s parameters in alphabetical order If you need technical assistance please provide the information listed on this page ...

Страница 103: ...ra in the address field to resume the connection Restore This feature allows you to restore the Network Camera to factory default settings Network Type Select this option to retain the Network Type settings please refer to Network Type on page 35 Daylight Saving Time Select this option to retain the Daylight Saving Time settings please refer to System on page 25 Custom Language Select this option ...

Страница 104: ...e Export files column click Export to export the daylight saving time configuration file from the Network Camera 2 A file download dialog will pop up as shown below Click Open to review the XML file or click Save to store the file for editing 3 Open the file with Microsoft Notepad and locate your time zone set the start and end time of DST When completed save the file In the example below DST begi...

Страница 105: ...ile Click Browse to upload a setting backup file Please note that the model and firmware version of the device should be the same as the setting backup file If you have set up a fixed IP or other special settings for your device it is not suggested to upload a settings backup file Upgrade Firmware This feature allows you to upgrade the firmware of your Network Camera It takes a few minutes to comp...

Страница 106: ...s displayed when you have selected an incorrect firmware file Starting firmware upgrade Do not power down the server during the upgrade The server will restart automatically after the upgrade is completed This will take about 1 5 minutes Wrong PKG file format Unpack fail Reboot system now This connection will close ...

Страница 107: ...or the server denoted with servername in the URL syntax description below that is replaced with the string myserver in the URL syntax example further down in the page URL syntax is denoted with the word Syntax written in bold face followed by a box with the referenced syntax as shown below For example name of the server is written as servername and is intended to be replaced with the name of the a...

Страница 108: ...tten exactly as they are named in the camera or video server The CGIs are organized in functionally related directories under the cgi bin directory The file extension cgi is required Syntax http servername cgi bin subdir subdir cgi ext parameter value parameter value Example Set digital output 0 to active http mywebserver cgi bin dido setdo cgi do0 1 ...

Страница 109: ...ontrol DI DO PTZ of the camera 4 operator anonymous viewer dido camctrl operator Operator access rights can modify most of the camera s parameters except some privileges and network options 6 admin anonymous viewer dido camctrl operator admin Administrator access rights can fully control the camera s operations 7 N A Internal parameters Unable to be changed by any external interfaces ...

Страница 110: ...up _ name If you do not specify any parameters all the parameters on the server will be returned If you specify only group the parameters of the related group will be returned When querying parameter values the current parameter values are returned A successful control request returns parameter pairs as follows Return HTTP 1 0 200 OK r n Content Type text html r n Context Length length r n r n par...

Страница 111: ...VIVOTEK User s Manual 111 Response HTTP 1 0 200 OK r n Content Type text html r n Context Length 33 r n r n network_ipaddress 192 168 0 123 r n ...

Страница 112: ... VALUE DESCRIPTION group _ name value to assigned Assign value to the parameter group _ name return return page Redirect to the page return page after the parameter is assigned The return page can be a full URL path or relative path according to the current path If you omit this parameter it will redirect to an empty page Note The return page can be a general HTML file htm html It cannot be a CGI ...

Страница 113: ...the IP address of server to 192 168 0 123 Request http myserver cgi bin admin setparam cgi network_ipaddress 192 168 0 123 Response HTTP 1 0 200 OK r n Content Type text html r n Context Length 33 r n r n network_ipaddress 192 168 0 123 r n ...

Страница 114: ... to a domain name shorter than n characters eg www ibm com email address n A string limited to an email address shorter than n characters eg joe www ibm com ip address A string limited to an IP address eg 192 168 1 1 mac address A string limited to contain a MAC address without hyphens or colons boolean A boolean value of 1 or 0 represents Yes or No True or False Enable or Disable value1 value2 va...

Страница 115: ...t to auto to use NTP to synchronize time datetime MMDDhhmmYYYY ss 6 6 Another current time format of the system ntp domain name ip address blank 6 6 NTP server Do not use skip to invoke default server for default value timezoneindex 489 529 6 6 Indicate timezone and area 480 GMT 12 00 Eniwetok Kwajalein 440 GMT 11 00 Midway Island Samoa 400 GMT 10 00 Hawaii 360 GMT 09 00 Alaska 320 GMT 08 00 Las V...

Страница 116: ...k 83 GMT 02 00 Israel 120 GMT 03 00 Baghdad Kuwait Riyadh Moscow St Petersburg Nairobi 121 GMT 03 00 Iraq 140 GMT 03 30 Tehran 160 GMT 04 00 Abu Dhabi Muscat Baku Tbilisi Yerevan 180 GMT 04 30 Kabul 200 GMT 05 00 Ekaterinburg Islamabad Karachi Tashkent 220 GMT 05 30 Calcutta Chennai Mumbai New Delhi 230 GMT 05 45 Kathmandu 240 GMT 06 00 Almaty Novosibirsk Astana Dhaka Sri Jayawardenepura 260 GMT 0...

Страница 117: ... privacybuttonof f boolean 6 6 0 enable privacy button function 1 disable privacy button function updateinterval 0 3600 86400 604800 2592000 6 6 0 to Disable automatic time adjustment otherwise it indicates the seconds between NTP automatic update intervals restore 0 positive integer 7 6 Restore the system parameters to default values after value seconds reset 0 positive integer 7 6 Restart the se...

Страница 118: ...stem parameters to default values except wireless settings This command can cooperate with other restoreexceptXYZ commands When cooperating with others the system parameters will be restored to default values except for a union of combined results capability_network_wireless 1 7 1 1 system info Subgroup of system info The fields in this group are unchangeable NAME VALUE SECURITY get set DESCRIPTIO...

Страница 119: ...ered capability ndi 0 do_i 0 ndo 1 product dependent boolean 1 7 0 Inactive normal 1 Active triggered capability ndo 0 wled_i 0 nwled 1 product dependent boolean 1 7 0 Inactive normal 1 Active triggered capability nwled 0 vi_i 0 nvi 1 product dependent boolean 1 7 Virtual input 0 Inactive 1 Active capability nvi 0 onlinenum_rtsp integer 6 7 Current number of RTSP connections onlinenum_httppush int...

Страница 120: ...ator admin 6 6 Indicate which privileges and above can control digital output capability ndo 0 privilege_wled product dependent view operator admin 6 6 Indicate which privileges and above can control white light LED capability nwled 0 user_i0_name string 64 6 7 User name of root user_i 1 20 _name string 64 6 7 User name user_i0_pass password 64 6 6 Root password user_i 1 20 _pass password 64 7 6 U...

Страница 121: ...port settings Ex Change HTTP port from 80 to 5556 and change RTP port for video from 5556 to 20480 Then set preprocess 9 to stop both service first cgi bin admin setparam cgi network_preprocess 9 network_http_port 5556 network_rtp_videoport 20480 type lan pppoe product dependent 6 6 Network connection type resetip boolean 6 6 1 Get ipaddress subnet router dns1 dns2 from DHCP server at next reboot ...

Страница 122: ...lled time Represented in EPOCH certificate_size integer 6 7 Certificate file size in bytes privatekey_exist boolean 6 6 Private key installed flag for TLS privatekey_time integer 6 7 Private key installed time Represented in EPOCH privatekey_size integer 6 7 Private key file size in bytes 7 6 2 QOS Subgroup of network qos_cos capability protocol qos cos 0 NAME VALUE SECURITY get set DESCRIPTION en...

Страница 123: ...ess 6 6 IPv6 DNS address allowoptional boolean 6 6 Allow manually setup of IP address setting 7 6 4 FTP Subgroup of network ftp NAME VALUE SECURITY get set DESCRIPTION port 21 1025 65535 6 6 Local ftp server port 7 6 5 HTTP Subgroup of network http NAME VALUE SECURITY get set DESCRIPTION port 80 1025 65535 6 6 HTTP port alternateport 1025 65535 6 6 Alternate HTTP port authmode basic digest 1 6 HTT...

Страница 124: ...e disable basic digest 1 6 RTSP authentication mode capability protocol rtsp 1 s0_accessname string 32 1 6 RTSP access name for stream1 capability protocol rtsp 1 and capability nmediastream 0 s1_accessname product dependent string 32 1 6 RTSP access name for stream2 capability protocol rtsp 1 and capability nmediastream 1 s2_accessname product dependent string 32 1 6 RTSP access name for stream3 ...

Страница 125: ...deoport 1025 65535 6 6 Video channel port for RTP capability protocol rtp_unicast 1 audioport 1025 65535 6 6 Audio channel port for RTP capability protocol rtp_unicast 1 7 6 10 PPPoE Subgroup of network pppoe capability protocol pppoe 0 NAME VALUE SECURITY get set DESCRIPTION user string 128 6 6 PPPoE account user name pass password 64 6 6 PPPoE account password 7 7 Wireless Group wireless capabil...

Страница 126: ...t keyselect 1 4 6 6 Default key number key1 password 32 6 6 WEP key1 for encryption The valid characters are A Z a z 0 9 key2 password 32 6 6 WEP key2 for encryption The valid characters are A Z a z 0 9 key3 password 32 6 6 WEP key3 for encryption The valid characters are A Z a z 0 9 key4 password 32 6 6 WEP key4 for encryption The valid characters are A Z a z 0 9 Domain U for USA C for Canada E f...

Страница 127: ...ip address 6 6 IPv4 address list Ipv6list_i 0 9 String 44 6 6 IPv6 address list 7 9 Video input Group videoin NAME VALUE SECURITY get set DESCRIPTION cmosfreq 50 60 4 4 CMOS frequency capability videoin type 2 whitebalance auto manual 4 4 auto indicates auto white balance manual indicates keep current value atwbvalue1 0 9999999999 4 4 Auto white balance value atwbvalue2 0 9999999999 4 4 Auto white...

Страница 128: ...leblc boolean 4 4 Enable backlight compensation agc 0 1 2 3 4 4 Set auto gain control to normal level middle or MAX level 0 2X 1 4X 2 8X 3 16X color 0 1 4 4 0 monochrome 1 color flip boolean 4 4 Flip the image mirror boolean 4 4 Mirror the image ptzstatus integer 1 7 A 32 bit integer each bit can be set separately as follows Bit 0 Support camera control function 0 not support 1 support Bit 1 Built...

Страница 129: ...video when choosing vbr in ratecontrolmode 0 99 100 is the customized manual input setting 1 worst quality 5 best quality s 0 m 1 _mpeg4 _qvalue 1 31 4 4 Manual video quality level input s 0 m 1 _mpeg4 _quant 0 or 99 s 0 m 1 _mpeg4 _qpercent 1 100 4 4 Using percentage to represent manual video quality level input s 0 m 1 _mpeg4_quant 100 s 0 m 1 _mpeg4_bitra te 1000 8000000 4 4 Set bit rate in bps...

Страница 130: ...aximum frame rate in fps for h264 s 0 m 1 _h264_profil e 0 2 1 4 Indicate H264 profiles 0 baseline 1 main profile 2 high profile s 0 m 1 _mjpeg_quan t 0 1 5 99 100 4 4 Quality of JPEG video 0 99 100 is the customized manual input setting 1 worst quality 5 best quality s 0 m 1 _mjpeg_qval ue 0 200 4 4 Manual video quality level input s 0 m 1 _mjpeg_quant 0 or 99 or 100 s 0 m 1 _mjpeg_qper cent 1 10...

Страница 131: ...time hh mm 4 4 Begin time of schedule mode endtime hh mm 4 4 End time of schedule mode maxexposure 15 30 4 4 Maximum exposure time enableblc boolean 4 4 Enable backlight compensation exposurelevel 1 8 4 4 Exposure level agc 0 1 2 3 4 4 Set auto gain control to normal level middle or MAX level 0 2X 1 4X 2 8X 3 16X 7 10 Video input preview The temporary settings for video preview Group videoinprevie...

Страница 132: ...ction strength 1 is minimum and 63 is maximum 7 12 Image setting for preview Group imagepreview_c 0 n 1 for n channel products NAME VALUE SECURITY get set DESCRIPTION brightness 5 5 4 4 Preview of brightness adjustment of image according to mode settings saturation 5 5 4 4 Preview of saturation adjustment of image according to mode settings Contrast 5 5 4 4 Preview of contrast adjustment of image ...

Страница 133: ...amr g711 4 4 Set audio codec type for input s 0 m 1 _gamr_bitrate 4750 5150 5900 6700 7400 7950 10200 12200 4 4 Set AMR bitrate in bps s 0 m 1 _g711_mode pcmu pcma 4 4 Set G 711 mode 7 14 Audio output per channel Group audioout_c 0 n 1 for n channel products capability audioout 0 NAME VALUE SECURITY get set DESCRIPTION gainpercentage 1 100 4 4 Gain of output 7 15 Motion detection settings Group mo...

Страница 134: ...n_i 0 2 _enable boolean 4 4 Enable motion window i 0 m 1 _win_i 0 2 _name string 14 4 4 Name of motion window i 0 m 1 _win_i 0 2 _left 0 320 4 4 Left coordinate of window position i 0 m 1 _win_i 0 2 _top 0 240 4 4 Top coordinate of window position i 0 m 1 _win_i 0 2 _width 0 320 4 4 Width of motion detection window i 0 m 1 _win_i 0 2 _height 0 240 4 4 Height of motion detection window i 0 m 1 _win...

Страница 135: ...ng 64 6 6 Your user name or email to login to the DDNS service provider provider _pas swordkey string 64 6 6 Your password or key to login to the DDNS service provider provider _ser vername string 128 6 6 The server name for safe100 This field only exists if the provider is customsafe100 7 18 UPnP presentation Group upnppresentation NAME VALUE SECURITY get set DESCRIPTION enable boolean 6 6 Enable...

Страница 136: ... v2 0 1 6 6 SNMP v2 enabled 0 for disable 1 for enable v3 0 1 6 6 SNMP v3 enabled 0 for disable 1 for enable secnamerw string 31 6 6 Read write security name secnamero string 31 6 6 Read only security name authpwrw string 8 128 6 6 Read write authentication password authpwro string 8 128 6 6 Read only authentication password authtyperw MD5 SHA 6 6 Read write authentication type authtypero MD5 SHA ...

Страница 137: ...nt string 7 1 6 Font color of video title theme_color_controlbackground string 7 1 6 Background color of control area theme_color_configbackground string 7 1 6 Background color of configuration area theme_color_videobackground string 7 1 6 Background color of video area theme_color_case string 7 1 6 Frame color 7 23 Privacy mask Group privacymask_c 0 n 1 for n channel product NAME VALUE SECURITY g...

Страница 138: ...audio inputs naudioout 0 positive integer 0 7 Number of audio outputs nvideoin positive integer 0 7 Number of video inputs nmediastream positive integer 0 7 Number of media stream per channels nvideosetting positive integer 0 7 Number of video settings per channel naudiosetting positive integer 0 7 Number of audio settings per channel nuart 0 positive integer 0 7 Number of UART interfaces nvideoin...

Страница 139: ...2 supports ePTZ or not The rest may be deduced by analogy npreset 0 positive integer 0 7 Number of preset locations protocol_https boolean 0 7 Indicate whether to support HTTP over SSL protocol_rtsp boolean 0 7 Indicate whether to support RTSP protocol_sip boolean 0 7 Indicate whether to support SIP protocol_maxconnectio n positive integer 0 7 The maximum allowed simultaneous connections protocol_...

Страница 140: ...0 7 Available maximum frame list videoin_codec mpeg4 mjpeg h264 0 7 Available codec list videoin_streamcodec integer 0 7 Each stream has its own support codec type It is bitwise depends on videoin_codec bit0 mpeg4 bit1 mjpeg bit2 h264 First stream support mjpeg and h264 bit0 0 bit1 1 bit2 1 videoout_codec a list of the available codec types separated by commas 0 7 Available codec list audio_aec bo...

Страница 141: ...11b boolean 0 7 Indicate whether to support wireless 802 11b wireless_s802dot11g boolean 0 7 Indicate whether to support wireless 802 11g wireless_beginchannel 1 14 0 7 Indicate the begin channel of wireless network wireless_endchannel 1 14 0 7 Indicate the end channel of wireless network wireless_encrypt_wep boolean 0 7 Indicate whether to support wireless WEP wireless_encrypt_wpa boolean 0 7 Ind...

Страница 142: ...ation of this entry enable 0 1 6 6 Enable or disable this event priority 0 1 2 6 6 Indicate the priority of this event 0 low priority 1 normal priority 2 high priority delay 1 999 6 6 Delay in seconds before detecting the next event trigger boot di pir motion seq recnotify tampering vi 6 6 Indicate the trigger condition boot System boot di Digital input pir PIR motion Video motion detection seq Pe...

Страница 143: ...ch weekday is scheduled One bit represents one weekday bit0 LSB Saturday bit1 Friday bit2 Thursday bit3 Wednesday bit4 Tuesday bit5 Monday bit6 Sunday For example to detect events on Friday and Sunday set weekday as 66 begintime hh mm 6 6 Begin time of the weekly schedule endtime hh mm 6 6 End time of the weekly schedule 00 00 24 00 sets schedule as always on action_do_i 0 ndo 1 _enable 0 1 6 6 En...

Страница 144: ...server ftp_passwd string 64 6 6 Password of the user ftp_port 0 65535 6 6 Port to connect to the server ftp_location string 128 6 6 Location to upload or store the media ftp_passive 0 1 6 6 Enable or disable passive mode 0 disable passive mode 1 enable passive mode email_address string 128 6 6 Email server address email_sslmode 0 1 6 6 Enable support SSL email_port 0 65535 6 6 Port to connect to t...

Страница 145: ...me suffix 0 Do not add snapshot_preevent 0 7 6 6 Indicates the number of pre event images snapshot_postevent 0 7 6 6 The number of post event images videoclip_source integer 6 6 Indicate the source of media stream 0 means the first stream 1 means the second stream and etc 2 means the third stream and etc 3 means the fourth stream and etc videoclip_prefix string 16 6 6 Indicate the prefix of the fi...

Страница 146: ...iority 2 indicates high priority source 0 2 6 6 Indicate the source of media stream 0 means the first stream 1 means the second stream and so on limitsize 0 1 6 6 0 Entire free space mechanism 1 Limit recording size mechanism cyclic 0 1 6 6 0 Disable cyclic recording 1 Enable cyclic recording notify 0 1 6 6 0 Disable recording notification 1 Enable recording notification notifyserver 0 31 6 6 Indi...

Страница 147: ...6 6 Indicate the prefix of the filename cyclesize 16 6 6 The maximum size for cycle recording in Kbytes when choosing to limit recording size reserveamount 0 15000000 6 6 The reserved amount in Mbytes when choosing cyclic recording mechanism dest 0 6 6 The destination to store the recorded data 0 means the index of the network storage adaptive_enable 0 1 6 6 Indicate whether the adaptive recording...

Страница 148: ...rmation stateorprovincename string 128 6 6 State or province name in the certificate information localityname string 128 6 6 The locality name in the certificate information organizationname string 64 6 6 Organization name in the certificate information unit string 32 6 6 Organizational unit name in the certificate information commonname string 64 6 6 Common name in the certificate information val...

Страница 149: ...et DESCRIPTION on_mode 0 1 1 6 The style to turn on white light LED 0 Directly 1 Fade in off_mode 0 1 1 6 The style to turn off white light LED 0 Directly 1 Fade out direct_brightness 1 100 1 6 Brightness percentage of white light LED to reach as on_mode is 0 fade_brightness 1 100 1 6 Brightness percentage of white light LED to reach as on_mode is 1 7 34 Audio clip Group audioclip_i 0 19 PARAMETER...

Страница 150: ...rmal state 1 Active triggered state Example Drive the digital output 1 to triggered state and redirect to an empty page http myserver cgi bin dido setdo cgi do1 1 8 2 Query Status of the Digital Input capability ndi 0 Note This request requires Viewer privileges Method GET POST Syntax http servername cgi bin dido getdi cgi di0 di1 di2 di3 If no parameter is specified all of the digital input statu...

Страница 151: ...rivileges Method GET POST Syntax http servername cgi bin dido getdo cgi do0 do1 do2 do3 If no parameter is specified all the digital output statuses will be returned Return HTTP 1 0 200 OK r n Content Type text plain r n Content Length length r n r n do0 state r n do1 state r n do2 state r n do3 state r n where state can be 0 or 1 Example Query the status of digital output 1 Request http myserver ...

Страница 152: ...resolution 0 The resolution of the image quality 1 5 3 The quality of the image streamid 0 m 1 1 The stream number The server will return the most up to date snapshot of the selected channel and stream in JPEG format The size and quality of the image will be set according to the video settings on the server Return HTTP 1 0 200 OK r n Content Type image jpeg r n Content Length image size r n binary...

Страница 153: ...lue The password of the new user to add or that of the old user to modify The default value is an empty string privilege value The privilege of the user to add or to modify viewer Viewer privilege operator Operator privilege admin Administrator privilege return return page Redirect to the page return page after the parameter is assigned The return page can be a full URL path or relative path accor...

Страница 154: ... servername cgi bin admin ipfilter cgi method add v4 v6 ip ipaddress index valu e return return page http servername cgi bin admin ipfilter cgi method del v4 v6 index value return return page PARAMETER VALUE DESCRIPTION type NULL Get IP filter type allow deny Set IP filter type method addv4 Add IPv4 address into access list addv6 Add IPv6 address into access list delv4 Delete IPv4 address from acc...

Страница 155: ...cgi bin admin ctrlevent cgi x sessioncookie string 22 content type application x vvtk tunnelled pragma no cache cache control no cache content length 32767 expires Sun 9 Jam 1972 00 00 00 GMT User must use GET and POST to establish two channels for downstream and upstream The x sessioncookie in GET and POST should be the same to be recognized as a pair for one session The contents of upstream shou...

Страница 156: ...DP You can get the SDP by HTTP GET When using scalable multicast Get SDP file which contains the multicast information via HTTP 8 11 Open the Network Stream Note This request requires Viewer access privileges Syntax For HTTP push server MJPEG http servername network_http_s 0 m 1 _accessname For RTSP MP4 the user needs to input the URL below into an RTSP compatible player rtsp servername network_rt...

Страница 157: ...0 milliseconds setting it to trigger state Note that when the virtual input is waiting for next state it cannot accept new requests return return page Redirect to the page return page after the request is completely assigned The return page can be a full URL path or relative path according the current path If you omit this parameter it will redirect to an empty page Return Code Description 200 The...

Страница 158: ...VIVOTEK 158 User s Manual Examples 1 setvi cgi vi0 0 15000 1 2 setvi cgi vi0 1 Request 2 will not be accepted during the execution time 15 seconds ...

Страница 159: ...and alarm PIR Passive Infrared Sensor for human detection IP8133 33W White light illuminators when event triggered IP8133 33W Event notification using HTTP SMTP or FTP Local recording of MP4 file Alarm and Event Management Muilti level user access with password protection IP address filtering Wireless WEP WPA PSK WPA2 IP8133W WPS Wi Fi Protected Setup IP8133W HTTPS encrypted data transmission Secu...

Страница 160: ...ED UNDER THE AMR NB STANDARD PATENT LICENSE AGREEMENT WITH RESPECT TO THE USE OF THIS PRODUCT THE FOLLOWING LICENSORS PATENTS MAY APPLY TELEFONAKIEBOLAGET ERICSSON AB US PAT 6192335 6275798 6029125 6424938 6058359 NOKIA CORPORATION US PAT 5946651 6199035 VOICEAGE CORPORATION AT PAT 0516621 BE PAT 0516621 CA PAT 2010830 CH PAT 0516621 DE PAT 0516621 DK PAT 0516621 ES PAT 0516621 FR PAT 0516621 GB P...

Страница 161: ...nt off and on the user is encouraged to try to correct the interference by one or more of the following measures Reorient or relocate the receiving antenna Increase the separation between the equipment and receiver Connect the equipment into an outlet on a circuit different from that to which the receiver is connected Consult the dealer or an experienced radio TV technician for help Shielded inter...

Отзывы: