background image


User Manual


- English


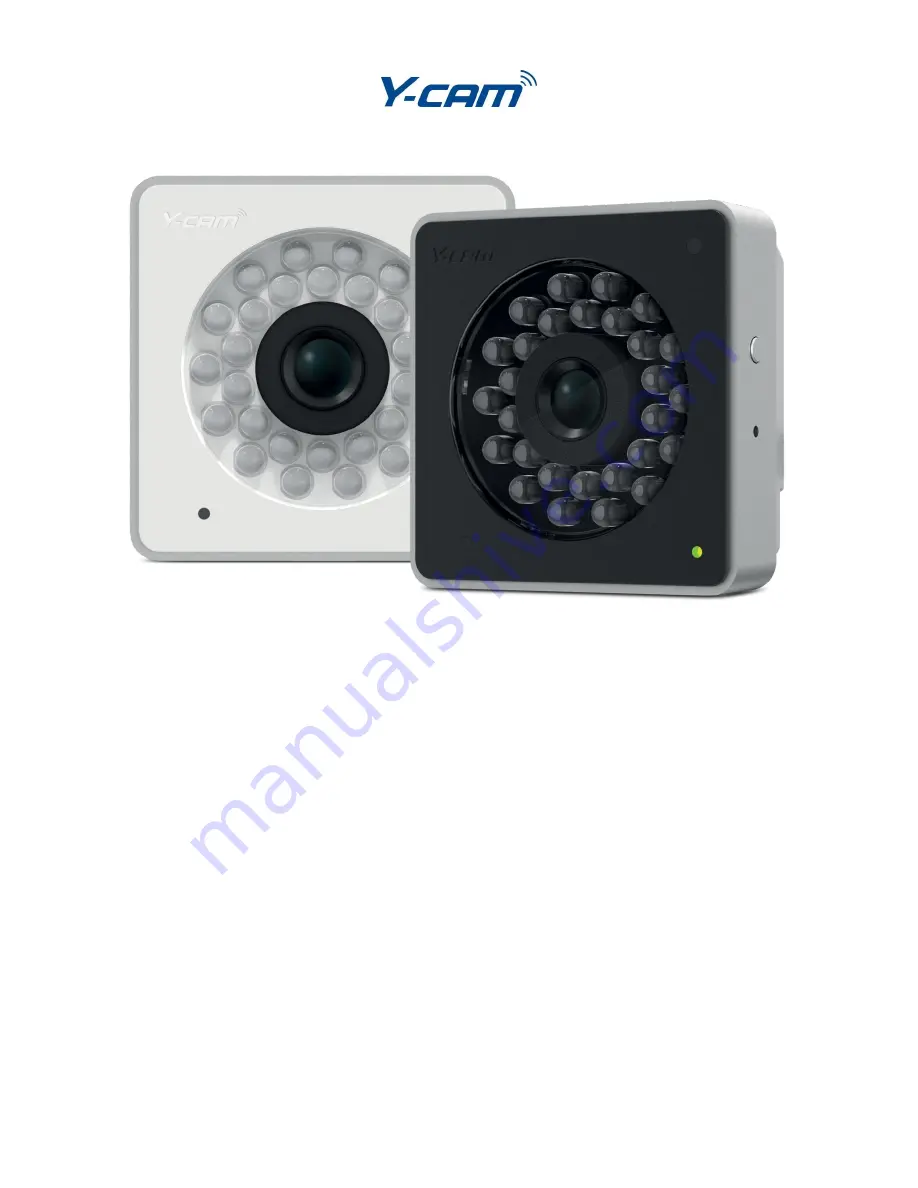
This manual applies to the following Y-cam products: 


Y-cam Cube 

Y-cam Cube 720 

Y-cam Cube 1080  

White:

 YCW005 

Black:

 YCB005


White:

 YCWHD5 

Black:

 YCBHD5 

White:

 YCWHD6


Black:

 YCBHD6 


Features and operations listed in this manual depend on the specific model. 

Each cameras model name can be found on the reverse of the camera. 


Please read this manual carefully before attempting to install or operate this product.  

Please retain this manual for your future reference.  This User Manual is a work-in-progress and is constantly being updated.  

You are invited to check the website regularly for updated versions. 


V1.0 

Summary of Contents for Cube YCW005

Page 1: ...erations listed in this manual depend on the specific model Each cameras model name can be found on the reverse of the camera Please read this manual carefully before attempting to install or operate this product Please retain this manual for your future reference This User Manual is a work in progress and is constantly being updated You are invited to check the website regularly for updated versi...

Page 2: ...Y CAM SETUP 20 5 0 WELCOME TO YOUR Y CAM 21 5 1 LIVE VIEW USING INTERNET EXPLORER 23 5 1 1 EXPLANATION OF OPERATING BAR 24 5 2 LIVE VIEW USING FIREFOX SAFARI AND OTHER BROWSERS 25 6 0 Y CAM SETTINGS 26 6 1 QUICK SETUP WITH THE WIZARD 28 6 2 SYSTEM PAGE 29 6 3 SUPPORT PAGE 30 6 4 REBOOT 31 6 5 CAMERA MENU 32 6 5 1 CAMERA SETUP 33 6 5 2 STREAM SETUP 34 6 5 3 OSD SETUP 36 6 5 4 NIGHT VISION SETUP 37 ...

Page 3: ...SNAPSHOT TO STORAGE PERIODICALLY 68 6 8 3 9 RECORD TO STORAGE ON ALARM 69 6 8 3 10 RECORD TO STORAGE CONTINUOUSLY 70 6 8 3 11 SEND FILES IN STORAGE TO FTP SERVER 71 6 9 TOOLS MENU 72 6 9 1 SYSTEM IDENTITY 72 6 9 2 USER MANAGEMENT 73 6 9 3 DATE TIME 74 6 9 4 BACKUP AND RESET 75 6 9 5 FIRMWARE UPGRADE 76 7 0 ADVANCED SETTINGS 78 7 1 MANUALLY ENTERING TCP IP SETTINGS FOR A CAMERA 78 7 2 PROXY SERVER ...

Page 4: ...business network or Wi Fi The Y cam also comes with motion detection software that can generate alarm triggers via e mail and by uploading images straight to a website Notice This product may cause interference with other wireless equipment that operate at 2 4GHz ISM band In the event of interference please turn off one of the devices or move it to a safe distance Product Assurance This 2 4GHz wir...

Page 5: ...o try to correct the interference by one or more of the following measures Reorient or relocate the receiving antenna Increase the separation between the equipment and the receiver Connect the equipment into an outlet on a circuit different from that to which the receiver is connected Consult the dealer or an experienced radio TV technician for help This device complies with Part 15 of the FCC Rul...

Page 6: ...T put this product near any medical equipment Radio waves might potentially cause breakdown of electrical medical equipment 3 This product should be placed at least 1 foot away from any heart pacemaker Radio waves might potentially influence a heart pacemaker 4 DO NOT use this product for any illegal activities It is the user s responsibility to ensure that the usage of this camera is of a legal n...

Page 7: ...atible with that of the device to avoid potential damage Please note Y cam Power Supplies are not interchangeable The Power Adaptor supplied with your Y cam should not be used with other models of Y cam and may cause product failure for other products Always check the voltage of the Power Supply you are using with the corresponding model ...

Page 8: ...ar water unless the camera is specified as waterproof 9 Do not use the camera in the places which are enclosed by metal The surrounding metal may shield the electromagnetic waves and result in failure of signal reception 10 Please follow your local government environment protection policies 11 Please turn off the power when left unused 12 Do not disassemble or attempt to repair the camera doing so...

Page 9: ...r Y cam product before set up begins as settings may be lost To ensure that you have the most recent firmware please visit http www y cam com 2 New versions of the software available on the Setup CD may also be available to ensure that you have the most recent versions please visit http www y cam com 3 It is recommended that Y cam products are not installed near microwave ovens or DECT phones cord...

Page 10: ...rnet access to your Y cam is required PC Requirements Processor Intel Pentium III 800MHz or Higher Pentium IV 2GHz or higher recommended Memory RAM 128Mb 256Mb or higher recommended Operating System Windows 2000 XP Vista Windows 7 Web Browser Internet Explorer Version 5 5 or above Mozilla Firefox Google Chrome Plug ins QuickTime for non IE browsers Mac Requirements Processor 800MHz PowerPC G4 or I...

Page 11: ... 1 7 EU Environmental Protection Waste electrical products should not be disposed of with household waste Please recycle where facilities exist Check with your Local Authority or retailer for recycling advice ...

Page 12: ...Page 12 2 0 EXPLORING YOUR Y CAM 2 1 Y cam Cube range at a glance Applies to products YCW005 YCB005 YCWHD5 YCBHD5 YCWHD6 YCBHD6 ...

Page 13: ...D5 YCWHD6 YCBHD6 To power the Cube using Y cam Cube PoE Dongle accessory sold separately connect the camera to the dongle with supplied miniUSB cable and then connect the Ethernet cable to Ethernet port on the PoE Dongle Note To power the camera using PoE a PoE 802 3af compatible switch is required ...

Page 14: ...orage menu MicroSD Important Notes and Information 1 There is a limit to the number of rewrites possible on any MicroSD memory card If you notice the card becoming slow or sluggish after a reasonable usage you will probably need to replace the microSD memory card You should try to avoid purchasing second hand memory cards 2 If the card is not recognized by the Y cam try formatting the microSD card...

Page 15: ...emory card slot can be found on the side of the Y cam The card can only be inserted into the camera with the golden pins of the microSD card facing the front of the camera The SD card should not be forced into the SD card slot as this may damage the Y cam ...

Page 16: ... Ethernet network cable plug this in to the USB to Ethernet cable supplied with your camera Once connected please plug in the USB cable directly into the Y cam The USB port will only fit one way so please ensure not force this into the socket as this may damage the Y cam and void your warranty Using the Power Adaptor supplied plug one end in to the Power Connection socket on the Y cam Plug the oth...

Page 17: ... and displays any cameras it finds It s very useful if you ever forget the address of you camera or in this case when you first install it 4 1 Y cam Software Installation for Windows 1 Insert the Setup CD into your CD drive and the installation screen should appear automatically If it doesn t navigate to your CD drive on your computer and then run Autorun exe 2 Click on Install Y cam Setup and the...

Page 18: ... want to change the default folder click Change to replace otherwise click Next 4 Click Install to install the Y cam Setup utility 5 Click Finish to end the installation You should now find a Y cam icon on your Desktop ...

Page 19: ...ion 3 Select Firewall tab then click Advanced 4 Make sure the check box next to Block UDP Traffic is un ticked then click Ok 5 Quit System Preferences and test the Y cam Setup software again OSX 10 5 Leopard 1 Click on System Preferences 2 Click on Security in the Personal section 3 Select the Firewall tab 4 Select Allow all incoming connections 5 Close the window and wait for a few seconds around...

Page 20: ...sh to search for cameras again Refresh Searches your local network for cameras Setup Select the required camera and click Setup to configure the network settings for the camera Open Select the required camera and click Open to access the camera via a web browser Exit Click Exit to close the Y cam Setup window Anytime you lose the IP address of your Y cam camera you can run the Setup software to ea...

Page 21: ...ious settings The address in the web browsers address bar should look something like http 192 168 1 50 this is your cameras internal IP address Accessing this homepage is a common way to access the camera when you are using it on your local network so it may be worth writing down the address that is displayed in your web browsers address bar or bookmarking it Ctrl D so you can come back later Of c...

Page 22: ...recommended you change your password as soon as you are logged in to avoid unauthorised access to the camera Make a note of the password somewhere safe as the only way to reset the password is to reset the cameras so all settings will be lost Please note The password can be any mixture of lower and uppercase alpha numeric characters Extended characters are not permitted ...

Page 23: ...ted to install an ActiveX Control Please follow the on screen instructions to download and install this control You will then view the following screen The two links at the top of the screen are Home and Settings Home This takes you back to your Y cam Homepage Settings This will take you to the cameras internal settings Please view the next page for an explanation of the Operating Bar settings ...

Page 24: ...nable video recording to your local computer Once finished press the button again to stop recording The video clip will be saved by default to the Videos directory 3 Settings The Settings button allows you to set the location where the snapshot and the video clips will be saved 1 Zoom Click on the button and the cursor turns to a magnifier Move the magnifier to the desired location and click on an...

Page 25: ...led on your system to record videos directly from the web browser if you are using a program other than Internet Explorer The links at the top of the screen are Home Settings Secondary Stream and Motion JPEG Home This takes you back to your Y cam Homepage Settings will take you to the cameras internal settings Secondary Stream This is set via your settings and is useful if you need a lower resolut...

Page 26: ...Settings word from your Live View or click on the word Settings from the Y cam Homepage This is the default Settings screen The Menu Panel contains a range of dropdown sections which expand and contract depending on selection Please note If you are installing the camera for the first time or after a reset to factory defaults you are advised to change the cameras default password as per the message...

Page 27: ...sswords that are easy to guess such as password admin 123456 ycam or your personal details Please note Keep this password safe The only way to recover from a lost password is to reset the camera back to its default settings and this will wipe all other settings Once you have typed your password twice click Save The system will then ask you to login again You should then see the following screen ...

Page 28: ...the Settings screen click on Wizard in the Header Menu The Wizard will launch in a new window Follow the simple instructions on the screen and enter the required details clicking next to proceed through each step With this Wizard you will be able to set the Name of Camera Quality of Picture you wish to view Time Zone System Time Wi Fi Setup TCP IP Setup This should help you get your camera setup a...

Page 29: ...ent status and strength of your wireless connection if in use IP address The internal IP address of your camera so you can access it on your local network DNS Servers If this option is empty it may prevent your camera from sending email alerts Enter the DNS in the TCP IP menu if needed DDNS If you do not have a static IP address a DDNS service helps you access your camera easily from outside your ...

Page 30: ...t is available for your Y cam product at http support y cam com Our Support Centre offers help by ticket support as well as a Knowledge Base of common problems and advanced settings Free Technical Support is available for your Y cam product by email helpdesk y cam com Connect discuss Y cam with other Y cam users http y cam com forum You can even connect with us via Twitter and Facebook we are happ...

Page 31: ... in the Header Menu to access the Camera Reboot page Click Reboot to restart the Y cam Rebooting the camera will retain all the settings and configurations A reboot is normally necessary when you insert a microSD card into the camera ...

Page 32: ...he Camera menu is located on the right of the Settings screen When you click on the word Camera a sub menu of camera setup options will be displayed Please note The Night Vision Setup option will not be available on all models ...

Page 33: ... should be set according to the mains frequency of the country the camera is being used in For UK this would be 50Hz For the USA this would be 60Hz Enable image mirror Displays a mirrored view of the video Enable image flip vertical Display video upside down useful if you have installed the camera upside down Microphone Microphone Enables or disables the built in microphone Volume Adjusts the sens...

Page 34: ...s will normally suffice for most users There are a number of video streams available You can configure settings for the primary and an optional secondary video stream Configuring a secondary stream is useful for providing a video stream that is at a lower resolution than the primary stream to third party devices or software Some devices and software require lower resolution The Mobile stream is si...

Page 35: ...dth Please select the appropriate settings according to your connection speed and network traffic If you are experiencing jerky video it may be necessary to decrease the bitrate For the Mobile Stream the bitrates are listed a lot lower but retain the same principle MJPEG Quality This sets the quality of the video when viewing the camera using Motion JPEG without audio It can be from 20 to 100 wher...

Page 36: ... in the camera and therefore the time and date may be incorrect unless the camera is synchronized to a time and date server on the internet This is accessible under the Tools menu and will be covered in more detail in the manual Display system name Set the OSD to display the System Name of the camera The system name can be modified from the System Identity page accessible under the Tools menu and ...

Page 37: ...to monochrome when the IR LEDs are turned on On switches the video to monochrome irrelevant of the status of the IR LEDs Off forces the Y cam to stay in colour mode even when the IR LEDs are on Moonlight Mode Turns Moonlight mode on or off or set it to automatic The Moonlight feature superimposes frames in order to brighten the image being viewed This is also known as frame integration In Auto the...

Page 38: ...Page 38 6 6 Network Menu The Network menu is located on the right of the Settings screen When you click on the word Network a sub menu of network setup options will be displayed ...

Page 39: ...nter your Wi Fi network details manually instructions on how to do this are below SSID Type the ID of the wireless network you want to connect to or an easier option is to click Search and all available Wireless Networks in range will be displayed If your network isn t listed move the camera closer to your wireless router or access point Mode Infrastructure mode or Adhoc mode Adhoc Mode Select Adh...

Page 40: ...ys in Hex format Encryption type Select either TKIP or AES for your default encryption setting WEP WPA key Type the encryption key that matches that of your router You will need to enter this twice Once you have entered your settings click Apply to save them If you have entered different keys when retyping them or the key doesn t match the length or type of characters required by the encryption ty...

Page 41: ...your computer you will need to setup the Y cam in Adhoc mode In order to view the Y cam directly from your computer you first need to configure the wireless device in your computer according to the Y cam settings above Once Adhoc has been selected select a Security Mode and type in a connection key and click Apply ...

Page 42: ...hrough these means press the WPS button located on your router and then the WPS button located on the side of the Cube camera the power light on the camera will flash blue please wait until the light becomes solid red before unplugging the cable This will establish the connection Note The Push Button option should be enabled on the router for this function to work ...

Page 43: ...tically DHCP Use the following IP address Select this option when a fixed IP is required IP address Type the IP address of your camera Required Subnet mask Type the subnet mask Required Default gateway Type the default gateway Required Primary DNS IP address Type the IP address of the primary DNS server Required Secondary DNS IP address Type the IP address of the secondary DNS server if necessary ...

Page 44: ...ovider from the drop down list then click Register This will take you to the service provider s website where you can register your own personal host name Please follow the instructions on the provider s site and then return to this page to enter the details Host Name Enter the host name you have registered e g yourname dtdns net User Name Enter the user name for the account you registered with th...

Page 45: ...tion Refer to your router manual for further details External HTTP RTSP port range By default this port range is 8150 8350 The ports are assigned in order so if you only have one camera attached to your system the chosen port will be 8150 for the first camera 8151 for the second and so on Every camera will remember its port and it will automatically use this port if still available whenever it is ...

Page 46: ...ernet connection The external address using DDNS is made up of two parts your DDNS account address and the port you opened via UPnP or manually For example DDNS Host name account http yourname dtdns com Port 8150 So with the above information your camera would have the address of http yourname dtdns com 8150 Open any internet browser on your computer and type your own DDNS account name followed by...

Page 47: ...f your broadband connection uses a static IP address to deliver the internet to your house In this case your camera will be available at for example http IPADDRESS PORTNUMBER Example http 86 123 123 123 8150 You can find your external IP address by visiting http www myipaddress com ...

Page 48: ...over a series of ports and sometimes the default ports used by the Y cam are blocked from access over the Internet therefore these ports need to be made accessible This is achieved using the Port Forwarding function on your router The ports used by the camera must be opened through the router for remote access to your Y cam Check your router s user manual for specific instructions on how to open a...

Page 49: ...Page 49 6 7 STORAGE The Storage menu is located on the right of the Settings screen When you click on the words Storage a sub menu of options will be displayed ...

Page 50: ...enable storage option Storage Select Select whether you want to record on NAS or microSD card Store directory This is the folder that videos will be saved to Max Space Storage capacity the camera will use on the chosen storage Max files The maximum number of files for all the videos can be recorded before overwriting Click Apply to confirm your setting ...

Page 51: ...h where to save the files on NAS Drive up to a maximum of 2 directory levels Authorization1 Select whether authentication is required by the NAS Drive User name Password Type the user name and password of the NAS Drive This field is required if your NAS Drive requires authentication Click Apply to confirm your setting ...

Page 52: ...ction Snapshot at Interval Enables you to view and delete all the snapshots which were recorded on periodical basis Record on Alarm Enables you to view and delete all the videos which were recorded upon motion detection Continuous Record Enables you to view and delete all the videos recorded according to the continuous record schedule The browse storage page shows a summary of all the files saved ...

Page 53: ... will be lost after format Logon to the camera under Settings Storage Format SD card Note Before the SD card is formatted the Format SD card page will display status as Not Ready The SD card format can take a few minutes depending on the size of the SD card ...

Page 54: ...Page 54 6 8 TASK 6 8 1 Motion Detection Motion Detection can trigger an alarm that sends images via e mail or FTP File Transfer Protocol You can set up to four different Motion Detection windows ...

Page 55: ...ects motion Lower sensitivity means the camera is less likely to detect motion Higher sensitivity means the camera is more likely to detect motion Note Sliding the Sensitivity bar to the left will decrease the sensitivity of the motion detection i e More movement is required to trigger the alarm The best way to configure these settings is to adjust the settings and have someone walk in front of th...

Page 56: ...itivity means the camera is more likely to detect motion Note Sliding the Sensitivity bar to the left will decrease the sensitivity of the motion detection i e More movement is required to trigger the alarm The best way to configure these settings is to adjust the settings and have someone walk in front of the camera until your feel you are getting the required results This trial and error method ...

Page 57: ...can set up to 4 schedules and you can use these to send alarms to different places such as emails FTP or SD card Schedule Setup Options Schedule ID Select the ID you can save up to four schedules and use them for different purposes Everyday Activate the alarm daily on specified times Un ticking this box will display the days of the week See screenshot Always Alarm is always activated Range Activat...

Page 58: ...various tasks you can enable on your Y cam This section will explain the various tasks and their functions Enable Enable task Schedule Option to choose always or set a particular schedule Task Task function Click Apply to confirm your setting ...

Page 59: ... that the camera should keep sending images at when an alarm is triggered Alarm interval This is the number of seconds for which the camera should stop sending e mail alerts after the first set Setting the time to 0 disables this feature SMTP server name Type the name or IP address of the SMTP server you want to use for sending the e Mails Please note that some networks do not allow e mail relayin...

Page 60: ... address Type the recipients e mail addresses for who you want the emails to be sent to Up to 3 addresses can be entered Subject Subject of the e mail that is sent Entering a relevant subject will help identify the alarm better i e Garage Alarm Message Type the text you wish to appear in the e mail E g this is to notify you that your alarm has been triggered Notes Email settings can be obtained fr...

Page 61: ... IP address of the SMTP server you want to use for sending the e Mails Please note that some networks do not allow e mail relaying Check with your system administrator or Internet service provider for more details SMTP server port The port number of the e mail server default is 25 Secure SSL connection Select whether your SMPT server requires an SSL connection Authentication Select whether authent...

Page 62: ... British Telecom BT is a good example of this Click Apply to confirm your setting Some email server settings to use your Y cam with popular email providers gmail com SMTP server name smtp gmail com SMTP server port 465 Secure SSL Yes Authentication Yes Username YourUserName gmail com Password xxxxxxx gmx com SMTP server name smtp gmx com SMTP server port 587 Secure SSL No Authentication Yes Userna...

Page 63: ...the name or IP address of the FTP server FTP server port The port number of the FTP server default is 21 Authentication Select whether authentication is required by the FTP server Choose No for anonymous access User name Type your FTP user name Password Type your FTP password Re type password Re type your password Passive mode Switch passive mode on or off This is required on some FTP servers Depe...

Page 64: ...The port number of the FTP server default is 21 Authentication Select whether authentication is required by the FTP server Choose No for anonymous access User name Type your FTP user name Password Type your FTP password Re type password Re type your password Passive mode Switch passive mode on or off This is required on some FTP servers Depends on your FTP server settings Keep Alive Time period fo...

Page 65: ...tting the time to 0 disables this feature and an HTTP alert is sent on every motion alert detected Sending URL Input the URL where the camera shall forward alarm Authentication Select whether authentication is required by the FTP server User name Type your HTTP user name Password Type your HTTP password Re type password Re type your password Click Apply to confirm your settings ...

Page 66: ...rval Time interval between HTTP sending Sending URL Input the URL to which the camera will send an alarm to User name Type your HTTP user name Password Type your HTTP password Re type password Re type your password Click Apply to confirm your settings ...

Page 67: ...The number of frames per seconds that the camera should keep sending images at when an alarm is triggered Alarm interval Number of seconds for which the camera should stop sending e mail alerts after the first set Setting the time to 0 disables this feature Image file name Name of file image snap shots are saved to Suffix of file name Choose between Sequence number and Date Click Apply to confirm ...

Page 68: ...e number of seconds that the camera should keep sending images after motion stops Snapshot frame rate The number of frames per seconds that the camera should keep sending images at when an alarm is triggered Image file name Name of file image snap shots are saved to Suffix of file name Choose between Sequence number and Date Click Apply to confirm your settings ...

Page 69: ...g until there is no motion for the duration of this parameter It can be from 5 seconds to 24 hours Split duration This specifies the maximum duration of one file If the recording goes on for longer than this parameter the camera will split the video into a number of files Record thumbnail Enable or disable thumbnail Image file name Name of file image snap shots are saved to Suffix of file name Cho...

Page 70: ... maximum duration of one file If the recording goes on for longer than this parameter the camera will split the video into a number of files Record thumbnail Enable or disable thumbnail Image file name Name of file image snap shots are saved to Suffix of file name Choose between Sequence number and Date Click Apply to confirm your settings ...

Page 71: ...Type your FTP password Re type password Re type your password Passive mode Switch passive mode on or off This is required on some FTP servers Depends on your FTP server settings Keep Alive Time period for which camera should be connected to the FTP server The camera will keep the connection with the server for the specified number of seconds after the last upload Upload bandwidth Available bandwid...

Page 72: ...System Name Type a name to easily identify the Y cam System Contact Type the contact name of the administrator of the Y cam This is useful in large organisations System Location Type the location of the Y cam This is useful when using a multi camera viewer program Tip The information you fill in can be displayed on the camera It can help to distinguish different cameras on the network ...

Page 73: ...s the camera simultaneously As the number of simultaneous users increases the overall performance will decrease This is dependent on the network bandwidth not the camera Allow anonymous access This is to be used if you wish to share video with other users without prompting them for a user name and password This will allow the user free access to view the Live View page whereas access to the Settin...

Page 74: ...vice location Choose your time zone Daylight saving time tick the box to enable daylight saving time Date and Time format Select the format of the date and time Auto time setting SNTP Enable or disable the auto time setting to update to the server below Time server Type the SNTP server name There are suggestions included Note 1 If the SNTP server is not found the Y cam s time will be synchronized ...

Page 75: ...ttings will be lost requiring you to reconfigure the camera Backup Click Backup to back up the current configuration of the Y cam for future reference Once you have your camera setup as you require this is recommended To restore a backup file Browse Click Browse to search for a backup configuration you wish to upload to the camera then click Restore Note Do not turn off the power during the Restor...

Page 76: ...t You will need to move or copy the file from this compressed folder some versions of Windows will allow you to do this but if not you will need a program like WinZip or WinRAR to unzip the file to a standard folder This is very important as the firmware will not update properly if it s left in the compressed state It is recommended you reboot your computer before attempting this operation and the...

Page 77: ...pgrade completes you will be prompted to reboot the camera and after this your latest firmware will be recorded If the update hasn t worked after 15 20 minutes reset the camera via the side button on the camera If you camera is unresponsive you will need to contact either your place of purchase or Y cam directly Your dealer or Y cam Solutions Ltd reserves the right to charge for any repair attribu...

Page 78: ...Select a camera click on Setup and the following setup interface will pop up 1 Enter a unique name for the camera the location optional and leave the default port number as 80 Obtain an IP address automatically and Obtain DNS server address automatically are selected by default if you are confident enough to enter your own settings you can do so by selecting Use the following IP address and follow...

Page 79: ...s of the camera is 192 168 1 150 This can be changed to any IP address on your IP range For example if the IP address of your PC is 192 168 1 52 then the IP address of your camera should be unique and on the same subnet i e 192 168 1 X where X is any number between 1 and 255 except 52 Ensure the IP address you chose is not the same as other devices on your network as this will result in conflict a...

Page 80: ...ck of image quality and delays in refresh intervals Consult your network administrator for further details Start Internet Explorer Select Tools Internet Options Connections tab and click LAN Settings Verify that the Use a proxy server check box is not checked When not checked click Cancel Your proxy server settings should not cause any problems If it is checked click Advanced Under exceptions ente...

Page 81: ...g 1 Open a new Internet Explorer window 2 From the menu bar select Tools and then select Internet options 3 From the Internet Options window select the Security tab 4 Click on the Custom Level button 5 Scroll down to the section labelled ActiveX controls and plug ins Select the option button so that they match the window below and then click OK to exit the window ...

Page 82: ... Subnet Mask 255 255 255 0 Default Gateway 192 168 168 1 7 Click OK to save these settings 8 Open an MS DOS Command Prompt or choose Run from the start menu and type cmd exe 9 Change the path in the command prompt to the location of the camera firmware as in step 2 e g C firmware and then leave this window open 10 Power off the camera wait 5 seconds push down on the reset button on the side of the...

Page 83: ...g IP settings 4 In the IP Address Field type in the number 192 168 1 20 5 In the Subnet Mask type in 255 255 255 0 6 In the Default Gateway type 192 168 1 150 The camera will automatically assign itself this IP address when no DHCP server is present 7 Leave DNS server settings blank 8 Click OK then Close to apply these settings 9 Turn the power on to the Y cam 10 The Connectivity Status indicator ...

Page 84: ...meras In order to use the Y cams with software that supports adding a generic MJPEG camera please use the path of your camera with live 0 mjpeg jpg on the end of it This will instruct the software to extract the Motion JPEG video stream from the specified path in the Y cam All current Y cam models support this method ...

Page 85: ...video stream You can also access video images from the network camera in the following ways For further details please click on the links in the Stream Setup page of the camera settings by the name of Primary Stream Secondary Stream and Mobile Stream ...

Page 86: ...d install ActiveX controls 2 Maximum 16 users are allowed to access the camera simultaneously through the network 3 Network traffic may prevent the viewing interface from appearing quickly Wait for a while 4 Refresh the page The colour of the picture is strange 1 Confirm the colour setting of PC is 16 bits or more 2 Identify which Y cam model you have Infrared versions of the camera sometimes have...

Page 87: ...therwise been damaged Please contact your place of purchase or Y cam Technical Support Motion Detection triggers unexpectedly 1 Motion detection is based on changes in pixel in the image This means that if there are sudden changes in the lighting motion detection may be triggered mistakenly Lower the sensitivity setting to avoid problems What do the changes to the LED light mean Amber Steady for c...

Page 88: ...network system in which devices communicate with each other by first going through the wireless router IP Address The unique 32 bit number assigned to each computer connected to the Internet IP numbers are used by the TCP IP protocol to route packets of data to their destinations JPEG A standard image format used widely for photographs also known as JPG Network Camera A stand alone device which al...

Reviews: