


Appendix
A
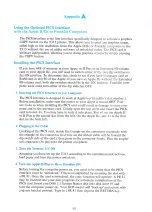
Using
the
Optional
PICS
Interface
with
the
Apple
II/IIe
or
Franklin
Computers
The
PICS
Interface
is the
first
interface
specifically
designed
to
activate
a
graphics
COPY
button
on
the
T315
printer.
This
allows
you
to
any
graphics
image,
either
high
or
low
resolution,
from
the
Apple II/Ile
or
Franklin
computers
to
the
T315
without
the
use
of
utility
software
of
imbedded
codes.
The
PICS
card
is
software
independent,
allowing
you
to
dump
graphics
screens
by simply
pressing
the
COPY
button.
Installing
the
PICS
Interface
If
you
have
64K
of
memory
in
your
Apple
or
II
Plus
or
an
Extended
80-column
card
in your
Apple Ile,
you
will
need
to
switch
either
of
the
two
dip
switches
to
the
ON
position.
To
determine
this,
check
to
see
if
you
have
a
language
card
or
RAM
card
in slot
#0
of the
Apple.
If
you
own
an
Apple
Ie
without
the
Extended
80-column
card,
both
dip
switches
should
be
in the
ON
position.
Franklin
com-
puter
users
must
turn
either
of the
dip
switches
OFF.
1.
Inserting
the
PICS
Interface
in
you
Computer
The
PICS
Interface
is
designed
to
work
in
Apple’s
or
Franklin’s
slot
number
1.
Before
installation,
make
sure
the
power
to
your
Apple
is turned
OFF.
Fail-
ure
to
do
so
when
installing
the
PICS
card
could
result
in
damage
to
your
com-
puter
and
to
the
interface
card.
Gently
open
the
top
cover
and
insert
the
PICS
card
into
slot
#1.
You
may
have
to
rock
it into
place.
Slot
#1
on
the
Apple
II
or
II
Plus
is the
second
slot
from
the
left.
On
the
Apple
Ile,
slot
#1
is
the
first
slot
on
the
back
left.
2.
Plugging
in the
Cable
Looking
at
the
PICS
card,
match
the
triangle
on
the
connector
receptacle
with
the
triangle
on
the
connector
(red
wire
on
the
ribbon
cable
will
be
toward
the
dip
switch
side
of the
card),
then
press
in
the
connector
firmly.
Plug
the
amphe-
nol
connector
(36 pin)
into
the
printer
receptacle.
3. Turn
the
Transtar
315
ON
Assuming
you
have
set
up
the
T315
according
to
the
installation
instructions,
load
paper
and
turn
the
power
switch
on.
4. Turn
the
Apple/II
Plus
or
Ile
or
Franklin
ON
Before
turning
the
computer
power
on,
you
need
to
be
aware
that
the
PICS
interface
must
be
‘initialized.’
This
is
accomplished
by accessing
the
slot
with
a
PR
#1.
Once
the
card
is
initialized,
the
copy
function
will
operate.
A PR
#1
may
be
inserted
into
your
disk
programs
for
automatic
initialization
of
the
PICS
card.
Insert
you
DOS
3.3
System
Master
disk
into
disk
drive
#1
and
turn
the
computer
power
on.
Your
DOS
master
will
‘boot-up’
and
return
with
a
square
bracket
prompt.
Type
in
]
PR
#1
then
depress
the
RETURN
key.
55
Содержание Transtar 315
Страница 1: ...Tran Star 315 Color Graphics Printer Operator s Manual ...
Страница 3: ...Transtar 315 Color Graphics Printer Operators Manual ...
Страница 9: ...Parts of the Printer i _ Upper case A Paper feed Figure Printer cover ...
Страница 12: ..._ Part 2 Installation Use ...
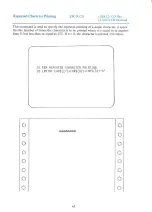
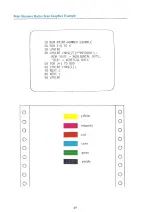
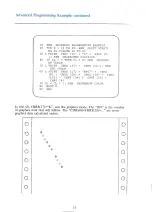
Страница 47: ...Dot Graphics Example 7 10 REM EXAMPLE GRAPHICS 20 LPRINT CHR 27 KOO1 CHR 75 30 LPRINT OO2 00 0 42 O LO LO ...